Geoprocessing > Using geoprocessing tools > Using the tool dialog
Tool dialog basics |
|
|
Release 9.2
Last modified November 9, 2006 |


Print all topics in : "Using the tool dialog" |
Every tool has a dialog, and the most common method for executing a tool is by using its dialog.
- A tool has any number of parameters, and in the tool's dialog, each parameter has an easy-to-use user interface control for such tasks as browsing for and selecting datasets, or picking valid values from a list.
- Extensive help is available for all system tools (system tools are developed by ESRI and installed with ArcGIS).
- Tool dialogs verify the correctness of your inputs and give you immediate feedback if there are problems.
- When a tool begins execution, you receive messages on the tool's progress.
- When the tool finishes executing, an entry will be posted to the Results tab on the ArcToolbox window.
Opening a tool's dialog box
In either the ArcToolbox window or in ArcCatalog, right-click the tool and click Open. Alternatively, double-click the tool. The tool's dialog box will open so you can set values for its parameters and execute the tool.
Learn more about finding tools in ArcToolbox
Tool parameters
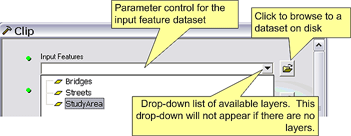
A tool parameter is a simple text string or number that tells the tool what you want it to do. Tool dialogs have any number of parameters and each parameter has its own user interface control. The most common parameter is the feature class control, shown below, which consists of a text box where you can type the pathname to a feature class and a browse button that enables you to pick feature classes from disk. The text box will typically have a drop-down list of available layers and table views that you can choose from.
Learn more about working with layers and table views
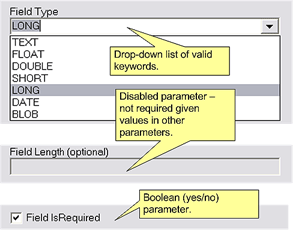
Other common parameters are preset text strings, called keywords, that you pick from a drop-down list, or simple check boxes for Boolean (yes/no) parameters. Following are a few examples of parameter controls.
Some tools may group parameters together under a kind of drop-down list. The example below shows a tool from the Network Analyst extension. To expose the parameter group, click the down arrows, as shown below.
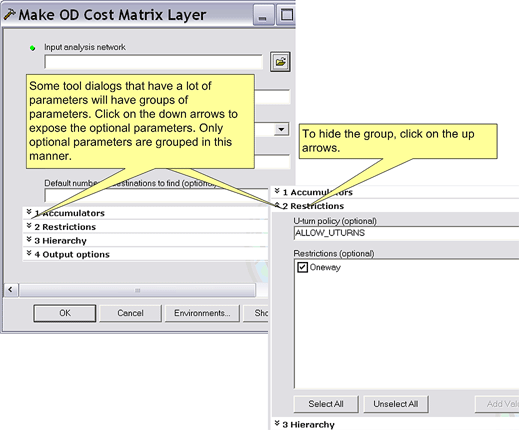
Only optional parameters are grouped in this manner.
Learn more about optional parameters
Once you have filled in all parameters correctly, you execute the tool by clicking the OK button. A progress dialog box will appear that gives execution status. See Tool execution and messages.
Advanced parameter controls
Some parameters have more complex user interface controls. One that you're likely to encounter is the multivalue parameter control, which allows you to input lists of things, like a list of feature classes or a list of numbers.
Learn more about the multivalue parameter control
There is a parameter control that allows you to interactively enter features by digitizing the feature with your mouse.
Learn more about interactively entering features
The Merge and Append tools have a field mapping parameter that allows you to specify how the output dataset fields are to be constructed from the input fields.
Learn more about the field mapping control
Getting help
The Show Help button exposes the tool's dialog side-panel help, which gives a synopsis of the tool and each parameter. For detailed help, click the Show Help button to expose the side-panel help and click the Help button ![]() . This leads you to the tool's reference page.
. This leads you to the tool's reference page.
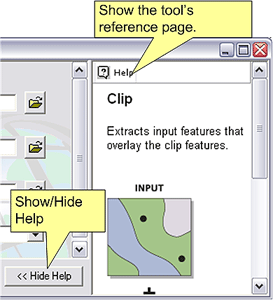
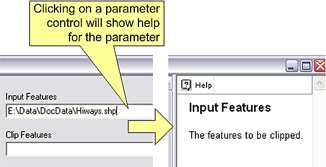
When the side-panel help is open, you can get help on individual parameters by clicking the parameter control, as shown below. To get back to overview help, click anywhere on the dialog except for the parameter controls.
Parameter status icons
As you fill in a parameter's control, the tool will validate your input and give you feedback by placing a status icon to the left of the parameter control. Required parameters that don't have a value have a green circle to their left. Invalid values have a red cross, and warnings have a yellow triangle.
![]()
You can hover over the parameter's icon with your mouse and tooltip will appear that describes any issues.
![]()
Optional parameters
Optional parameters have default values that are calculated and set by the tool. You can either accept the default value by doing nothing, or enter a new value.
Typically, the default values for optional parameters are computed and set whenever you change any of the tool's parameters. Other tools may set the default only when the dialog is first opened. Once you explicitly change an optional parameter value, the tool will never recompute or reset it.
Optional parameters do not have a status icon.
Data filtering
In most cases, the browse dialog and drop-down list in the dataset control will only show you valid choices. For example, if the parameter expects a point feature class as input, only point feature classes and layers based on point features will be shown as choices. This is not always true, however, because filtering out some types of datasets while browsing would take too much time for an interactive dialog. One example of this is a layer file (.lyr) on disk. A layer file may contain any type of dataset, and there is overhead in discovering the dataset type contained in the layer file.
In summary, you may sometimes be allowed to pick a .lyr or other data that contains inappropriate data. If this occurs, the tool will display an error or warning message and you'll have to pick another dataset.
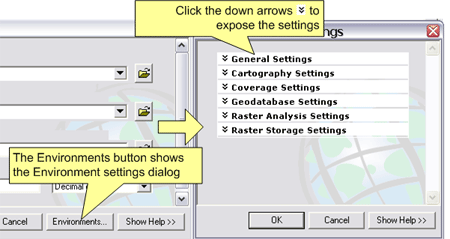
Tool environment settings
The environment button displays the Environment Settings dialog. Environment settings specified will only be used for the current execution of the tool—the application's environment settings are not permanently altered.
Learn more about geoprocessing environment settings