Geoprocessing > Sharing tools and toolboxes
Methods for distributing tools |
|
|
Release 9.2
Last modified November 9, 2007 |


Print all topics in : "Sharing tools and toolboxes" |
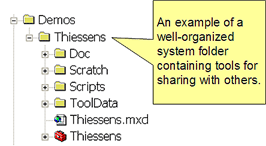
There are three basic methods for sharing your tools. All three methods start with the idea that you gather together your toolboxes, map documents, scripts, data, and documentation into one well-organized system folder, which is called the ToolShare folder.
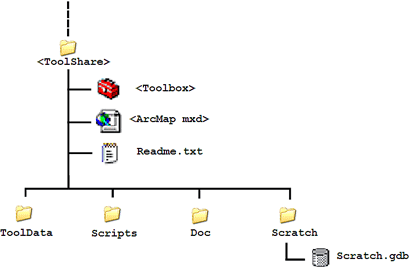
The illustrations below show the ToolShare structure. Details can be found in A structure for sharing tools. The content of the ToolShare folder is just a suggestion—nothing other than a toolbox is required.
Here's another way to view the ToolShare structure:
The three basic methods are:
- Package and ship
You either e-mail your ToolShare folder to your users or use traditional mail. If you're e-mailing, you typically use the zip compression utility to create a .zip file of the ToolShare folder. (This technique is also known as "zip and ship".) - Share on a local area network (LAN).
You share your ToolShare folder so that other users on your LAN can access it. - Publish as a geoprocessing service
You publish your toolbox as a geoprocessing service on an ArcGIS Server. Anyone with an internet connection can use your tools.
There are a number of considerations when deciding on which method to use, such as:
- Where will the input and output data reside?
- Where will the tool execute?
- Where will the tool's intermediate be created?
- Are any special username and account permissions required?
- What products and extensions do the tools require?
These questions are used to motivate the topics that follow.
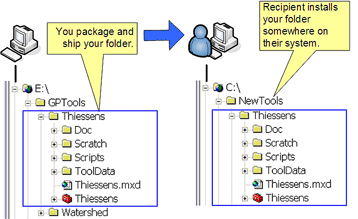
Package and ship
A very common method is to package and ship your ToolShare folder, as illustrated below.
Data considerations
The main reason to package and ship is that the recipient doesn't have access to your computer on your local area network (LAN). Otherwise, you'd probably just give them access to your toolbox over the LAN. Since package and ship assumes your client doesn't have access to your share folder, they won't have access to any of the data on your network, so all data must come from the client (with the exception of data found in the ToolData folder, as discussed in A structure for sharing tools).
Because the recipient copies your folder to their local disk drive, you should use relative pathnames in your tools or map documents.
Learn more about using relative pathnames
Intermediate data
Your models and scripts will most likely need a location to write intermediate and scratch data.
Learn more about managing intermediate data
Licensing issues
The recipient of your tool executes your tools on their computer. The recipient may not have the necessary products or licenses to execute your tools.
Any script you want to share should have logic to check the proper extension licenses and product levels.
Learn more about license and product level checking in scripts
Even if the recipient has the necessary extension installed, they may not have obtained a license to use that extension in their current session. If they don't have a license, the tool will exit with an error message indicating that the extension is not enabled, and they will have to obtain a license by clicking Extensions under the Tools menu of their current application, such as ArcCatalog or ArcMap.
Learn more about product and extension licensing with geoprocessing tools
The recipient may not have the necessary extension installed.
NOTE: If the necessary extension is not installed, the tool might not appear in the toolbox.
You should, of course, document which extensions are required and take steps to ensure the user understands what extensions are required. These steps may not suffice for some users. A particularly bad scenario is when all the tools in your toolbox depend on an uninstalled extension so when the user opens the toolbox, nothing appears. One solution you can try is to provide a script tool within the delivered toolbox that checks for the necessary extensions and outputs messages if there are problems. Such a tool doesn't depend on any extension and will always be loaded into the toolbox. The user can then run this extension-checking tool and view informative messages.
Learn more about license checking in scripts
Technical note: it's not that the tool depends on the extension but whether it uses data types that are only installed with the extension. For example, the Network Analyst Hierarchy Settings data type is only installed with Network Analyst. This data type is used by some (but not all) of the Network Analyst tools. When a tool is loaded, ArcGIS looks for all data types used by the tool and if it cannot find one, the tool is not loaded.
Learn more about geoprocessing data types
Scripts
Any script you want to share should have logic to check the proper licenses and product levels.
Learn more about license and product level checking in scripts
If your Python scripts import other modules, you need to ensure that these other modules can be found. The easiest way is to put all scripts in the <Scripts> directory.
Learn more about sharing Python modules
Stylesheets
The topic Changing tool dialog appearance demonstrates three methods that allow you to change the background image for a tool dialog from the standard ESRI image to something else, like your company logo or an image of a model. The pathname to this image is stored in a xml stylesheet and cannot be stored or converted to a relative pathname. If you are delivering tools that have custom background images, you need to instruct the user to place these images in:
<ArcGIS>\ArcToolbox\Common\
where <ArcGIS> is the ArcGIS install directory, such as C:\Program Files\ArcGIS.
In your modified xsl stylesheet, use the following method for declaring the background image:
<xsl:variable name="BackgroundImage">url(<xsl:value-of
 select="MdElementDialogInfo/CommonPath"/>/MyGraphic.gif)</xsl:variable>
Where MyGraphic.gif contains your custom background.
System tools
System tools can always be found on any system containing ArcGIS, regardless of the pathname to the tool.
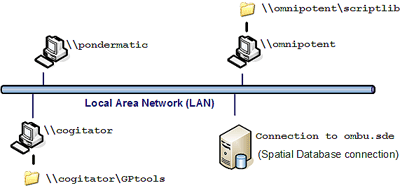
Sharing tools across a local area network
In a Local Area Network (LAN), resources (computers and other devices) can be shared with anyone that has access to the LAN and has permissions to use the resource. The illustration shows an example of a LAN with shared resources.
When your tools access and use resources (data and tools) found on the LAN, you must use UNC pathnames to access the resources. To share your tools across a LAN, you need to share the folder containing your toolbox so it can be accessed using a UNC pathname.
Sharing a folder across the LAN is a common practice. To share a folder, right-click the folder in either ArcCatalog or Windows Explorer, click Properties, click the Sharing tab, and choose Share this Folder. The topic Giving ArcGIS Server access to folders discusses the details of sharing folders, but in the context of ArcGIS Server. If you are not publishing to an ArcGIS Server, you'll still find this topic worthwhile—just ignore the parts about granting the server permissions.
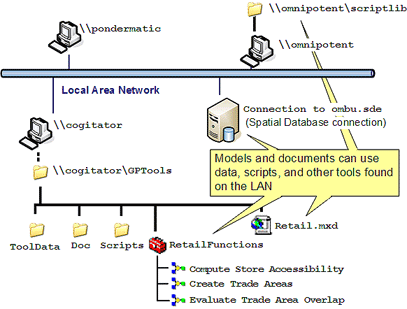
Just sharing your folder may not be enough—all data used in your models and scripts, as well as data sources in ArcMap layers, must either use relative pathnames or UNC pathnames to data, rather than the local pathname (such as E:\GPTools).
Helpful hint: sharing and connecting to local folders
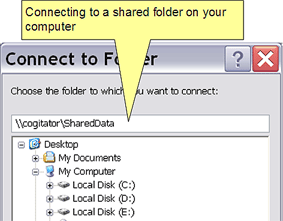
There may be times when you need to use a UNC pathname to a folder on your computer. For example, suppose you have a toolbox in D:\GPTools and data in E:\SharedData. D:\GPTools is shared as \\cogitator\GPTools, and other users on the LAN add a connection to it in ArcCatalog using the Connect to Folder tool
But what if one of your tools in \\cogitator\GPTools accesses data in E:\SharedData? You can't use a relative pathname since relative pathnames cannot span disk drives (from D: to E:). Nor can you use an absolute pathname (E:\SharedData) in a shared tool. So, you share E:\SharedData as \\cogitator\SharedData and use this UNC pathname within your tools and layers.
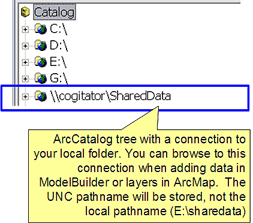
The helpful hint is to add a connection to \\cogitator\SharedData in ArcCatalog. Once added, all browse dialogs (such as browsing to data from ModelBuilder or adding layers in ArcMap) will allow you to browse directly to \\cogitator\SharedData, and the result data source location will be \\cogitator\SharedData, rather than E:\SharedData—exactly what you want.
To add a connection:
- In ArcCatalog, right-click E:\SharedData, click Properties, and choose Share this Folder.
- Click the Connect to Folder tool
 . Enter \\cogitator\SharedData (the UNC pathname) as shown in the example below.
- Click OK.
The ArcCatalog tree should now show the folder containing the toolbox, as shown below.
Accessing ArcSDE data
Accessing ArcSDE Database Connections in your shared tools requires that you have an unambiguous reference to the Database Connection.
Learn more about accessing ArcSDE data in tools
Licensing
Tools executed across a LAN execute on the user's computer, so the same licensing issues exist as for packaging and shipping.
Intermediate data
Your models and scripts will most likely need a location to write intermediate and scratch data.
Learn more about managing intermediate data
Publishing to ArcGIS Server
ArcGIS Server allows you to share your resources (services) across an enterprise (LAN) and across the web (internet). Resources include toolboxes and maps. The main advantages of sharing your GIS resources with ArcGIS Server are the same as sharing any data through any kind of server technology—for instance, the data is centrally managed, supports multiple users, and provides clients with the most up-to-date information. Another advantage, particularly for geoprocessing, is that tools execute on the server computer, using the resources (and licenses) found on the server computer.
ArcGIS Server is a separately licensed ESRI product that has its own install package as well as its own help system, available at http://webhelp.esri.com/arcgisserver/9.2/. You do not need ArcGIS Server to use its services—anyone with ESRI products (such as ArcGIS or ArcExplorer) and an internet connection can use services.
If you have administrative access to an ArcGIS Server, you can publish your toolbox as a geoprocessing service. Publishing a toolbox is easy—in ArcCatalog, you first establish a connection to the server with administrative permissions, and then right-click a toolbox and click Publish to ArcGIS Server.
While publishing a geoprocessing service is easy, you must take care in authoring your models (and any associated map documents) so that all data and tools can be accessed by the server. The person administering the server (the server administrator) will most likely set policies and guidelines about data access.
Learn more about publishing geoprocessing services