Show Navigation
|
Hide Navigation
You are here:
Getting started > Introducing ArcGIS Desktop
Getting started > Introducing ArcGIS Desktop
Tips and tricks within ArcGIS |
|
|
Release 9.3
Last modified May 27, 2009 |


Print all topics in : "Introducing ArcGIS Desktop" |
ArcGIS Desktop is a large application with many uses. This list of tips and tricks will help direct you to the correct reference information within the Help system to accomplish a variety of tasks.
Application framework
Toolbars and dockable windows
You can move toolbars and some dialog boxes to locations around your desktop or dock them within your application to organize a user interface that is most useable by you. If you hold down the Ctrl key while moving a toolbar or dockable window, you can move it to overlap the ArcMap interface without having it dock to the application. This is useful for large dialog boxes like the Snapping Environment dialog box, the topology Error Inspector dialog box, and the geoprocessing Command Line window.
Learn about basic user interface elements
The Customize dialog box
The Tools > Customize dialog box in the ArcGIS Desktop applications enables you to customize the user interface. While the Customize dialog box is displayed, you can drag and drop tools and commands between menus and toolbars and add new tools and commands to the user interface by dragging them from the Customize dialog box.
The Categories list on the Commands tab contains the commands available in that application, organized by menu name or type. When you look for a command in the list, you can type all or part of a command name into the Show commands containing box on the tab. This immediately filters the categories list so that only commands containing the string you entered are shown.
Learn about changing a toolbar's or menu's contents
Shortcut keys
Shortcut keys can be assigned to tools and commands that are on toolbars or in tool palettes. To set a shortcut key, open the Customize dialog box and click the Keyboard button at the bottom of the dialog box. On this form, you can see existing shortcut keys and set new ones.
Learn about the keyboard shortcuts in ArcMap, ArcGlobe, and ArcScene
Learn about assigning your own keyboard shortcut to a command
Lean about shortcut keys for editing in ArcMap
Learn about keyboard shortcuts for working with tables
You can download ArcGIS Desktop: A Selection of Time-Saving Tips and Shortcuts , a printable PDF of tips and shortcuts, from the ESRI Literature Web page.
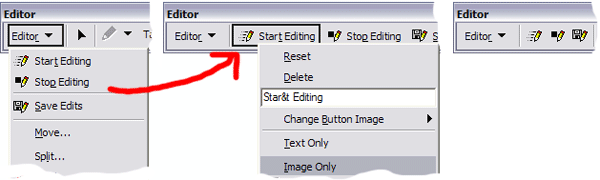
A quick customization you can do to speed up your work
A quick customization you can do to work faster in ArcMap is to move common editing commands onto the Editing toolbar rather than having to click a menu to access them.
To move the Start Editing, Stop Editing, and Save Edits commands, add the Editor toolbar and open the Customize dialog box. Click the Editor menu and drag the three commands to the Editor toolbar. Right-click each command and click Show Image Only so each one is just shown with its icon. Close the Customize dialog box. Now you can start and stop editing and save edits with one click.
Editing and data compilation
Editing shortcuts
There are a number of shortcut keys that you can use when editing.
Learn about the shortcut keys for editing in ArcMap
Entering units other than map units
When editing in ArcMap, you can do an on-the-fly unit conversion if you specify the unit type. For example, 10m converts 10 meters to whatever the map units are for the target layer.
Learn about setting distance units
Angle/Direction
Modifying the angle and direction allows you to enter bearing and distance.
Learn about the sketch construction tools
Using snapping
Snapping allows you to make sure features properly connect together including avoiding gaps and overlaps. Press the spacebar to temporarily suspend snapping—which may be useful when you are tracing along features.
Learn about turning on snapping
Avoiding accidentally moving selected features
The sticky move tolerance allows you to set a minimum number of pixels your pointer must move on the screen before a selected feature is moved. This can be a useful way to prevent features from being accidentally moved small distances when they are clicked with the Edit tool.
Learn about moving features
Selecting the proper feature
When you have features selected from overlapping selectable layers, press the N key when the Edit tool is active to toggle through the selected features.
Learn about selecting features interactively
Geodata management
Dragging and dropping data
You can drag and drop data from ArcCatalog onto ArcMap or ModelBuilder or into geoprocessing tool dialog boxes and other applications. Click and hold the data (such as a raster dataset or feature class), then drag it over the ArcMap window and unclick it (dropping it). ArcMap does not have to be visible on your display to drag and drop data on the map—start to drag a selection in ArcCatalog, hold down the mouse, and hover over the ArcMap instance in the system tray (bottom of your screen) to focus ArcMap; while continuing to hold down the mouse button, either drop the selection on the map or manually position the exact location where you want the layer to be positioned in the table of contents.
Learn more about adding layers to a map
Types of data in ArcCatalog
ArcCatalog categorizes the information it displays based on the types of data (such as a file type/extension) that you have asked it to look for. Often, this takes time and can decrease performance when clicking on folders that contain lots of files. You can have ArcCatalog recognize only the files that you work with: click Tools from the Main menu and click Options. From the General tab, you can turn off the types of data you don't use to speed up navigation. This will also increase the performance of the Add Data dialog box that is used in ArcMap and other ArcGIS applications.
Learn about hiding folders and items
Renaming folder connections in ArcCatalog
You can rename your folder connections to give them shorter or more meaningful names. Like renaming a shortcut to a folder in Windows Explorer, renaming a folder connection in ArcCatalog doesn't affect the name of the folder it points to. You can still click on a renamed folder connection and look in the ArcCatalog status bar if you want to see its full path.

ArcSDE connection files
Connections to ArcSDE are stored as files in your user profile. You can copy and paste those connection files to any folder (like a project folder that contains maps), making it easier to organize your data and maps.
Learn about creating spatial database connections
Easy access to your frequently used coordinate systems
When working with external datasets (such as CAD files or shapefiles) you may need to apply a map projection. Instead of searching through the predefined list of projections each time, add the projections you use most often to your list of favorite projections. In the ArcCatalog tree, drag and drop your most frequently used coordinate systems into the top level of the Coordinate Systems folder. This makes them easier to access from all dialog boxes and wizards in which you choose a coordinate system:
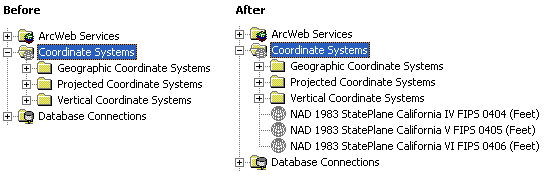
- Dragging a coordinate system to the top level of the Coordinate Systems folder automatically copies it instead of moving it, so your underlying coordinate system tree is left unchanged and you can just delete the ones at the top level if you don't want them there anymore.
- The Coordinate Systems folder is turned off in ArcCatalog by default. To turn it on, go to Tools > Options > General tab. You can turn it back off again after customizing its contents if you like. Turning it off in ArcCatalog doesn't affect dialog boxes and wizards that use it.
Learn about defining a shapefile's coordinate system
Learn about defining a raster's coordinate system
Learn about defining a coverage's coordinate system
Learn about defining a coordinate system for CAD data
Geoprocessing
Automating your work with models and scripts
Using the geoprocessing framework, you can automate repetitive tasks like data conversion or analysis, using geoprocessing models. You can export a model as a script that can be easily scheduled or automated. Doing so will save you time and increase your productivity. Learn more about automating with scripts. Learn more about automating with modelsUsing the Results tab
The Results tab on the ArcToolbox window makes it easy to review and reuse the geoprocessing steps you've performed in your current and previous sessions. It's a record of everything you've done. You can see each operation you've performed, including all inputs, outputs, and messages. You can perform operations on results, like reopening the tool dialog box or dragging datasets from the result into a tool.
Learn more about the Results tab
Using batch mode
You can run any geoprocessing tool in batch mode, allowing you to execute a single tool multiple times with different inputs without your intervention. Right-click any tool in the ArcToolbox window and click Batch to open a dialog box that contains the batch table.
Learn more about batch processing
Frequently asked questions (FAQs) about geoprocessing
Many times, as users, old or new, you run into the same issues. Where are custom toolboxes stored? How do I perform looping in ModelBuilder? How do I add a graphic to the dialog side panel of my custom tool? These questions and others like them are common problems faced everyday. The Frequently Asked Questions about geoprocessing will help you solve some of the more common issues.
Getting help
Context-sensitive help
You can get a context-sensitive help topic on any command in a pull-down menu or context menu (menu accessed by right-clicking). For example, if you right-click an item in ArcCatalog and want to know why a certain command is disabled, get context–sensitive help for that command to find out more information. Either hover the mouse over the toolbar button or highlight the command on a menu, then press SHIFT + F1; or click the What's This button
Learn about getting help within ArcGIS applications
Mapping and visualization
Setting the full extent of a map
When clicking the Full Extent button
You can use the Full Extent button as a one-click bookmark to a useful extent for a particular task you are doing. For example, suppose you are doing some editing in one area of a city map. By setting the Full Extent to display the area you are currently editing, you can quickly return to that area after zooming in on detail, instead of the entire city.
Learn about setting a custom extent for the map's full extent
Navigating maps with keyboard and mouse shortcuts
You can use keyboard shortcuts and your mouse for quicker navigation with maps and layout pages. For example, you can pan, zoom, or recenter the map without having to go to a toolbar and click a different tool.
For a list of navigation shortcuts, see Quick ways to navigate maps and pages.
Specifying scale in relative formats
In ArcMap, you can enter scales in relative formats such as
1 in = 5 mi
1 in to 5 mi
5 miles to 1 in
One inch = 5 miles
One in equals 5 mi
1in equals 5mi
The scale control in the Standard toolbar and in all dialog boxes automatically converts relative format to absolute format (for example, 1:316,800). The control recognizes commonly used measurement unit names and abbreviations.
Learn more about setting the map scale
Using viewer windows in ArcMap
Work with your data at multiple scales by choosing the Window > Viewer command or using the Create Viewer Window tool on the Data Frame Tools toolbar. Viewer windows are fully functioning live ArcMap displays so all tools and navigation shortcuts work inside them.
Viewer windows can be useful for
- Zooming in on detail without having to redraw your current display
- Performing zoomed–in edits while still seeing the bigger picture
- Comparing different locations in close–up side by side (business analysis, resource exploration, military intelligence, and so on)
- Previewing how your map's symbology, representations, and scale rules look at different scales
Using a dual screen configuration? Try dragging a viewer window onto your second screen and maximizing it to more than double your graphic display area:

Learn more about viewer windows
Commands in table window for working with records
Open a table and right-click the grey cell to the left of any record to access commands for selecting records and interacting with the map from the table. These commands include
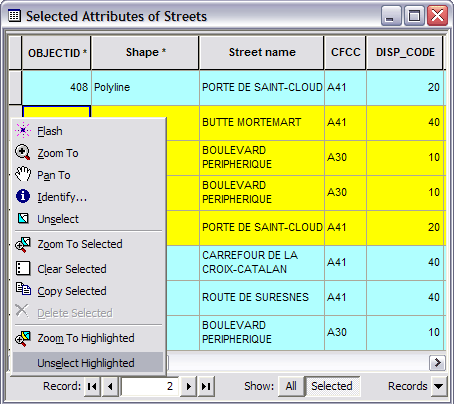
- Zoom To and Pan To let you navigate to a feature on the map without changing the selected set.
- Unselect Highlighted lets you remove the highlighted (yellow) records from the selected set when you are in Show Selected Records mode.
Keyboard and mouse shortcuts exist for many of these commands. Highlight a command in the menu and press Shift + F1 to get a context–sensitive help topic about that command including shortcut info.
Learn about keyboard shortcuts for working with tables
The graphic above also shows the ability to have long field names and text fields wrap around in the table. Specify this in the Options > Appearance dialog box with the Column Header Height and Cell Height settings.
Formatting numeric values
Numeric values in layer and table attributes can be reformatted on the fly to change the way they appear throughout ArcMap. To reformat a numeric value for a layer, open the Properties dialog box and click the Fields tab, click the ellipse button
Learn about Setting field properties, aliases, and table display options
On-the-fly raster resampling
In ArcMap, you can use bilinear interpolation or cubic convolution to smooth the appearance of raster images prior to displaying them in ArcMap. For example, you might have a 30–meter DEM that looks blocky (you see the individual pixels) if you zoom beyond the raster resolution. If you open the raster layer Properties dialog box and click the Display tab, you can change the resampling so that raster appears much smoother if you zoom beyond the real resolution of the data. This is useful when combining low–resolution elevation data (that is, USGS DEM) with scanned DRG (USGS 7.5 minute quads) or large–scale vector data.
Learn about performance tuning for displaying raster data
My Places dialog box
The My Places dialog box lets you create and work with a list of your most frequently used or favorite addresses, locations, features, and spatial extents. You can use this dialog box to navigate around to view these places. You can also annotate your map to show their locations and add the places into the route–finding dialog boxes as stops and barriers.
Your list of places is available regardless of which map or globe document you are working with. Places are stored in a separate file on your computer, not in the map document or globe document, as is the case with spatial bookmarks. So you work with the same list of places in any application that supports them.
Learn more about the My Places dialog box
Group layers
When you have a lot of layers in your map, you can group the layers to organize them in the table of contents. You can create grouped layers using a number of methods including selecting two or more layers, right-clicking with the mouse on one of the selected layers, and clicking Group from the menu. You may choose to group layers based on display order or theme, or to organize content for a project. If you save a group layer to a layer file, you can save your project layers independent of a map document.
Learn about managing group layersXa
relative paths to reference the data in your map. You can choose this option from the Document Properties dialog box.
Learn about referencing data in the map
Layer files
If you are collaborating on and sharing data with others in GIS projects, or if you have a set of base layers that you always add to a map as reference information, you can use layer files to store how the information in that layer is drawn on any map.
Learn about saving a layer to disk
Selection tab on the table of contents
The Selection tab displays a list of the layers in the active data frame only. Checking a layer on or off on this tab changes whether or not features in that layer can be selected. If you right–click a layer on this tab, the context menu will present a list of commands that will help you with selections.
Learn about using the table of contents
Label styles and label expressions
Defining the style and expression used to label a feature can be a time–consuming process, which is sometimes easily forgotten. Using a label style, you can save the style settings for a label (such as font, size, and placement). Likewise, you can save the expression used into an .lxp file and load that expression into other layers or maps.
Learn about styles
Learn about creating symbols
Learn about specifying the text of labels
Maplex abbreviation dictionaries
Abbreviation dictionaries allow the label engine to shorten long labels to fit within small spaces and place more labels. You can create an abbreviation dictionary and store it either as a file on disk or in a database.
If you have Maplex installed, learn about abbreviating words to place more labels
Tables
Keyboard and mouse shortcuts
There are a number of shortcut keys available when working with tables. In addition, you can right-click a gray cell to the left of a record to open a context menu of selection and navigation shortcuts, or right-click a field name to open a context menu of field management shortcuts.
Learn more about shortcuts with tables
Calculating area, length, perimeter, and other geometric measurements
You can easily calculate area, length, perimeter, centroid, and point coordinates without having to write code. Open the attribute table, right-click the heading for a text or numeric field, and click Calculate Geometry.
Learn more about Calculate Geometry
Direct read of Microsoft Excel spreadsheets
You can open Microsoft Excel tables directly in ArcGIS and work with them like other tabular data sources. For example, you can add them to ArcMap, preview them in ArcCatalog, and use them as inputs to geoprocessing tools. Excel files are added to ArcMap like other data, through the Add Data dialog box. When you browse to an Excel file, you will need to choose which table you want to open. Any name references to cells or ranges defined in Excel are preserved in ArcGIS.
Learn more about working with Microsoft Excel files in ArcGIS