Geoprocessing
A whirlwind tour of geoprocessing |
|
|
Release 9.3
Last modified December 9, 2008 |


Print all topics in : "Geoprocessing" |
What follows is a high–level overview of the geoprocessing framework—the collection of user interface components that allow you to access and execute tools.
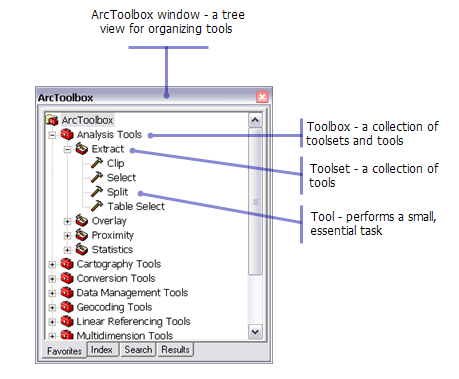
ArcToolbox window
ArcToolbox is your primary entry point into the geoprocessing framework. Tools are organized into toolboxes and toolsets, and ArcGIS ships with hundreds of tools organized into a dozen or so toolboxes, providing a rich set of functionality across a wide range of disciplines.
In ArcCatalog, ArcMap, ArcScene, and ArcGlobe, you can view the ArcToolbox window by clicking the Show/Hide ArcToolbox window button ![]() on the Standard toolbar. The ArcToolbox window is a tree-view user interface that organizes all the geoprocessing tools.
on the Standard toolbar. The ArcToolbox window is a tree-view user interface that organizes all the geoprocessing tools.

You can create your own tools, organize them into new toolsets and toolboxes, and share them with any ArcGIS user.
Learn more about ArcToolbox
Tool dialog
To open the tool's dialog box, double-click the tool in the ArcToolbox window or right-click the tool and click Open.

After filling out the tool's parameters on the dialog box, clicking OK will cause the tool to execute. In this example, the Clip tool will clip features from the Streets layer. The output feature class, Streets_Clip3, will contain only those features that fall within the StudyArea polygons. The output feature class will be automatically added to the ArcMap table of contents.
Learn more about using tool dialog boxes
Command Line
The Command Line window is another method for executing a tool. To open the Command Line window, click the show/hide Command Line window button ![]() on the standard toolbar. In the Command Line window, type the name of the tool followed by its parameters. The text you type is called the command line. Pressing the Enter key executes the command line.
on the standard toolbar. In the Command Line window, type the name of the tool followed by its parameters. The text you type is called the command line. Pressing the Enter key executes the command line.

Learn more about the Command Line window
Models and ModelBuilder
Geoprocessing allows you to chain together sequences of tools, feeding the output of one tool into another. You use a geoprocessing model to chain tools together, and using ModelBuilder, shown below, is how you create models.

The above model was constructed by creating a new, empty model and dragging and dropping tools from toolboxes into the ModelBuilder window.
To create a new model using ModelBuilder, right-click the toolbox or toolset to which you want to add the model and click New > Model, as shown below.

Learn more about opening ModelBuilder.
Learn more about saving a model
The most important thing to note here is that
models are tools
. They behave exactly like all other tools in the toolbox. You can execute them using their dialog box or in the Command Line window, as shown below. Since models are tools, you can embed models within models.

Learn more about building models
Scripting
You can use a standard scripting language (such as Python, Visual Basic Script, and JavaScript) to create new tools. The illustration below shows a tool based on a Python script. This script does the same work as the Clip and Buffer model show above. (In fact, the script was automatically generated by ModelBuilder.)

To create a new script tool, right-click the toolbox or toolset to which you want to add the script and click Add > Script, as shown below.

Like models, tools based on scripts can be executed using their dialog box or in the Command Line window, and you can use them in models and other scripts.
Learn more about scripting.