In its simplest form, a raster consists of a matrix of cells (or pixels) organized into rows and columns (or a grid) where each cell contains a value representing information, such as temperature. Rasters are digital aerial photographs, imagery from satellites, digital pictures, or even scanned maps.

Data stored in a raster format represents real-world phenomena, such as
-
Thematic data (also known as discrete), representing features such as land-use or soils data
-
Continuous data, representing phenomena such as temperature, elevation, or spectral data such as satellite images and aerial photographs
Thematic and continuous rasters may be displayed as layers along with other geographic data on your map.
While the structure of raster data is simple, it is exceptionally useful for a wide range of applications. In ArcGIS Explorer the uses of raster data as layers may be categorized as follows:
- Rasters as basemaps
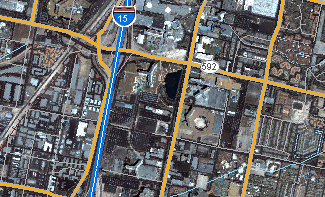
- A common use of raster data in a GIS is as a background display for other feature layers. For example, orthophotographs displayed underneath other layers provide the map user with confidence that map layers are spatially aligned and represent real objects as well as additional information. Three main sources of raster basemaps are orthophotos from aerial photography, satellite imagery, and scanned maps.
Below is a raster used as a basemap for road data.
- Rasters as surface maps
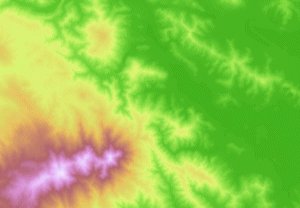
- Rasters are well suited for representing data that changes continuously across a landscape (surface). They provide an effective method of storing the continuity as a surface. They also provide a regularly spaced representation of surfaces. Elevation values measured from the earth's surface are the most common application of surface maps, but other values, such as rainfall, temperature, concentration, and population density, can also define surfaces that can be spatially analyzed.
The raster below displays elevation—using green to show lower elevation and red, pink, and white cells to show higher elevation.
- Rasters as thematic maps
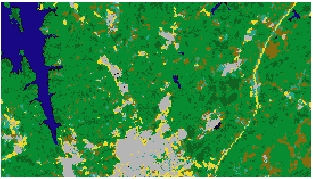
- Rasters representing thematic data can be derived from analyzing other data. A common analysis application is classifying a satellite image by land-cover categories. Basically, this activity groups the values of multispectral data into classes (such as vegetation type) and assigns a categorical value. Thematic maps can also result from geoprocessing operations that combine data from various sources such as vector, raster, and terrain data. For example, you can process data through a geoprocessing model to create a raster dataset that maps suitability for a specific activity.
Below is an example of a classified raster dataset showing land use. Agriculture is respresented in brown, water in blue, bare ground in yellow, a variety of deciduous and non-deciduous trees in shades of green, and urban/developed land in gray.
To add raster data to the map
On the Home tab, in the Map group, click Add Content  and then click Raster Data... and browse for an image file to add.
ArcGIS Explorer supports the display of many raster formats, including: Imagine image (.img), bitmap (.bmp), JPEG (.jpg, .jpeg), Portable Network Graphics (.png), Graphics Interchange Format (.gif), Tagged Image File Format (.tif, .tiff), ARC/INFO and Space Imaging BIL (.bil), ARC/INFO and Space Imaging BIP (.bip), ARC/INFO and Space Imaging BSQ (.bsq), DTED Level 0-2 (.dted), ERDAS 7.5 LAN (.lan), ERDAS 7.5 GIS (.gis), JP2 (.jp2), MrSID (.sid), RAW (.raw), NTIF (.ntf), USGS ASCII DEM (.dem), X11 Pixmap (.xpm), PC Raster (.map), PCI Geomatics Database File (.pix), JPC (.jpc), J2C (.j2c), J2K (.j2k), HDF (.hdf), BSB (.kap), Raster Product Format RPF, CIB, CADRG (.toc), DIGEST ASRP & USRP (.img).
Georeference a raster
If the raster has a coordinate system defined it will be drawn on the map. If the coordinate system is undefined you will be prompted to georeference the raster. If you choose to georeference a raster you will see the following dialog:
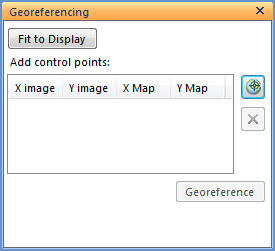
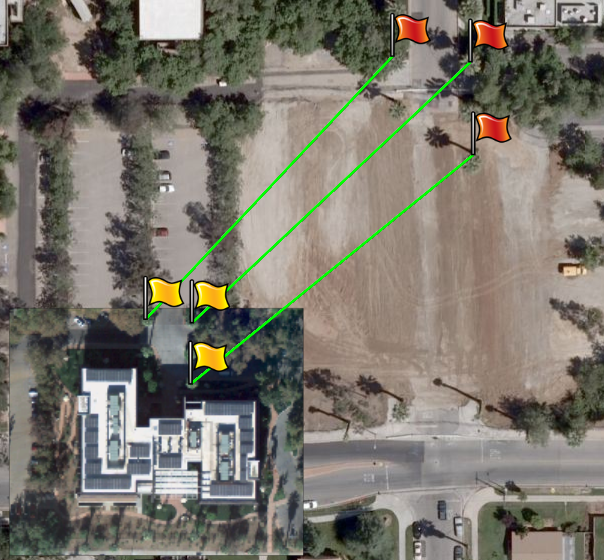
Pan and zoom the map to the geographic location where you want the raster to display. Click the Fit to Display button to move the raster closer to the desired location. Use the Get position button  and click a location on the raster. After clicking, the raster will turn off, allowing you to see and click the corresponding position on the map. Repeat this process adding a minimum of 3 control points. Once you have finished adding control points, click Georeference to align the raster with the map at the desired location.
Note: The following formats are supported for georeferencing:
Tip: You can also adjust rasters that already have a coordinate system defined by clicking the Georeference button  on the Raster Layers - Tools tab.
 Feedback
 E-mail this topic
 Print this topic