If you are collaborating with others or need to remind yourself of something you observed or discovered you can supply a note anywhere on the map using Notes in the Home tab’s Create group. Each note has a title, text, and an associated shape that you can sketch on the map. The text you supply will appear in a popup window that displays when you click the shape you've associated with the note or select Show Popup in the note's contextual tab or context menu.
Selecting the note type
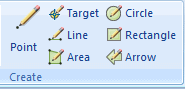
Create a note and edit its geometry by choosing one of the buttons in the Home tab’s Create group:
Creating the note's geometry
You start creating the note’s geometry by sketching its shape on the map in the default symbol for the note type. If you’re adding a Point note, you click once to position the note at that location on the map; if you chose Target, the note is immediately added to the center of the map; if you’re adding a Line, you click the mouse on two or more positions on the map and a line will draw; if you’re adding an Area, you click the mouse on three or more positions on the map and a polygon will be rendered; if you are adding a Circle or Rectangle, click the mouse on two positions on the map and the polygon will be rendered; and if you are adding an Arrow, the first click of the mouse is the location of the tip of the arrow, the second click defines the length of the arrow, and the third click defines the width of the arrow. For Lines, Areas and Arrows, double-click the last vertex you want to enter. ArcGIS Explorer will close the polygon for you; that is, for polygons, it will complete the side from the last vertex entered to the first vertex entered and for arrows, it will complete the arrow with a default width of one twentieth the length of the arrow.
Note: The minimum length of an arrow must be at least 10 meters.
Revising the geometry of Line and Area notes
During the course of sketching Lines and Areas you may inadvertantly enter an undesired vertex. Prior to completing the shape, you can "back up" and remove vertices by clicking the right-mouse button. Each right-mouse button click removes a single vertex going back to the initial vertex. You can remove all vertices in this manner, except for the first one you entered. At any time, you can use the left-mouse button to add new vertices.
Note Content
When you click on a newly created note’s shape, once you’ve finished your geometry editing session, you’ll see that it has a popup window associated with it. The popup window appears in editing mode:
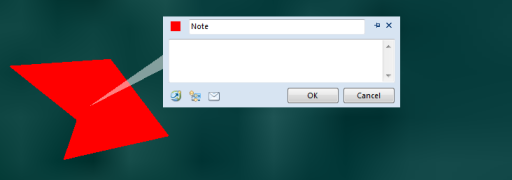
You can change the note's title, and enter content that will display when you show the note's popup or click it on the map display. This content can be plain text, a link, or HTML markup.
Learn more about HTML for notes and other map content
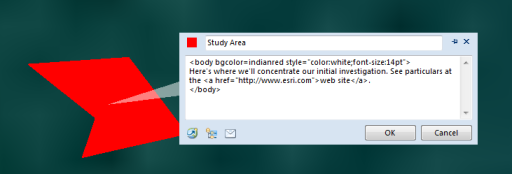
Once you've finished entering the content for the note, click OK. You'll see the note and how its markup has been interpreted:

Learn more about disabling the popup content window when creating notes
 Feedback
 E-mail this topic
 Print this topic