Image overlays can be drawn onto the map display, primarily to support presentations; for example, you can add .png files that represent legends, logos, advisory text such as "Confidential" or "Draft", .png copies of PowerPoint slides, graphics that frame the display or other information. An image overlay may be added to the display and captured as part of a slide or used as a slide itself. You can add any number of image overlays to the map, toggling the image on or off as you would any other map item in the Contents window.
Once you've added an image overlay or overlay text you can do the following
To set the transparency of the image overlay
- Select the image overlay in the Contents window.
- On the Tools tab in the Adjust group, click Transparency and move the slider to control the image overlay's appearance. The higher you move the slider's thumb control, the less opaque the image overlay will be.
Top of Page
To set a specific color in the image overlay to be transparent
- Select the image overlay in the Contents window.
- On the Tools tab in the Adjust group, click Set Transparent Color and then click the part of the image overlay that contains a color that you want to render transparent. Note that all the pixels in the image that match the color you selected will be affected; however, there is no selection tolerance, so if a pixel does not match the selected pixel exactly it will not be made transparent.
- To undo this action, on the Tools tab in the Adjust group, click Reset Image Overlay.
Note: not applicable for overlay text
Top of Page
To replace the image overlay with another
- Select the image overlay in the Contents window.
- On the Tools tab in the Adjust group, click Change Image Overlay and then browse for a different image.
- Note that the formatting, position, and size of the original image are maintained; consequently you may need to make adjustments to the new image overlay; an alternative to this technique is to use the Remove button in the Organize group and then add a new image.
Top of Page
To discard all previous formatting changes
- Select the image overlay in the Contents window.
- On the Tools tab in the Adjust group, click Reset Image Overlay.
- The image overlay will revert to its format and appearance when you first added it.
Top of Page
To position the image overlay on the map display
- Select the image overlay in the Contents window.
- On the Tools tab in the Size and Position group, click Change Image Overlay and select the position in the gallery that corresponds to the location on the screen or use the arrows to nudge the overlay to the desired position:
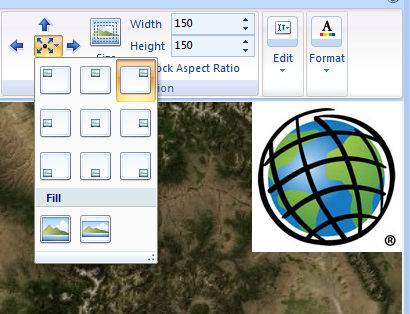
- The bottom two buttons in the Position Gallery provide the means of filling the map with the overlay. The left-hand button fills and stretches the image, whereas the right-hand button fills the map display but maintains the image's aspect ratio:

Top of Page
To set the way image overlay resizes in relation to the map display
- Select the image overlay in the Contents window.
- To control the way the image resizes if the map display changes size, click Size Mode in the Size and Position group of the Tools tab.
- Choose either Absolute to keep the image the same size as you resize the application window or Relative to stretch the image overlay.
Top of Page
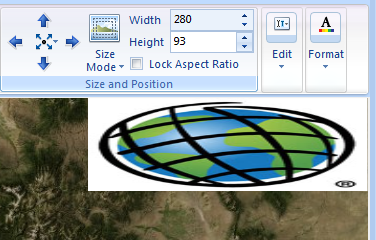
To set the image overlay's width and height
- Select the image overlay in the Contents window.
- Resize the image by pixel Width and/or Height by specifying values in the appropriate control.
- Check Lock Aspect Ratio to prevent the image from being sized in only one direction.
Note: Width and height is not applicable to overlay text, use the font size instead.
Top of Page
To lock the image overlay's aspect ratio
- Select the image overlay in the Contents window.
- Check Lock Aspect Ratio to maintain the ratio of the image's dimensions to each other when you set the Width and/or Height.
- With Lock Aspect Ratio checked, you need only supply one of the two size parameters. If Lock Aspect Ratio is not checked and you change the size of the image, you may find that this causes unwanted effects:
Top of Page
To remove the image overlay from the map
- Select the image overlay in the Contents window.
- In the Organize group of the Tools tab, click Remove or right-click the image-overlay and select Remove in the context menu.
Top of Page
To rename the image overlay
The name assigned to the image overlay originally is the name of the file you added.
- Right-click the image overlay in the Contents window.
or
- Click the image overlay name twice.
- The application selects and highlights the name. Type the new name and press Enter.
Top of Page
To move the image overlay to a folder
- Select the image overlay in the Contents window. or right-click it.
- In the Organize group of the Tools tab, click Move to Folder or right-click the image-overlay and select Move to Folder in the context menu.
- In the Move Items dialog select an existing folder to move the image overlay to or create a New Folder and then move the image overlay to it.
or
- Click and drag the image overlay to the folder.
Top of Page
Share the image overlay as map content or KML
- Select the image overlay in the Contents window. or right-click it.
- In the Organize group of the Tools tab, click Share or right-click the image-overlay and select Share in the context menu.
- You can share the image overlay as a map content (.nmc) file or KML.
Top of Page
To e-mail the image overlay to someone
- Select the image overlay in the Contents window. or right-click it.
- In the Organize group of the Tools tab, click E-Mail or right-click the image-overlay and select Share in the context menu.
- Specify the addressee in the e-mail application that appears. ArcGIS Explorer supplies a boilerplate message and attaches a Map Content (.nmc) file that contains the image overlay file.
Top of Page
To change the order in which an image overlay draws in relation to others
- Select the image overlay in the Contents window.
- Depending on how you want to position the selected image overlay in relation to other image overlays on the map, click Bring to Front, Bring Forward, Send to Back, or Send Backward in the Tools tab's Organize group.
- These controls do not affect the drawing order of other kinds of layers on the map; image overlays display in front of all other layers, no matter what their location relative to each other.
Top of Page
 Feedback
 E-mail this topic
 Print this topic