You will define the GIS functionality in your web applications by selecting and configuring tasks. Tasks encapsulate specific functionality for your application, such as querying or editing. Manager includes the following set of tasks that initially populates the list of available tasks:
- Editing task
- Find Address task
- Find Place task
- Geoprocessing task
- Query Attributes task
- Search Attributes task
The Editing and Geoprocessing tasks are valid only with ArcGIS Server services. Other tasks can work with multiple types of services. For example, the Search Attributes task can search the attributes of layers from ArcGIS Server, ArcIMS, and ArcWeb services.
You can also use the developer libraries included with the Web ADF to create custom tasks. See the discussion Working with tasks in the Developer Help for more instructions.
Some tasks require that you define supporting services in order for them to run. For example, the Find Address task requires you to select an existing ArcGIS Server geocoding service, an ArcIMS service enabled for geocoding, or an ArcWeb Service that can geocode. You can select these services in the Supporting Services tab.
For each task that you add to your application, a Configure button is available that lets you customize the specific look and behavior of the task. In many cases this involves selecting the layers and fields that you want the task to work with. If you want to see field aliases appear in the task, or if you want to hide certain fields, you should configure these settings in the map document (.mxd) before you create the task. The Layer Properties dialog in ArcMap contains a Fields tab where you can hide fields and set field aliases. You must start and stop the map service in order for these changes to appear.
The following sections describe the available tasks in more detail.
Editing task
The Editing task provides a suite of tools for Web-based editing of features and attributes in ArcSDE geodatabases. This task requires that your application contain a map service accessed through an ArcGIS Server Local connection that includes at least one layer from an ArcSDE geodatabase. Shapefiles, personal geodatabase, and file geodatabase layers are not editable, however you can include these types of layers in the map service.
What can I do with the Editing task?
When you add the Editing task to an application, users of that application will be able to access various tools to edit data and save their edits. The Editing task includes tools for creating, moving, copying, splitting, merging, and deleting features. Additionally, you can view and edit the locations of feature vertices. When you configure the Editing task for your application, you can select which versions and layers users will be able to edit. When editing, users of your application can adjust the snapping and selection options.
Editing in the Web environment has a slightly different feel from desktop editing, and you may want to use a practice dataset to accustom yourself to the available tools and their behavior. For instance, when editing with snapping enabled, you will not see the snapping occur on the screen until after you place the vertex. The placed vertex will be snapped to the appropriate vertex, edge, or end. (Note: To see the snapping tolerance, check the "Show snap circle" check box, and to see where the current cursor location will snap to, press the "s" key.)
How do I use the tools contained in the Editing task?
You can find detailed help about each tool in the Editing task by clicking the Help button in the upper-right corner of the Web Mapping Application. The "Editing Data" page contains graphics and instructions for using all of the tools contained in the Editing Task.
Is the Editing task customizable?
Beginning at ArcGIS Server 9.2, Service Pack 2, the Editing task is customizable. See the Editor Task control discussion in the Developer Help for samples and instructions on how you can add your own functionality to the Editing task.
You can also customize the Web Mapping Application Help to document any tools you add to the Editing task. The help file for the “Editing data” topic is located in C:\Inetpub\wwwroot\<Application name>\Help\EditorTask.htm. You can use any text or HTML editor to modify this topic with a description of your customized Editing task.
Editing with pooled and non-pooled services
Prior to ArcGIS Server 9.2, Service Pack 2, the Editing task was only available with non-pooled map services. At Service Pack 2, you also have the option to use the Editing task with pooled map services. When you use pooled services, your server can support a larger number of concurrent users because the server does not have to create a dedicated service instance for each user during his or her application session. Instead, users can share service instances from a pool. Before you implement the Editing task with a pooled service, you should be aware of the following:
- Editing of pooled services is only available with non-versioned data.
- You cannot undo or redo edits when you edit a pooled service.
- Conflicts are always resolved in favor of the edit session, meaning that the most recent edit will overwrite any previous edits performed on the same feature.
Editing versioned and non-versioned data
The Editing task supports editing versioned and non-versioned data. To edit versioned data with the Editing task, you must be using a non-pooled service.
You can edit non-versioned data with either pooled or non-pooled services. When editing non-versioned data, you cannot undo or redo edits or adjust the auto-reconciliation options. The last edit to be saved always overwrites any previous edits to the same feature.
How are conflicts resolved?
What happens when two users edit the same feature at the same time using the Editing task? The Editing task auto-reconciles any conflicts based on two important settings:
- Are conflicts defined by object (row) or by attribute (column)? If two users edit different attributes of the same feature, is this considered a conflict? If you've chosen to define conflicts by object (row), this situation is treated as a conflict and only one of the users' edits can be applied. However, if you've chosen to define conflicts by attribute (column), both edits may be applied. In this case, a conflict would only occur if the two users edited the same attribute.
- Are conflicts resolved in favor of the database or the edit session? If someone else edits the same feature as you and saves his or her edits first, what happens when you save? If you've chosen to resolve conflicts in favor of the database, your edits will not be applied. This setting can be thought of as "First-in-wins". If you've chosen to resolve conflicts in favor of the edit session, your changes will overwrite the other user's edits. Resolving conflicts in favor of the edit version can be thought of as "Last in wins".
By default, conflicts are resolved by object (row) in favor of the database. If you want different settings, click the Configure button for the Editing task in Manager, then click the Advanced tab to set the auto-reconciliation options.

You can define how conflicts are reconciled by using the Advanced tab in the Editing task configurator.
You can also choose whether users will receive a message when attempting to save a conflicting edit. The message reads: “The target version has been updated since you started editing. While merging these changes into your edit session, conflicts were detected and resolved.” You can see the changes from others' edits when the map refreshes.
Additional information about the Editing task
Following is some additional information that you should know about the behavior and abilities of the Editing task:
- The Editing task is designed for simple feature and attribute editing, and is unaware of the behavior of the underlying geodatabase. Consequently, you cannot use the Editing task to validate topology or networks, administer ArcSDE, create versions, and so on. These types of operations are best completed in ArcGIS Desktop before or after the Web editing session.
- The Editing task cannot be used with annotation layers, joined fields, or standalone tables.
-
By default, the Editing task creates a new selection every time you apply the Select Features tool. You change this behavior at runtime so that the selection envelope always adds to the current selection set, removes from the current selection set, or toggles the selected state of features within the envelope. To do this, click Settings on the Editing Task, expand the Select Features panel, and change the Selection Mode.

The Selection Mode dropdown allows you to change the way the Select Features tool creates a selection set.
-
When editing a layer that has a unique value renderer applied, you will see multiple buttons available for creating features. These buttons allow you to immediately create the type of feature on which the renderer is based.

Since the Buildings feature class has a unique value renderer defined in the map service, multiple buttons are available for creating features.
- The Editing task does not support duplicate layer names. Before adding the Editing task to your application, make sure all of the layers that you will edit have unique names in the source map document.
- For a detailed walkthrough of how to set up the Editing Task in a Web application, see Tutorial: Creating a Web editing application.
Find Address task
The Find Address task prompts the user for an address, then displays the resulting address on the map. It can be configured with an ArcGIS Server geocode service, an ArcIMS service with geocoding enabled, or ArcWeb Services.
For ArcGIS Server, the Find Address task is based on a locator. Once you add a Find Address task to your Current Tasks list, you need to specify the locator using the Supporting Services tab. The number of input boxes and the text you see in the user interface for the Find Address task comes from the locator itself. You can change the text by opening the locator (.loc) in a text file before publishing it to the server. Changing it in the locator, however, will also change how the text appears in ArcGIS Desktop.
- Navigate to the location of the locator.
- Edit it in a text editor.
-
Search for the text "FieldAliases." For instance:
FieldAliases = Zone
-
Edit the field alias. For example, you might change Zone to ZIP Code.
FieldAliases = ZIP Code
For more information on locators, see the ArcGIS Desktop Help.
If you are using ArcIMS, you must select a layer with a geocode extension, and then configure the task.
- Click the Supporting Services tab to see a list of services that include the geocode extension.
- Select the service layer you wish to use, and click Add.
- Click the Select Tasks tab.
- Select the Find Address task, and click Add.
- Select the task in the Current Tasks list, and click Configure.
-
In the dialog:
- Change the title name, if desired.
- Type a tool tip, if desired.
- Confirm the GeocodeResource is correct. It sould be the layer name you selected earlier.
- Change the button text, if desired.
- Leave the defaults for TaskResultsContainer and GeocodeResourceManager.
- Click Apply.
Find Place task
The Find Place task allows a user to type in the name of the place to search for on the map. The application accesses an ArcWeb Service to search for the place name entered by the user, who can then highlight the resulting places on the map.
To configure the Find Place task, you need to provide information about how you want the task to be displayed, how it will connect to ArcWeb Services, the places it will search for, and how the results will be returned.
- To configure the display settings, you specify the text strings that appear on and around the task panel. Use the Label Text to direct the user what to search for. You can phrase the label text any way you'd like, such as "Enter a place" or "Type the name of a city". Optionally, you can provide more detailed instructions in a Help Tip that will appear when the end user hovers the cursor over the input box.
-
Since the Find Place task uses an ArcWeb Service, you will need to provide the user name and password for an ArcWeb Services account. See the ArcWeb Services home page for information on ArcWeb Services and how to create an account. Applicable ArcWeb Services credit deductions will occur for searches made with the Find Place task.
Once you've provided an account name, select an ArcWeb Service from the list of Place Finder services. At the time of the 9.2 release of ArcGIS Server, the following services are available. For the most up-to-date list of Place Finder services, see the ArcWeb Services home page.
World Gazeteer ESRI
This service provides geographic place name data from several sources including the National Geospatial-Intelligence Agency (NGA), U.S. Geological Survey (USGS), and ESRI. The Place Finder Web Service recognizes more than three million place names including geographic regions (e.g., continents, states, cities), bodies of water, and major points of interest.
U.S. Landmarks Place Finder Tele Atlas
This service provides access to geographic landmark data from the Tele Atlas Dynamap/2000 database. It offers more than fifty thousand landmark place names including amusement parks, stadiums, colleges, hospitals, and more.
U.S. Populated Places Tele Atlas
This service offers place name information from the Tele Atlas Dynamap/2000 database. It provides place names and codes for locations in the United States.
U.S. Postal Places Tele Atlas
This service provides access to United States postal place names from the Tele Atlas Dynamap/2000 database. The place names are those assigned to each ZIP code area or point in the United States. The extent provided for each place represents the aggregated extent of the ZIP code areas that share that place name or the area surrounding the ZIP code point.
World Postal Codes Place Finder GfK GeoMarketing
This service provides access to world postal code data from GfK GeoMarketing. This includes postal code, country, administrative area name, postal code center point, and postal code extent, facilitating postal code-level geocoding for various countries throughout the world.
- Each ArcWeb Service contains a subset of place types that you can search against. You can control which places are searched by adding and removing items from the Available Places and Search These Places lists. You can also choose if you want to search against the exact text entered by the user, or search for places that start with the text entered by the user.
- The results of the search will appear in the results window of the application, where the user of the application can make them visible on the map. You can choose which color will be used to display the results on the map, and a limit for how many results the search will return. This can prevent your server and your application from becoming too busy if a common search term is entered that would return many results. The default maximum number of results is 50.
The Find Place task does not support custom lists of places.
Geoprocessing task
With the Geoprocessing task, you can make use of services that run ArcGIS geoprocessing jobs on the server and send the results back to the client application. The Geoprocessing task requires an ArcGIS Server geoprocessing service, which you specify using the Supporting Services tab. Geoprocessing services are based on models and can be published from either a toolbox or a map document containing a tool layer. See the topic Geoprocessing services for more information on how to create a geoprocessing service.
Configuring the Geoprocessing task
When you add a Geoprocessing task to your application in Manager, remember these required steps:
- Use the Supporting Services tab to select a geoprocessing service that will be associated with the task.
- Switch back to the Select Tasks tab, and under the list of Current Tasks, click the Geoprocessing task. Then click the Configure button to access the Task Configuration dialog.
- In the Task Configuration dialog, set the Task Definition by expanding the geoprocessing service and selecting one tool from it. This is the tool that will be associated with this Geoprocessing task. To make other tools available, you can add other Geoprocessing tasks.
- The Task Configuration dialog also has a setting for the virtual directory where the result data file will be written. The value you enter here will be set as the VirtualDirectory property of the Geoprocessing task. The account running the application must have Read and Write access to this directory.
Running the Geoprocessing task and working with results
When you open a Geoprocessing task, you will see a dialog that allows for specification of the model parameters. For example, if the underlying model requires a line feature class as input, the dialog will include tools for drawing lines. Once you've specified all of the parameters, you can then invoke the model by clicking a button on the task. As the job runs, you can see any messages from the task in the Results panel. When the task has completed, the results will appear on the map if one of the following conditions is met:
- The output recordset has the same spatial reference as the map
- The task has at least one feature input parameter and the Environment Setting for "Output Coordinate System" is set to "Same as Input" on the published toolbox
Geoprocessing services have a property that determines whether they run synchronously or asynchronously. If the service is configured to run asynchronously, you have the option to view the task results even after closing the web application. If the task has not finished executing before you close the browser, and if you have cookies enabled, the results will be retrieved automatically next time you visit the web application. Otherwise, you can click the Save link on the results node to save the result information to a file. You can use this file to check task results in a later session. The Save link is only available if the VirtualDirectory property of the Geoprocessing task is set (This property is mentioned in Step 4 above). If the service is configured to run synchronously, no Save link appears and you must keep the session alive in order to view the results when they become available.
The results of a Geoprocessing task can either be drawn on the server or by the Web ADF. If the result is drawn by the Web ADF, you will be able to zoom and pan to the results, and will see the results listed as individual features. By default, the results will be drawn by the Web ADF unless the geoprocessing service that you used to configure the task has an associated map service, in which case the results will be drawn on the server. You can change this behavior in Visual Studio by setting the task’s DrawResultsOnMapServer property to "False".
Further help with the Geoprocessing Task
The tutorial Publishing a geoprocessing service includes steps for configuring the Geoprocessing task and working with it in a Web application. The tutorial starts with building a model in ArcGIS Desktop, then works through the process of publishing the model as a geoprocessing service and configuring the Geoprocessing task so that the model can be run within a Web application.
Query Attributes task
The Query Attributes task helps users select or view certain data on the map, based on that data's attributes. A Query Attributes Task creates a single query on one map layer. However, the query may have compound criteria. For example, you can define a query on a cities layer that selects cities with a population greater than a value entered by the user, and with a name that begins with a value entered by the user.
When you configure the Query Attributes task, you create an easy-to-understand form that will guide the user through the process of making the query. This way, users of your application will not have to know the details about the dataset, nor will they have to construct a Structured Query Language (SQL) statement, in order to query the data.
For example, suppose you wanted users to select U.S. counties by entering a state name and a minimum average household size. A SQL expression for this selection might look something like this: "SELECT * FROM counties.sdc.counties WHERE: "STATE_NAME" = 'Idaho' AND "AVE_HH_SZ" > 3.0. The users of your Web application might not know the field names of your data, or how to write a SQL statement. You can help them by using the Query Attributes task to create an easy-to-read form with text like the following: "I want to select counties in the state of: (user picks a state from a dropdown box) whose average household size is greater than or equal to: (user enters a number in a text box)."
When you add a Query Attributes task in Manager remember the following important steps:
- Click the task name in the list of Current Tasks, then click the Configure button to display the Task Configuration settings. You use this dialog to build the query and to specify the wording that a user sees when the task is displayed. You can also adjust how the results will be displayed.
-
In the Task Configuration panel, use the Query Settings section to build your query. After selecting a map service and a layer to query, click the Add button to add a condition to your query. You can add multiple conditions to create a compound query. If you're new to SQL or you need a review, a good place to start is About building an SQL expression in the ArcGIS Desktop Help.
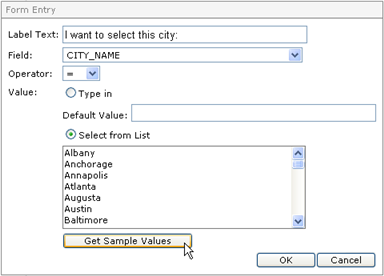
Example of a query condition allowing the user to pick a city from a dropdown.
-
By default, ArcGIS Server map services limit the number of records returned by a query to 500 records. This is important to remember when configuring the task because if you click the 'Get Sample Values' button, only the first 500 records will be scanned for unique values. To change this behavior, you need to manually edit the configuration file and raise the MaxRecordCount property to the number of records from which you want to retrieve sample values. Then stop and start the service. See the Service Configuration Files topic in the ArcGIS Server Help for instructions on editing configuration files.
Note that by default, the Query Attributes task limits results to 50, so if you keep this value and you do not need to use 'Get Sample Values', you will not need to edit the service configuration file.
- You may find it helpful to create a practice application to gain experience with creating queries in Manager. Before deploying any application, test your queries with known values to see if they yield the expected results.
Search Attributes task
The Search Attributes task allows a user to enter some text that will be used to search the attributes of the layers on the map. This kind of search is similar to the simple Web search that sites like Yahoo and Google provide. After searching for something, the user can then select, zoom to, or pan to any features in the list of results.
To configure the Search Attributes task, you'll need to specify the display settings, the search fields, and how you want the results to appear:
By default, ArcGIS Server map services limit the number of records returned by a query to 500 records. To change this default behavior, you need to manually edit the configuration file and change the MaxRecordCount property. See the Service Configuration Files topic in the ArcGIS Server Help for more information.
- To configure the display settings, you specify the text strings that appear on and around the task panel. Use the Label Text to direct the user what to search for. You can phrase the label text any way you'd like, such as "Search for rivers" or "Enter the last name of a parcel owner". Optionally, you can provide more detailed instructions in a Help Tip that will appear when the end user puts the mouse over the text box.
- The Search Fields are the fields whose attributes will be searched for the text specified by the user. You can select one or more fields from the layers of any service on your map. The best fields for this type of task are usually nominal fields where most records have a unique value, for example, the name of the feature. When working with ordinal, interval, or ratio fields—for example, the average temperature or the cost of a feature—consider using the Query Attributes task instead.
- When configuring how the results are displayed, you have the option to limit the number of results that are returned from a search. This can prevent the server from becoming unavailable if a search is made that would return an unreasonably large number of records. You also have the option to disable the default behaviors of grouping the results by layer and showing the attributes of the records returned by the search.
Next topic: Customizing the look and feel of the application