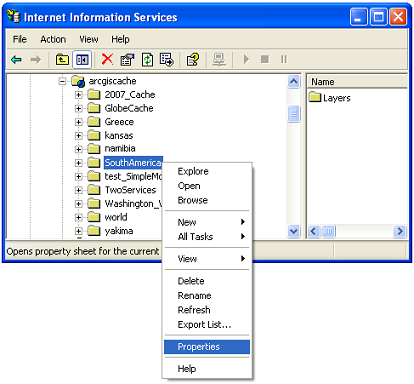
Navigate to the virtual cache directory and find the folder containing your map cache. Right-click the folder and click Properties.
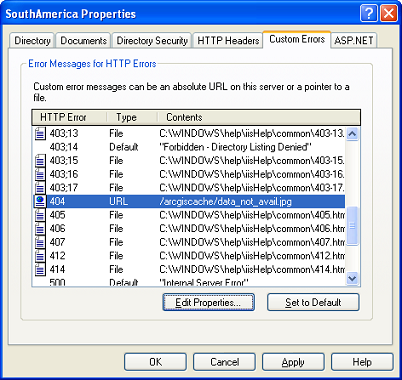
Click OK. Your dialog should look similar to the one below. Click OK again to return to IIS Manager.
ArcGIS provides many ways to create a cached map service. ArcCatalog, ArcToolBox geoprocessing tools, scriptable command line geoprocessing tools, or the ArcEngine API can all create and manage caches, and ArcCatalog provides an easy means to associate a cache with a map service.
The easiest way to create a cached map service is to use ArcCatalog. It is important to note that ArcGIS Server Manager cannot create or manipulate caches.
Before a cached map service can be created, however, there are a few required and optional prerequisites: an already published standard map service, a cache directory and an associated virtual cache directory that have been registered with the ArcGIS Server, and optionally, a pre-defined cache tiling scheme.
Steps for creating and publishing a standard map service have already been defined previously in this documentation (see Map services if you need a review). Keep in mind that creating a cache is a computing resource intensive process that can take anywhere from hours to days depending on the complexity and extent of the source data and the scale-levels that are cached.
Registering the cache directory with the ArcGIS Server is a similar process to that previously described for registering output directories, except that the administrator must choose "cache" for the type of directory to register. This directory should be a UNC path with read/write access rights for the SOC account if the cache directory does not reside on the SOC machine or if more than one SOC machine is being used to generate the cache. The cache directory must also be accessible by the account hosting the web server. Depending on the client-application, the virtual cache directory should have anonymous read-access permissions.
Defining an optional, pre-defined cache tiling scheme is recommended primarily when you intend to publish many cached map services that use the same tiling scheme. A pre-defined tiling scheme is defined using the Generate Map Server Cache Tiling Scheme Geoprocessing Tool. The output from this tool is called a tiling scheme file. This file can be used as input to the cache generation tool. Instructions for using this GP tool are found later in this documentation. It is important to note that when combining multiple cached map services in the Web ADF for the Microsoft® .NET Framework, best performance will be achieved by ensuring that the data frame extent and the cache tile origin is identical between cached services.
For additional points you should consider before building a cache, see the topic Planning a map cache.
Within ArcCatalog, you can access all of the tools needed to create, update, and delete map caches. Steps for each of these procedures follow in more detail:
Creating a cache with ArcCatalog is performed with the following steps:
Define the scale levels that should be cached. The "STANDARD" scale option will auto-generate the scales based on the number defined in the "Number of Scales" field.
The "CUSTOM" option permits choosing any scale-levels desired. After entering a value in the "Scales" text box, click the "+" button to add it to the list of scale levels. Note that you cannot enter a ratio; you must enter the scale factor. Therefore, entering a value of 2000 denotes a scale of 1:2000, entering 100 denotes a scale of 1:100, and so on.
After creating the cache, the map service restarts (in order to read the new configuration information about its new cache) and becomes a cached map service. The cache now resides in the server cache directory in a sub-directory that has the same name as the parent map service.
If the map extent is changed in the map document, layers are added to or deleted from the map document, or if an additional level of detail is desired, the generate tool can be re-run. The generate tool is intelligent enough to know what tiles already exist and will only add new tiles where necessary.
If there is a problem while generating the cache and the generation tool fails, if the cache tiles become obsolete, if cache tiles are damaged, or if layers or scale-levels need to be removed from the cache, the cache can be updated. There are two ways to update a cache: recreate all tiles, or recreate empty tiles. If you choose "Recreate Empty Tiles", the tool will skip over all previously created tiles and start creating new tiles where necessary. The steps for updating a cache follow:
After updating the cache ArcCatalog will not show the changes in the updated cache until the user deletes the local ArcCatalog cache (a separate client-side cache). Instructions for deleting this cache can be found in the ArcGIS Desktop Help.
You can delete an entire fused cache or individual layers in a multi-layer cache. Before removing a cached map service from your ArcGIS Server you should consider deleting the cache using ArcCatalog. You can also just remove the configuration, but the associated cache will remain on disk and might result in unexpected behavior if you create a new map service with the same folder name and configuration name as the one you just deleted (the old cache will be reused for the new map service). The best practice is to use ArcCatalog to delete the cache as follows:
Caches can also be created and managed using the Geoprocessing tools directly from the System toolbox in ArcToolbox. These tools are available in the Caching toolset located in ArcToolBox > System > Caching and include "Generate Map Server Tiling Scheme", "Generate Map Server Cache", "Update Map Server Cache", and "Delete Map Server Cache".
Using the "Generate Map Server Cache", "Update Map Server Cache" and "Delete Map Server Cache" tools within ArcCatalog has already been described above, but there are some additional considerations when using them directly from the toolbox:
The tools can otherwise be used as described above. After the tools execute successfully, the map services they operated on need to be restarted to reflect additions, changes or deletions of the cache.
In addition to the tools described above, the "Generate Map Server Cache Tiling Scheme" tool is also available from the ArcToolbox server tools. This tool is a little different in that it does not work directly with the ArcGIS Server. This tool is used to create pre-defined cache tiling scheme files (described above) using a data frame from a map document and additional input (identical to that described above for "Generate Map Server Cache"). The output XML configuration file can be read as input to the "Generate Map Server Cache" tool.
There are cases where the cache may need to be distributed to other servers or where a new map service configuration needs to be configured to work with an existing cache. The map documents used to create the new map services should match the structure of the cache that is intended to be reused. In these cases, perform the following steps to associate the cache with a new map service:
You can configure your server to return a blank or "Data not available" tile if someone pans to the edge of the map or navigates to an area that you have not completed caching. Configuring your server to return a "Data not available" tile can in some cases yield a better user experience than returning nothing.
To display the tile, you need to create a custom error response on your virtual cache directory for HTTP Error 404: "Not Found". Instead of an error message, the Web server returns the tile.
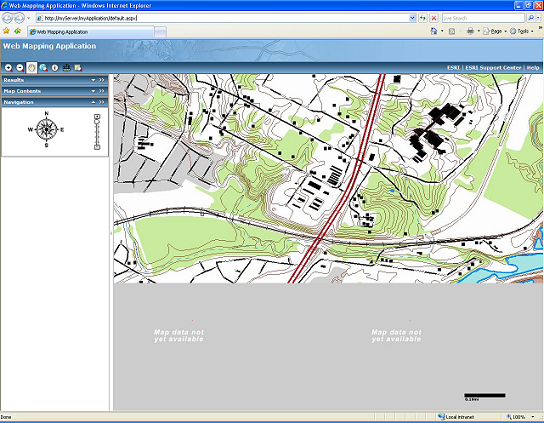
In the Web application above, the Web server has been configured to return a gray tile with the message "Map data not yet available" in places where the cache has not been generated.
Following are steps for configuring Internet Information Services (IIS) 6.0 to return a blank or "Data not available" tile. Before you perform these steps, you should put the blank or "Data not available" tile in your server cache directory. The tile you use must have the same dimensions and image format as the other tiles in the cache.
Navigate to the virtual cache directory and find the folder containing your map cache. Right-click the folder and click Properties.
Click OK. Your dialog should look similar to the one below. Click OK again to return to IIS Manager.