Choosing cache properties


Choosing cache properties |
|
| Release 9.3.1 |
|
There are two steps to making a map cache:
This topic is about setting the cache properties. See Creating cache tiles for more about creating the tiles.
When you view a map service's properties in either Manager or ArcCatalog, you will see a Caching tab. This is where you set the tiling scheme and other properties for your cache. You should set these options before you start creating cache tiles.
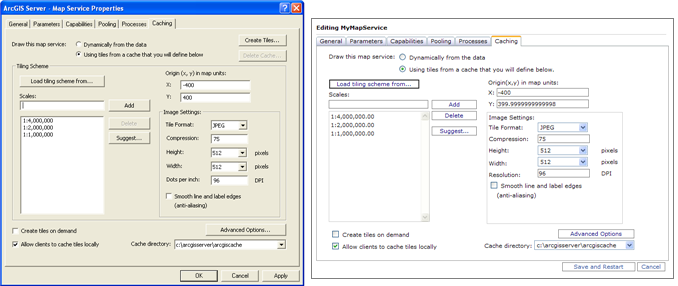
To use a cache for your map service, you first need to choose the option to draw the map service "Using tiles from its cache". If you choose to draw "Dynamically from the data" the server will draw the map each time and the map service will not use any cached tiles you have created.
The information below explains additional settings you can access on the Caching tab. Once you start creating the cache, you can't change these options unless you delete the existing cache and start over. For this reason, it's important to plan the tiling scheme and other properties for your cache ahead of time.
When you've finished setting the cache properties, click the Create Tiles button to start creating tiles. You can also return to this dialog box later and click Update Tiles to create more tiles or update existing ones.
The tiling scheme includes the scale levels, tile dimensions, and tile origin for the cache. These properties define where tile boundaries will exist and are important to match when overlaying caches in some clients. Other properties such as image format and antialiasing are also written into the tiling scheme. There are several ways you can choose a tiling scheme:
Load a tiling scheme from an online mapping service such as ArcGIS Online, Google Maps, or Bing Maps
The ArcGIS Online and Bing™ Maps/Google Maps tiling schemes allow you to easily overlay your cache tiles with data from these online mapping services. ArcGIS Server 9.3 includes these tiling schemes as built-in options when loading a tiling scheme.
The ArcGIS Online tiling scheme was the principal tiling scheme used by ArcGIS Online until December 2009, at which time ArcGIS Online introduced a new set of services in the Bing Maps/Google Maps tiling scheme. The ArcGIS Online tiling scheme uses 512 x 512 pixel tiles. When you choose this tiling scheme, the data frame of your source map document must use the WGS 1984 geographic coordinate system. The ArcGIS Online tiling scheme is ideal if you need to support legacy ArcGIS Online services in Web applications. It also yields the best performance and quality when creating 3D globe caches from 2D map cache tiles. The ArcGIS Online tiling scheme tends to create smaller caches than the Bing Maps/Google Maps tiling scheme, because the larger tile dimensions produce fewer files.
The Microsoft Virtual Earth/Google Maps tiling scheme is the tiling scheme used by Bing Maps, Google Maps, and current ArcGIS Online services. This tiling scheme uses 256 x 256 pixel tiles. When you choose this tiling scheme, the data frame of your source map document must use the WGS 1984 Web Mercator projected coordinate system. Another advantage of this tiling scheme is that it is widely known in the Web mapping world, so your tiles will match those of other organizations who have used this tiling scheme.
The above tiling schemes may contain scales that would be zoomed in too far to be of use to your map. Caching at large scales can take up much time and disk storage space. For example, the largest scale for the Bing Maps/Google Maps tiling scheme is about 1:1,000. Caching the entire continental United States at this scale can take weeks and require hundreds of gigabytes of storage. If you aren't prepared to cache at this scale level, you should uncheck the box for this scale level when you create tiles.
Caution: If you remove scales from a tiling scheme that you import from an online mapping service, you may lose your ability to overlay tiles from that service. Simply choosing not to create tiles at a scale is usually a better option than removing the scale.
Load a tiling scheme from an existing map service
Choose this option if your organization has created a tiling scheme for an existing service on your GIS server and you want to match it. Matching tiling schemes ensures that your tiles will overlay correctly in JavaScript applications and other mashups.
If you choose this option, your source map document should use the same coordinate system as the map whose tiling scheme you are importing.
Load a tiling scheme file
All map caches have a tiling scheme file conf.xml in the cache directory (Example: c:\arcgisserver\arcgiscache\MyService\MyDataFrame\conf.xml). You can browse to this file to set the tiling scheme for your map service. This option allows you to use a tiling scheme file you obtained through e-mail, a file share, or an ArcGIS Server 9.2 service.
Create your own tiling scheme
Choosing a tiling scheme from an online mapping service is not always possible due to requirements that you use a different coordinate system or set of scale levels. In this scenario, you will need to create your own tiling scheme. The following sections in this document will help you choose appropriate scales and other properties for your tiling scheme.
If you choose to create your own tiling scheme, you can define the scales yourself or allow ArcGIS Server to suggest some scales for you.
When you choose the Suggest option, the dialog box asks how many scales you want, then the software picks levels that have been increased or decreased by a power of 2 from 1:1,000,000 starting with the level closest to the extent of the source map document. For example, if the source map document has an extent of 1:121,000,000 and 3 scale levels are defined, ArcGIS Server will suggest scale levels at
In general you should limit the number of suggested scales you request to about 20 or fewer.
Once you're familiar with the cache creation process, it's best to pick your own scale levels instead of asking the software to suggest scales for you. If possible, you should even pick the scales before you start designing your map. That way, you can design your map to look good at each of the scales.
A simple way to pick a set of scales is to determine the closest scale at which your users will need to view the map, then double the scale's denominator until you reach a scale that would contain your entire area of interest in just one or two tiles. For example, if you were designing a tiling scheme for a city and the closest scale at which someone should view your map is 1:2,400, your scales could be 1:2,400; 1:4,800; 1:9,600; 1:19,200; 1:38,400, until you reach a scale that would cause the entire city to be visible on your computer screen at once.
The tiling scheme origin is the upper left corner of the tiling scheme grid. The origin does not necessarily represent the point at which tiles begin to be created; that happens when the full extent of the map is reached. Using a common tiling scheme origin for your caches ensures that your caches can overlay each other in Web applications.
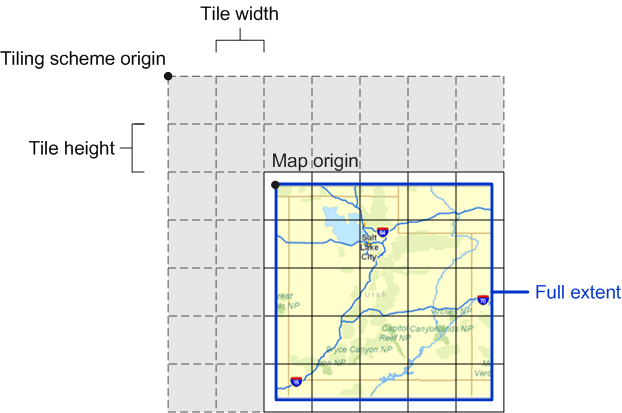
In most cases, you should keep the default tiling scheme origin chosen by the software. The default is the upper left point of the coordinate reference defined by the map document. If no coordinate reference is defined in the map document, the upper left of the two times the maximum of the union of extents of all the layers in the map is used.
If you change the tiling scheme origin to something other than the default, be aware that tiles can be created only in the map area to the lower right of the tiling scheme origin. If you want to cache only a certain area of your map, creating tiles based on a bounding rectangle or feature class are better options than changing the tiling scheme origin.
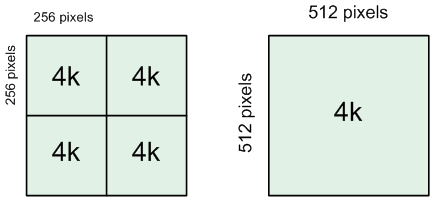
The default tile width and height is 512 pixels. You can choose any width and height that is a power of 2, but it's recommended that you use 128, 256, or 512. If you are building a cache that will overlay another cache, be sure to use the same tile width and height for both caches.
Choosing a smaller tile width and height may improve performance of the application requesting tiles from the cache, as less data will need to be transferred. However, smaller tile size results in a larger cache size and longer creation time. Because the default Windows disk block size is 4 kilobytes (K), small tiles that may only be 1K in size will actually use 4K of disk space. A larger tile might be 4K in size and fit perfectly in a 4K block. Therefore, four 1K tiles use 16K of space on disk, whereas the single 4K tile covering the same area only uses 4K. With large numbers of tiles, this difference can become significant.
This setting determines what output image format the map service will use when it creates the tiles. Your choice of image format is important because it determines the size on disk of the tiles, the image quality, and the ability to make the tile background transparent.
The default image format is PNG 8, but you may often need to change this based on the type of map you are creating. Below is a summary of the available image formats and their appropriate uses.
PNG8 - Use PNG 8for overlay services that need to have a transparent background, such as roads and boundaries. PNG 8 creates tiles of very small size on disk with no loss of information.
Do not use PNG 8 if your map contains more than 256 colors. Imagery, hillshades, gradient fills, transparency, and antialiasing can easily push your map over 256 colors. Even symbols such as highway shields may have subtle antialiasing around the edges that unexpectedly add colors to your map.
JPEG - Use this format for base map services that have large color variation and do not need to have a transparent background. For example, raster imagery and very detailed vector basemaps tend to work well with JPEG.
JPEG is a lossy image format. It attempts to selectively remove data without affecting the appearance of the image. This can cause very small tile sizes on disk, but if your map contains vector linework or labels, it may produce too much "noise" or blurry area around the lines. If this is the case, you can attempt to raise the Compression value from the default of 75. A higher value such as 90 may balance an acceptable quality of linework with the small tile size benefit of the JPEG.
It's up to you to decide what image quality you consider acceptable. If you are willing to accept a minor amount of noise in the images, you may save large amounts of disk space by choosing JPEG. The smaller tile size also means the browser can download the tiles faster.
Before committing to an image format for a large cache, build a small cache of a representative area of your map and examine the tile quality and performance in a test application. If you'll be working with multiple caches, build a small test cache for each and add them to a test application to make sure they overlay as expected. This will allow you to make adjustments before you create the entire cache.
To make a small test cache, use the editing tools in ArcGIS Desktop to create a new feature class consisting of a small rectangle around the area you want to test. Then use the option at the bottom of the Manage Map Server Cache Tiles tool that allows you to create tiles based on the boundary of a feature class. Browse to the feature class containing your test area and create the tiles.
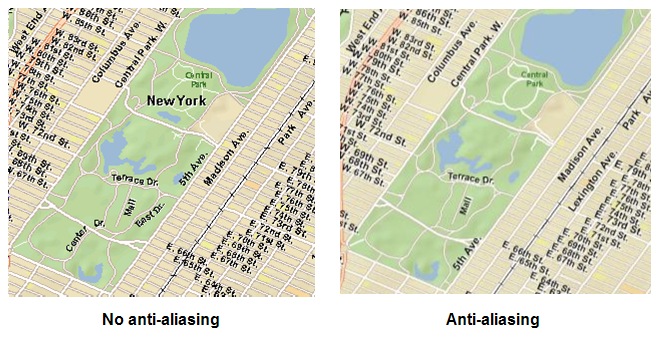
Antialiasing is a graphics technique that blends foreground and background pixels near edges to trick the eye into seeing smoother borders. You can apply antialiasing to your map services to get higher quality line and label appearance. As a server administrator, you must decide whether the performance hit of the antialiasing is worth the improved visual quality.
Antialiasing works differently depending on whether the map service is based on an MXD file (ArcMap document) or an MSD file (map service definition). To get the best quality and performance, it's recommended that you use antialiasing with MSD-based services, using the PNG 32 image format.
The Map Service Publishing toolbar in ArcMap allows you to apply different levels of antialiasing to lines and text for MSD-based services. The higher the quality of antialiasing you choose, the slower the map will draw. You can use the Preview button on the toolbar to get an idea of the appearance and draw times with different levels of antialiasing.
If you're using an MXD-based service, ArcGIS Server performs the antialiasing by downsampling a large map area before cutting it into the smaller size tile specified in the tiling scheme. With this technique, the data frame background color contributes to the color of the antialiased features. If your vector-based cache will overlay raster imagery, change the data frame background to a darker color that is unlikely to appear in the map before you start creating the cache. Some software tools will allow you to find the average color within a given image, and this can be a good color value to use for your data frame background.
Dots per inch (DPI) refers to the resolution of the cache tiles that the server will generate. DPI depends on the user's screen resolution (for example, 1024x768) and physical size (for example, 19" diagonal). DPI can vary widely on client machines because of big screens (which lower DPI) and higher-resolution screens and graphics cards (which increase DPI with higher settings). If clients will frequently be printing maps that include your cached layer, you may find it helpful to raise the DPI beyond the default, but be aware that this will increase the size of the files in the cache.
When choosing a DPI setting, the default value of 96 is usually sufficient unless you are working primarily on a network where the majority of your client machines have a different DPI.
Clicking the Advanced Options button presents you with the option of choosing a fused or multilayer cache. A fused cache includes all the layers in the map in one fused image. The layers must be turned on and off together.
In contrast, a multilayer cache consists of a set of cached images for each layer. When you display the map, the server must still blend together the tiles from each layer. The more layers you have in your multilayer cache, the longer the blending will take. If you attempt to use a multilayer cache with too many layers, you may lose the performance benefit of the cache. Additionally, the cache takes longer to create because each layer has to be rendered at all scale levels over the extent of the cache.
Use fused caches whenever possible. If you need to be able to turn layers on and off, consider overlaying multiple fused caches instead of using a multilayer cache. To do this, determine some logical groups of layers from your original map document and add each group to its own map document. Publish a service for each map document, then create a fused cache for each one. You can then overlay these fused caches in Web applications or in ArcMap.
Tip: If you use the above technique of overlaying fused caches, be sure to use the same tiling scheme for each cache. Also, add the fused caches directly into the client application for best performance. Avoid embedding one or more services within a service.
If you use a multilayer cache, ArcMap is the recommended client for working with the cache. Using a multilayer cache in a Web application provides little or no advantage over using a non-cached map service. Multilayer caches are not available with MSD-based services.
The Caching tab contains a check box for enabling on-demand caching. This means that tiles for previously un-cached areas will be added to the cache when they are first requested by a client.
Learn more about when to use on-demand caching.
Performance Tip: When you have enabled on-demand caching, your client applications will achieve better performance using an ArcGIS Server Internet connection as opposed to an ArcGIS Server local connection.
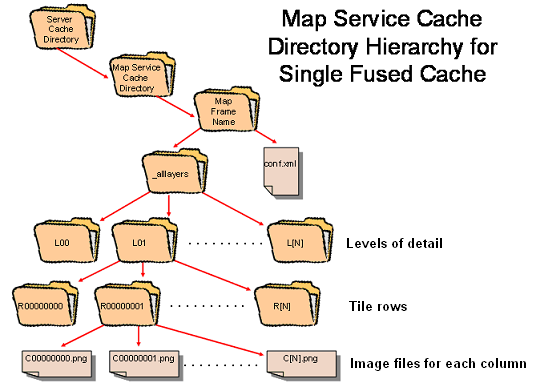
The server cache directory is the folder on disk where your cache tiles are stored. One server cache directory can hold multiple caches; however, if you want, you can add more than one server cache directory to your server. On the Caching tab, you can choose which server cache directory will be used to store your cache.
It's a good practice to associate the server cache directory with a virtual directory on your Web server so that tiles can be retrieved through a URL.
Learn more about how client applications get tiles from the virtual directory.
When you install all the components of ArcGIS Server on just one machine, a server cache directory is created for you. (The default location is C:\arcgisserver\arcgiscache.) A virtual directory that references this location also gets created.
If you install the components of ArcGIS Server across multiple machines, you need to configure the server cache directory and its associated virtual directory yourself. For further reading, see Creating a server directory and Configuring a multiple-machine deployment. Be sure to give the SOC account Write access to the server cache directory so that ArcGIS Server can successfully place the tiles in the directory. You can optionally remove Write access when you finish creating your caches.
You can open the server cache directory in Windows Explorer to examine the cache tiles and tiling scheme file conf.xml. The tiles are organized into a directory hierarchy. The top-level directory has the same name as the map service unless the service was created in a GIS server folder. If the map service is in a folder, the top-level directory is named <folder name>_<map service name>.
Under the top-level directory, you'll find a subdirectory for the particular data frame in the map being cached. Next, depending on whether you've created a single fused cache or a multilayer cache, you'll find either a single subdirectory _alllayers, or multiple subdirectories, each named after the specific layer being cached in the multilayer cache. Within each layer subdirectory, you'll find subdirectories for each level of detail, followed by subdirectories for each tile row, and finally, the actual image files that represent a particular column in the row.
Note: A server cache directory can also contain a GlobeCache folder, which contains all the globe caches stored in the server cache directory.