WFS services


WFS services |
|
| Release 9.3.1 |
|
With ArcGIS Server 9.3, you can publish services that comply with the Open Geographic Consortium, Inc. (OGC) Web Feature Service (WFS) specification. This is an open specification for serving geographic features over the Web.
In order to publish your data using WFS with ArcGIS Server, you must have an appropriate ArcGIS Server license. Refer to the functionality matrix for licensing requirements.
This topic is organized in the following sections:
Serving your data through a WFS service allows any application that can work with Web services to access geographic features from your map or geodatabase. Unlike the OGC Web Map Service (WMS) that returns an image of a map, the WFS service returns actual features with geometry and attributes that clients can use in any type of geospatial analysis. WFS services also support filters that allow users to perform spatial and attribute queries on the data.
Technical notes
There are two ways you can create a WFS service: from a map or from a geodatabase.
You can create a WFS service by starting with an ArcMap map document (.mxd). Publish the map document as an ArcGIS Server map service using either Manager or ArcCatalog. When prompted for the capabilities you want to enable, check WFS. This creates a URL that any WFS client can use to access the service.
If you need help publishing the service, see Publishing a GIS resource to the server.
The map document is just a specification of the layers that will be available in your WFS service. Symbology, query definitions, and field aliases defined at the layer level will not transfer to the WFS service because the purpose of the service is to expose the features in the data. To expose the visual properties of your map through OGC specifications, use a WMS service. Remember the following things when publishing a WFS service from a map document:
If you use your source map document for many purposes other than publishing WFS services, you may need to make a copy of the map document that will act as the source document for the WFS service. You can then alter the copy so that it meets the above requirements without affecting your original map document.
Another way to create a WFS service is by starting with a geodatabase. This can be any type of geodatabase: personal, file, or ArcSDE. Publish the geodatabase as an ArcGIS Server geodata service, using either Manager or ArcCatalog. When prompted for the capabilities you want to enable, check WFS. This creates a URL that any WFS client can use to access the service.
When creating a WFS service from a geodata service, all the feature classes for which the connected user has access will be exposed in the service. Also, only feature classes, tables and SDE views that are registered with the geodatabase will be exposed in the service.
If you need help publishing the service, see Publishing a GIS resource to the server.
Creating a WFS service from a geodatabase allows you to edit the features, as well as read and query them.
If a feature class in your map or geodatabase uses a spatial reference that cannot be represented with an EPSG code, WGS 84 will be used as the spatial reference for that feature class.
Feature classes in your map or geodatabase that use an unknown spatial reference system will be ignored by the WFS service.
Once published, you can set properties specific to the WFS service. These properties define the metadata which clients can use to get information about the service. By default, some service-level properties are set while others are left unset. The following describes how to use Manager or ArcCatalog to set the properties that define the service-level metadata:
For a description of these properties, see the OGC Web Services Common Specification version 1.0.
Note that the Enable Transactions checkbox is used to allow edits to be applied through WFS-T. See the Editing and WFS services section below for more information.
Another way to define the metadata is by using an external capabilities file. Using an external capabilities file allows you to include additional projections for your feature types other the defaults. The defaults include the coordinate system of the layer or feature class and WGS84 (EPSG 4326). See the Advanced topics section below for more information on using external capabilities files.
The following characters cannot be included in any of the service properties: &, <, >, ", '. If you need to use one of these characters, you must substitute the appropriate escape sequence from the table below:
| & | & |
| < | < |
| > | > |
| " | " |
| ' | ' |
A WFS service exposes an ArcGIS Server map or geodata service to WFS consumers. The security for a WFS service is managed by controlling the security of its parent map or geodata service. If a particular role, for example Planners, is denied access to a map, then Planners will not be able to access the map no matter whether they try to consume it through SOAP, REST, or WFS interfaces.
ArcGIS Server supports a number of different authentication schemes. Services that are expected to be accessed via OGC interfaces should be secured using HTTP Basic, HTTP Digest, or Integrated Windows Authentication. Most OGC clients (both non-ESRI as well as ESRI clients) will understand and work with these widespread standard authentication schemes.
When you create a WFS service with ArcGIS Server, it can be used in any client that supports WFS.
A Web browser is the simplest client of a WFS service. WFS requests can be issued through HTTP, and the responses or exceptions are returned through the browser. All WFS services support three operations: GetCapabilities, DescribeFeatureType, and GetFeature. Through URL parameters, you can use these operations to obtain service metadata, feature type information, and GML-encoded features from the WFS service. These operations and parameters are detailed in the OGC WFS specifications.
There are many third-party clients available for consuming WFS services. To consume WFS services created by ArcGIS Server, the client must support WFS 1.1 or 1.0 and the Simple Features Profile of GML.
The out-of-the-box Web Mapping Application that comes with ArcGIS Server does not support the addition of WFS services. However, ArcCatalog and ArcMap can work with WFS services. For help with using WFS services in ArcMap, see WFS support in ArcGIS.
The WFS 1.1 specification indicates that for many geographic coordinate systems, including WGS84, coordinates are returned in the order lat, long (y, x). WFS services published through ArcGIS server follow this specification. Some WFS clients, however, expect the coordinates to be returned long, lat (x,y). In this case, you can choose to swap the coordinate order for features returned from the WFS service and return long, lat. See Advanced topics below for more information.
To connect to the service, you'll need to know the URL. The URL follows this pattern:
http://<server name>/<instance name>/services/<folder name (if applicable)>/<service name>/<service type>/WFSServer?
For example, if you enabled the WFS capability on a map service WFSDemoService in a folder DemoFolder on a server MyServer with the default instance name of arcgis, the URL
would be as follows:
http://MyServer/arcgis/services/DemoFolder/WFSDemoService/MapServer/WFSServer?
Similarly, if you enabled the WFS capability on a geodata
service, the URL would be as follows:
http://MyServer/arcgis/services/DemoFolder/WFSDemoService/GeoDataServer/WFSServer?
When you work with WFS services, you can use a series of filters to select groups of features. WFS services created with ArcGIS Server use the OGC OpenGIS Filter Encoding Implementation Specification (FE) version 1.1. These are the filters you can apply:
| Geometry | Spatial | Logical | Comparison | Sort |
| Envelope | BBOX | And | EqualTo | SortBy* |
| Point | Equals | Or | NotEqualTo | |
| MultiPoint | Disjoint | Not | LessThan | |
| MultiCurve | Intersects | GreaterThan | ||
| MultiSurface | Crosses | LessThanOrEqualTo | ||
| Touches | GreaterThanOrEqualTo | |||
| Within | Like | |||
| Contains | Between | |||
| Overlaps | NullCheck |
Examples of using GetFeature with these filters can be found in section 9.5 of the Web Feature Service Implementation Specification.
The FeatureID parameter can be used in GetFeature requests to request specific features in a WFS service. The FeatureID parameter consists of the FeatureType and the gml:id not the OBJECTID of the feature. The format of a FeatureID for a feature in an ArcGIS WFS service is <FeatureType>.<gml:id>. One method to identify the gml:id of a feature in a WFS service is to do a GetFeature request on the FeatureType of interest.
For example: There is a FeatureType called Cities in a WFS service. If you do a GetFeature request for the Cities the response will include the gml:id for each feature.
URL example: http://bobmk/arcgis/services/wfs_services/ArcSDE_wfs/GeoDataServer/WFSServer?request=getfeature&typename=cities
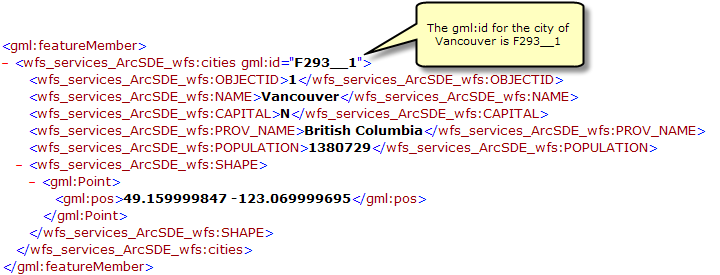
In this example the FeatureID for the city of Vancouver would be cities.F293__1. The following request could be used to specifically request the city of Vancouver using the FeatureID: http://bobmk/arcgis/services/wfs_services/ArcSDE_wfs/GeoDataServer/WFSServer?request=getfeature&featureid=cities.F293__1
Map services and geodata services are what you use to publish data from ESRI data sources such as the geodatabase. When you publish a map or geodata service with the WFS capability, the data can be accessed by OGC-compliant WFS clients. These WFS clients can also see the latest changes made to the data.
When a request comes in from a WFS client such as a viewer, the data is returned as it exists in the data source at that time. For example, suppose you have a map document containing a feature class. This feature class comes from a file geodatabase. Now you publish that map document as a map service and enable the WFS capability. A client with a WFS viewer can access the data in the feature class using the WFS URL provided by the map service.
Now suppose someone else accesses the source file geodatabase and adds, updates, and deletes features in the feature class. The next time the client with the WFS viewer refreshes, they will see the data with the most recent edits.
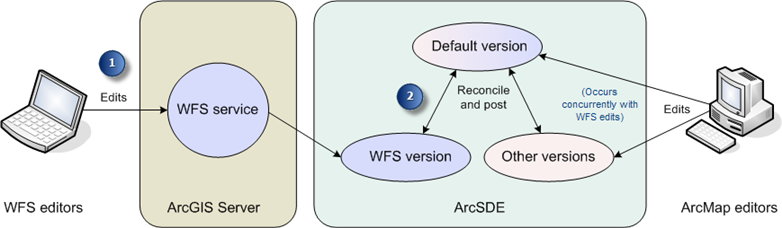
When the data source is an ArcSDE geodatabase, geodata services and map services publish data from a specific version. If data is edited in that version, both WFS clients and non-WFS clients will see these changes. However, if edits are made in other versions, clients will not see the changes until they are reconciled in to the published version.
This gives you more control over the data exposed through your services. Suppose you publish some data with the WFS capability from a version named WFS. Clients with WFS viewers then start to access the data through your service. Meanwhile, editors in the office use ArcGIS to update the Default version. The changes made by the editors are then checked and adjusted if necessary. Once the evaluation is complete, the WFS version is reconciled with the Default version. At this point, the WFS clients will see the latest updates from the editors.
A transactional WFS service (sometimes known as WFS-T) allows WFS editors to apply changes to the data in the source database through the WFS service. To apply changes through WFS-T, the data must be from an ArcSDE geodatabase and it must be versioned. It is also recommended that you publish the service from a nondefault version. To publish your geodatabase as a transactional WFS service, follow these steps:
Once transactions are enabled, WFS clients can apply changes to the geodatabase using transactional WFS methods. The following is an example of how changes can be applied:
When the edits are posted, the locks are released and the features can be edited by other WFS editors. Locks can also be released if they time out. By default, locks will time out after 5 minutes, but this can be adjusted by specifying a time-out in minutes using the GetFeatureWithLock method. An administrator can set the default time-out by manually editing a configuration and setting the element DefaultLockExpiration (time in minutes).
When a client requests a lock using GetFeatureWithLock, a feature collection with the locked features and a lockID is returned. If any of the requested features cannot be locked, the request will fail and the client will need to call GetFeatureWithLock again. Other clients will be prevented from acquiring locks on these features until the locks are released.
Insert-only transactions do not require features to be locked. Since existing features are not being modified (updated or deleted), there is no need to call GetFeatureWithLock. Any transaction requests with updates or deletions must have a lockID.
When changes are posted through WFS-T, they are applied to the published version. The power of versioning allows you to expose your geodatabase to both WFS and non-WFS editors and to effectively merge the edits made by the two groups with full conflict detection. To merge edits, you can reconcile and post the published WFS-T version with its parent. If there are outstanding locks, the system will not allow reconcile and post to succeed. This is to prevent conflicts between features locked by a WFS-T client and features changed because of the reconcile and post process. In addition, reconcile and post will lock the published version, preventing GetFeatureWithLock and Transaction calls during the reconcile and post process.
Feature locks are kept on the server by means of a locks table. The locks table is created when transactions are enabled and appears as a regular table in the geodatabase. The table is named following the convention VERSION_<versionID>_ROW_LOCKS. To prevent reconcile and post from being blocked, administrators may want to delete outstanding locks by directly deleting rows from the locks table before calling reconcile and post.
The published WFS-T version shouldn't be edited using ArcGIS. An ArcGIS editor isn't aware of feature locks and therefore locked features may be edited. In such a case, the edits made in ArcGIS may cause conflicts that prevent the WFS-T client from uploading its changes. Creating and editing child versions of the published version may also cause similar problems if changes are reconciled and posted into the published version.
Multiple WFS-T services can reference the same published version since all of them share the same locks table. There is a 1 to 1 association between the published version and its locks table.
If you disable transactions or remove the WFS service, the locks table will not automatically be deleted. Once there are no longer any WFS-T services referencing the version, this table can be deleted manually.
This section contains advanced items of information regarding WFS services:
Publishing a WFS service using external capabilities files is aimed at users who are familiar with OGC WFS specifications and WFS capabilities files syntax. This option gives you maximum flexibility to customize your WFS services. With external capabilities files you can
Publishing a WFS service using an external capabilities file saves the time it takes to create the capabilities file from scratch each time the service is accessed. This may improve the speed in connecting to your WFS service, especially when there are many type names in your service. However, if you make changes to the service's underlying map document or geodatabase, you must also update the capabilities file accordingly for the service to continue working.
There are two different methods that can be used to create an external capabilities file. You can create the capabilities files from scratch in an XML or text editor. You can also generate a capabilities file by publishing a WFS service with the defaults and then calling GetCapabilities from a web browser. The contents returned from the GetCapabilities requests can be saved as xml file, modified as desired and used as the external capabilities file. How to structure and fill in the content of the external capabilities file is beyond the scope of this help system, but more information is available at the Further reading link at the end of this topic.
As of ArcGIS 9.3 SP1, ArcGIS Server is compliant with both 1.1.0 and 1.0.0 OGC WFS specifications. As a result, the steps to create and use external capabilities files for ArcGIS 9.3 SP1 have changed. The following steps will cover how to create external capabilities files from an existing WFS service and how to publish a WFS service using these files. Steps will be included for both ArcGIS 9.3 and the new process starting at ArcGIS 9.3 SP1.
How to create and publish a WFS service with external capabilities files at ArcGIS 9.3
Part 1: Creating an external capabilities file from an existing WFS service
Part 2: Creating a WFS Service with an external capabilities file at ArcGIS 9.3
Once the capabilities file has been created, it can be placed in a folder accessible to the SOC and the Server. For example, the file can be placed in the same folder as the Geodatabase or Map Document of the service. A URL location can also be used.
An existing service that is using the default properties can be updated to use an external capabilities file, or a new service that references the external capabilities file can be created. The steps below describe how to publish a WFS service with an external capabilities file.
How to publish a WFS service with the external capabilities files:
How to create and publish a WFS service with external capabilities files as of ArcGIS 9.3 SP1
As of ArcGIS 9.3 SP1, ArcGIS Server is compliant with both 1.1.0 and 1.0.0 OGC WFS specifications. As a result, two external capabilities files are required, one that references 1.1.0 specifications and one that references 1.0.0 specifications.
Part 1: Creating external capabilities files from an existing WFS service
Part 2: Creating a WFS Service with an external capabilities file as of 9.3 SP1
Once the capabilities file has been created, it can be placed in a folder accessible to the SOC and the Server. For example, the file can be placed in the same folder as the Geodatabase or Map Document of the service. A URL location can also be used. It is important to note that as of ArcGIS 9.3 SP1 both files must be placed in the same location.
An existing service that is using the default properties can be updated to use an external capabilities file, or a new service that references the external capabilities files can be created. The steps below describe how to publish a WFS service with the external capabilities files.
How to publish a WFS service with the external capabilities files:
Adding spatial reference systems to an external capabilities file
Although you can request a map from the WFS service using any of the hundreds of supported spatial reference systems, some WFS clients will return an error if the spatial reference you request does not appear in the capabilities file. Other clients, such as the Data Interoperability extension, only allow you to switch among the spatial reference systems listed in the capabilities file.
You can manually add more spatial reference systems to the external capabilities file of your WFS service. External capabilities files are described above.
Features returned in some geographic coordinate systems (for example, WGS 84) have an axis order of lat, long (y,x) by default. This is in compliance with the WFS 1.1 specification. For example, a point may be returned from a getfeature request with its coordinates specified as follows:
<gml:Point>
     <gml:pos>48.4922165520043 -122.630685732366</gml:pos>
</gml:Point>
Some WFS clients expect the coordinates to be returned with an axis order of long, lat (x,y). To work with these clients, you can set the axis order for the service to be long, lat. The following describes how to set the property:
In the WFS section, add the following to the properties: <AxisOrderWFS11>longlat</AxisOrderWFS11> For example:
<Extension>
		<TypeName>WFSServer</TypeName>
		<Enabled>true</Enabled>
		<Properties>
			<AxisOrderWFS11>longlat</AxisOrderWFS11>
			<CustomGetCapabilities>false</CustomGetCapabilities>
			<EnableTransactions>false</EnableTransactions>
			<Name>wfs_WFSTest_ras</Name>
			<OnlineResource>http://bobmk/arcgis/services/wfs/WFSTest_ras/MapServer/WFSServer</OnlineResource>
			<AppSchemaURI>http://bobmk/arcgis/services/wfs/WFSTest_ras/MapServer/WFSServer</AppSchemaURI>
			<AppSchemaPrefix>wfs_WFSTest_ras</AppSchemaPrefix>
		</Properties>
		<Info>
			<WebEnabled>true</WebEnabled>
		</Info>
	</Extension>
Features with geographic coordinates requested from the service are now returned with a long, lat axis order.
Note that the axis order property only applies to features with geographic coordinates. Features with projected coordinates are always returned with an x, y axis order.
The type names generated for WFS services defined from ArcSDE geodatabases will be based on the unqualified name of the feature class by default. For example, the type name for a feature class named bob.buildings will be buildings.
You can set a property to include the fully qualified name when the type name is generated. You may want to do this if more than one feature class has the same name but a different owner in the geodatabase. When the fully qualified name is used, the type name for bob.buildings will be bob_buildings.
The following describes how to set the property to use the fully qualified name:
In the WFS section, add the following to the properties: <UseQualifiedName>true</UseQualifiedName> For example:
<Extension>
		<TypeName>WFSServer</TypeName>
		<Enabled>true</Enabled>
		<Properties>
			<UseQualifiedName>true</UseQualifiedName>
			<CustomGetCapabilities>false</CustomGetCapabilities>
			<EnableTransactions>false</EnableTransactions>
			<Name>wfs_WFSTest_ras</Name>
			<OnlineResource>http://bobmk/arcgis/services/wfs/WFSTest_ras/MapServer/WFSServer</OnlineResource>
			<AppSchemaURI>http://bobmk/arcgis/services/wfs/WFSTest_ras/MapServer/WFSServer</AppSchemaURI>
			<AppSchemaPrefix>wfs_WFSTest_ras</AppSchemaPrefix>
		</Properties>
		<Info>
			<WebEnabled>true</WebEnabled>
		</Info>
	</Extension>
If you're interested in reading more about WFS services, see these additional resources: