Geoprocessing task


Geoprocessing task |
|
| Release 9.3 |
|
With the Geoprocessing task, you can make use of services that run ArcGIS geoprocessing jobs on the server and send the results back to the client application. The Geoprocessing task requires an ArcGIS Server geoprocessing service, which you add as a Supporting Service. Geoprocessing services are based on models and can be published from either a toolbox or a map document containing a tool layer. See the ArcGIS Server Help book "Geoprocessing services" for more information on how to create a geoprocessing service.
The Geoprocessing task gives you access to much of the functionality of ArcGIS without having to add custom code to your web application. For example, you can use the Geoprocessing task to access network analysis tools, select features, run geostatistical analysis models, and so on without needing to learn ArcObjects or web programming. You just create the model in ArcGIS Desktop, publish a geoprocessing service, and use the service in the Geoprocessing task. The "Geoprocessing services" book mentioned above contains many examples of functionality you could expose through geoprocessing services and tasks.
When you add a Geoprocessing task to your application in Manager, remember these required steps:
The Task Configuration dialog box also has a setting for the virtual directory where the result data file will be written. Set this property if your users will be running asynchronous tasks whose results will need to be viewed in a future browser session.
The path is relative to your IIS Web Site, not your local file system. For example, you might have a virtual directory configured on C:\arcgisserver\arcgisoutput that you typically access through the URL http://server/arcgisoutput. In this case, you would put "/arcgisoutput" as the path where the result information would be written.
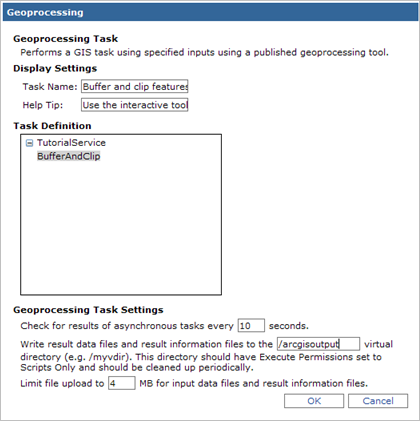
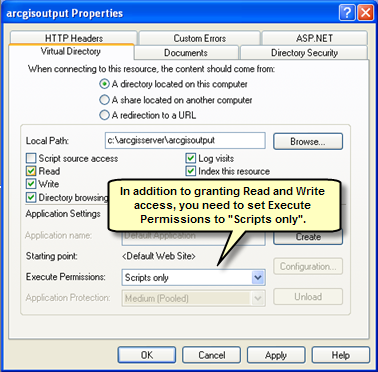
The virtual directory must have Read and Write access and "Scripts Only" execute permissions enabled. You can set these permissions in the virtual directory's Properties dialog in IIS Manager.
When you open a Geoprocessing task, you will see a dialog box that allows for specification of the model parameters. For example, if the underlying model requires a line feature class as input, the dialog box will include tools for drawing lines. Once you've specified all the parameters, you can then invoke the model by clicking a button on the task. As the job runs, you can see any messages from the task on the Results panel. When the task has completed, the results will appear on the map.
Note: If you are using ArcGIS Server 9.2 geoprocessing services, the results will only appear if one of the following conditions is met:
Geoprocessing services have a property that determines whether they run synchronously or asynchronously. Use synchronous services to run short jobs for which the user expects to view the results right away. Use asynchronous services for longer tasks, especially those that might exceed the default ConnectionTimeout of 2 minutes in IIS.
If the service is configured to run asynchronously, you have the option to view the task results even after you exit the Web application. If the task has not finished executing before you close the browser, and if you have cookies enabled, the results will be retrieved automatically the next time you visit the Web application. If you don't have cookies enabled, you can click the Save link on the results node to save the result information to a file. You can use this file to check task results in a later session.
The Save link is only available if the Geoprocessing task has a virtual directory denoted (see Step 4 above). This virtual directory must have Read and Write access as well as "Scripts only" execute permissions enabled. If the service is configured to run synchronously, no Save link appears and you must keep the session alive to view the results when they become available.
The results of a Geoprocessing task can be drawn either on the server or by the Web ADF. If the result is drawn by the Web ADF, you will be able to zoom and pan to the results and see the results listed as individual features. By default, the results will be drawn by the Web ADF unless the geoprocessing service that you used to configure the task has an associated map service, in which case the results will be drawn on the server. You can change this behavior in Visual Studio by setting the task's DrawResultsOnMapServer property to False.
The ArcGIS Server Help topic "Tutorial: Publishing a geoprocessing service" includes steps for configuring the Geoprocessing task and working with it in a Web application. The tutorial starts with building a model in ArcGIS Desktop, then works through the process of publishing the model as a geoprocessing service and configuring the Geoprocessing task so that the model can be run within a Web application.