Selecting layers to display


Selecting layers to display |
|
| Release 9.3 |
|
To select the layers to display in your application, you connect to one or more GIS servers and choose the map services you want to add as layers to your map. You can overlay map services from ArcGIS Server, ArcIMS, ArcWeb Services, and OGC (WMS) servers in one Web application. The map services appear as layers in the Web Mapping Application and allow users of the application to work with the individual sublayers within the map services as well.
Each layer in the Web application has a set of properties that you can configure. For example, when overlaying layers, you can set the transparency so that you can see underlying layers. By default, the background of all but the bottom layer is made transparent. You can also set properties on the sublayers inside a layer. For example, you can adjust the field aliases and visibility, set a drawing symbol, and control how attributes display when running tasks that use the sublayer as input.
You can add layers to the map using the Layers tab in Manager.
Examine the list of available GIS servers. If the server containing your layer does not appear on the list, click Add GIS Server and choose the type of server you want to add:
ArcGIS Server Internet
This option connects to an ArcGIS Server through HTTP, allowing the use of the GIS server over the Internet.
To make an ArcGIS Server Internet connection, you will be prompted to enter the URL of the server. This will take the form http://<server>/<instance>/services. In most cases, the instance will have the default name, which is ArcGIS.
If you're connecting to an ArcGIS Server Internet service that requires a login, click Access Secure Services. You can enter the user name and password at this point.
An ArcGIS Server Internet connection cannot be used for layers that will be edited over the Web or any layers that will be worked with through fine-grained ArcObjects. Avoid using ArcGIS Server Internet connections to access nonpooled services.
ArcGIS Server Local
An ArcGIS Server Local connection is used for connecting to a GIS server on a local area network. ArcGIS Server Local connections are typically used when creating Web editing applications, such as those containing the Editor task.
To make an ArcGIS Server Local connection, you must enter the name of the GIS server you want to connect to (specifically, the machine running the server object manager, or SOM). You'll also see an additional panel of the wizard containing some information about the user account that your Web application will use for connecting to the local server.
ArcIMS
Use the ArcIMS option for adding ArcIMS Image and ArcMap Image Services. Feature and Metadata Services are not supported in a Web Mapping Application.
To add an ArcIMS service, you will be prompted to choose either a TCP or HTTP connection. For a TCP connection, you must specify a host and port. The host is the server where the ArcIMS application server resides. The machine must be on the same network as the Web server. The port is the port used for the Application Server, and the default is 5300. For an HTTP connection, you must specify the URL of the server you want to access. For example, if the server is mymachine, the URL is http://mymachine.
ArcWeb Services
ArcWeb Services is a set of GIS and mapping Web services hosted and maintained by ESRI. Some of these services are available to the public; others are only available on a subscription basis.
You can add ArcWeb Services to your map by providing the name and password of your ArcWeb Services account. Once you do, you'll see a list of available ArcWeb Services that you can choose for your map.
OGC WMS
You can add services to your map that support the Open Geospatial Consortium, Inc. (OGC) Web Map Service (WMS) specification. The Web ADF supports WMS versions 1.3.0, 1.1.1, 1.1.0, and 1.0.0. You must provide the URL of the service you want to add. The dialog gives example URLs for WMS services published with ArcIMS or ArcGIS Server. WMS services published in other ways may have different URL structures.
Once you have entered the connection information for the server as described above, click Add.
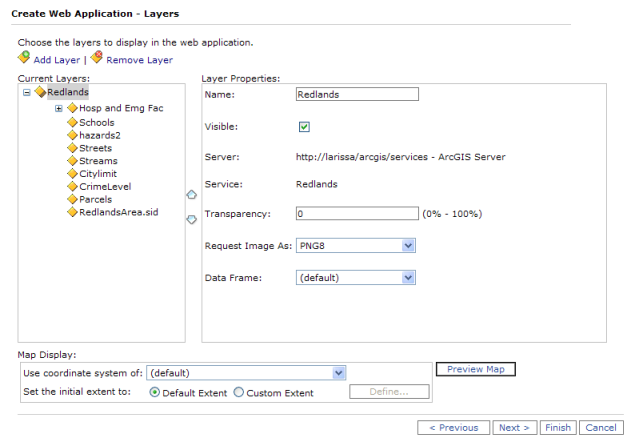
Once you've added some layers to the Current Layers list, you can set properties such as the name, transparency, and position of the layer. The following properties are available:
Seamless Panning - When checked, the layer will be redrawn while panning to create a seamless look. When unchecked, the layer will redraw only when panning stops. Disabling seamless panning provides better performance because only one image is requested.
You can only set seamless panning in Manager if you have ArcGIS Server 9.3 Service Pack 1 or higher. Otherwise, use the Dynamic Tiling property in the Map Resource Display Settings Editor in Visual Studio. For more details, see the MapResourceManager Control topic in the Developer Help.
To order the layers, use the up and down arrows between the Current Layers list and the Layer Properties.
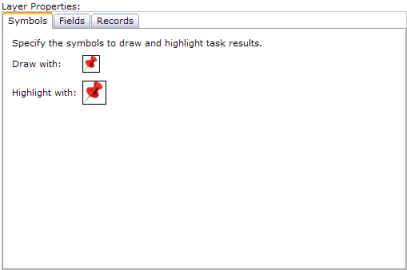
Clicking a sublayer inside a layer reveals additional properties for that sublayer. You'll see three categories of properties: Symbols, Records, and Fields. These properties allow you to specify how you want to draw and display attribute information for features in the sublayer. The Web Mapping Application uses these settings when identifying features and displaying task results as Map Tips.
The Symbols category represents how the layer should draw its features found through executing a task, like the Search or Query Attributes task. These symbols are only used when drawing task results.
The Fields category controls the display of field attributes for the layer when viewed in tabular form, such as when printing task results.
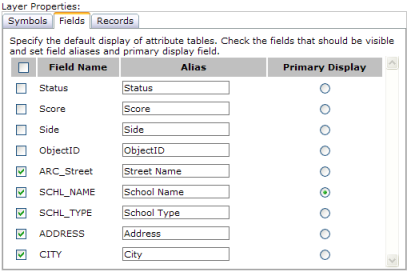
You can check those fields that should be visible and type in a more user friendly name with the field alias. The primary display field is used to summarize the record. For example, the Identify tool uses the primary display field in its results to help the user quickly recognize the record returned. Typically, the primary display field is a name field.
For ArcGIS Server map services, the settings you initially see in the Fields category reflect the field aliases, visibility, and primary display field as defined in the source map document (.mxd) for the map service. The settings you specify in Manager override the map document settings only for the particular Web application you're creating. If you want to reuse these settings in other Web applications, you should consider setting the field properties in the source map document using ArcMap instead of setting them in each Web application in Manager.
For services that are not ArcGIS Server services and don't provide field settings, all fields are visible by default and the alias is the same as the field name. The primary display field is set by default to the first string field with "name" in it. If no such field is found, it is the first string field. If there are no string fields, it is the first numeric field.
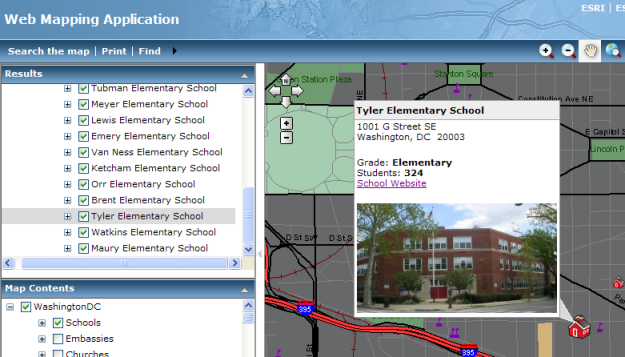
The Records category defines how to format the display of attribute information for an individual record in the layer. These settings define the content of the Map Tip window that appears when you click on a task result and the content of the Identify window that displays when using the Identify tool. For example, here's a Map Tip showing information about a particular school.
If you don't specify any record formatting, you'll get a simple list of field names and values based on the field visibility and alias settings set on the Fields tab. Alternatively, you can choose to display records using your own custom formatting.
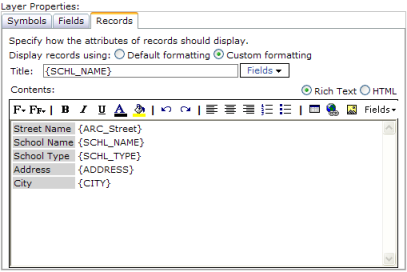
To apply your own custom formatting to the records, click the Custom Formatting option to enable the text editor on this tab. You can set the title, or summary of the record, that appears in the title bar of the window and the contents, or detailed information about the record.
There are two ways you can edit the contents: in Rich Text view or in HTML view. In HTML view you can enter any valid HTML. In Rich Text view, you can use the toolbar to set the font name and size, as well as insert hyperlinks and images. Here are the list of tools available to you on the toolbar:
At the bottom of the Layers tab is a set of map display properties. These allow you to configure the coordinate system and visible extent of the map in the Web application.
Set the initial extent to - Sets the map extent that will display when the Web application starts. The default is the full extent of the Primary Map Resource. A custom extent is useful if you want the initial view to contain just a portion of the map.
When you choose to use a custom extent, a preview window appears that allows you to set the extent interactively. You can pan and zoom the map, and the coordinates for the lower left and upper right will update accordingly. When you've determined the extent you want, click OK.
When you're done selecting layers and are ready to configure tasks for your application, click Next to move on to the next portion of the wizard. Or if you're satisfied with how your map looks and you want to accept the defaults for the rest of the application settings, click Finish.
Next topic: Configuring tasks