| Setting site properties | |
| Setting site properties | |
The site properties for your ArcIMS site can be set in the Site Properties dialog in Administrator and in the Configure Site tab of Service Administrator. The site properties can be changed at any time. The following properties are available in both Administrator and Service Administrator:
On Windows, if your site includes Spatial Servers on a number of different machines, use Universal Naming Convention (UNC) path names to define the output directory location. Since Administrator requires forward slashes, the syntax //servername/sharename/path is used, for example, //mycomputer/ArcIMS/Output.
The clean-up interval is the amount of time an output file remains on the server before being deleted. Files in the output directory are continually checked by ArcIMS Tasker. When a file is at least as old as the cleanup interval it is deleted. If you choose None as the cleanup interval, output files are never deleted.
The image memory limit value represents the number of pixels that make up an image. An image 512 by 512 pixels represents about 1 MB of memory usage. The default memory limit is an image 1024 by 1024 pixels, which represents about 4 MB of memory usage. The actual image output size may be considerably smaller. For example, a 512 by 512 GIF file may only be 8 kb in size. When considering image limits, think in terms of the number of pixels, not the actual file size.
When a requested image exceeds the maximum size, the image is not generated, and the Spatial Server sends an error message. This protects your site from users requesting large images. Also, the larger the image, the longer it takes to generate.
You can have ArcIMS automatically resize images that exceed this limit by adjusting the autoresize attribute in the GET_IMAGE request for the map view and GET_LAYOUT request for the layout view.
If you have problems changing the image memory limit in Administrator, try using Service Administrator instead.
The following properties are specific to Administrator:
Service Administrator also has some additional properties in its dialog:
The properties you set are saved to a property file. For Service Administrator, the properties are saved to a file named sitePreferences.properties located in the ArcIMS installation AppServer directory. You should not need to directly modify this file. Any changes to the site properties should be made using Service Administrator.
For Administrator, the property file is named aimsdefaults.properties and is located in your user profile directory. This property file is used for Administrator, Author, Designer, and launching the Help system. Some of the properties are not available through the dialog in Administrator, and the property file must be edited. The properties are:
Note: the alias feature is not valid. Any changes you make will be ignored. | 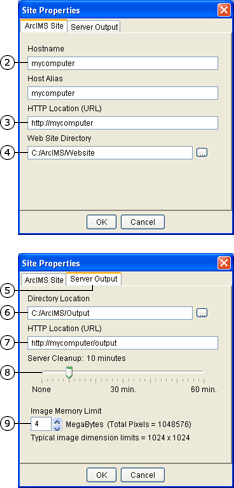 |
|  |
Windows: <Drive>:\Documents and Settings\<user account>
UNIX: $HOME