| Working with MapNotes | |
| Working with MapNotes | |
| Related Topics |
|---|
The MapNotes tools allow you to share ideas about data over the Internet. Use the MapNotes tools to add text or graphics about a map to a MapNotes layer, then submit your notes to ArcIMS Administrator. The MapNotes toolbar contains a full suite of tools to add, delete, and change the appearance of the notes that you create.
You can create more than one MapNotes layer during a single MapNotes session, but the total size of your MapNotes submission cannot be more than 100 KB. If you have many notes to submit, you must submit them in different sessions or the ArcIMS site administrator must increase the submission limit.
When you click the MapNotes button, the MapNotes toolbar appears. Existing MapNotes layers created by you or other users are automatically loaded. Use the following tools to create and edit MapNotes layers. When you are done, submit your MapNotes. A MapNotes item will appear in Administrator's MapNotes folder with a time stamp and description. After you have submitted your layer, others accessing the same Internet GIS application will also be able to see the MapNotes layer you created.
The description of a MapNotes layer can be viewed by others using the MapNotes and is listed, along with the MapNotes layer name, in ArcIMS Administrator. See Working with Folders in Administrator to see a listing of submitted MapNotes using ArcIMS Administrator.
MapNotes has been deprecated and may not be available in a future release.
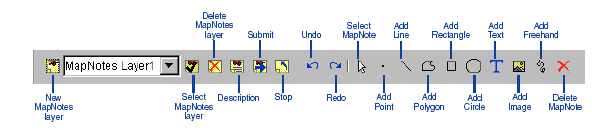
New MapNotes Layer: Creates a new MapNotes layer.
Select MapNotes Layer: Makes your chosen layer the active layer.
Delete MapNotes Layer: Deletes the current MapNotes layer from the list of available layers.
Description: Opens a dialog box in which you can type a description of the MapNotes layer.
Submit: Submits the current MapNotes session to ArcIMS Administrator.
Stop: Stops your MapNotes session and closes the MapNotes toolbar.
Undo: Removes the most recently added text or graphic from the layer.
Redo: Reintroduces text or graphics that were removed using the Undo button.
Select MapNote: Selects the text or graphic item that you click.
Add Point: Adds a point to the layer.
Add Line: Adds a line to the layer.
Add Polygon: Adds a polygon to the layer.
Add Rectangle: Adds a rectangle to the layer.
Add Circle: Adds a circle to the layer.
Add Text: Adds text and allows you to change the font style and color.
Add Image : Adds an image to the layer.
Add Freehand: Adds a freehand line to the layer.
Delete MapNote: Deletes the selected text or graphic item from the MapNotes layer.
When you are finished creating a line, freehand line or text, or polygon, double-click the map to complete your graphic.
After you have navigated to an image, add it to the map by clicking the location where you want it.
After you have set text properties, add the text to the map by clicking the location where you want it.
Java Custom Viewer: Click the Select MapNotes Layer button on the MapNotes toolbar. Click a layer in the dropdown list on the dialog box that appears then click Select.
Java Standard Viewer: Click the dropdown arrow on the MapNotes toolbar and click a layer.
If you made a mistake and want to undo it, click the Undo button. If you undid something and want to put it back to the way it was, click the Redo button.
The MapNotes toolbar will close if you click another tool on the Java Custom Viewer toolbar. To reopen the MapNotes toolbar, click the MapNotes button.
As an alternative to selecting MapNotes layers from a dropdown list, you can select layers interactively. Click the Select MapNotes Layer in the Java Standard Viewer or Select MapNotes Layer from Map in the Java Custom Viewer, then click the MapNotes icon on the map.