Introduction
The Data Download page is an optional component providing clip-zip-ship data download functionality for vector data. The data download interfaces with an ArcGIS Server Map Service and Geoprocessing service to provide the download clip/zip functionality. Note: The Data Download page can be configured for raster data, but requires customization best carried out through ESRI Professional Services. If you are interested in contracting support for raster Data Download, please contact portal@esri.com to discuss your project.
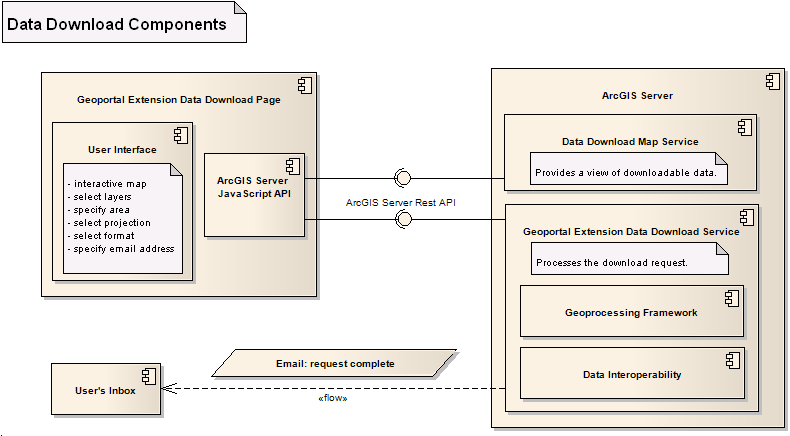
When downloading data, a user will draw the area they wish to download, select layers for download, select an output projection and format, and supply their E-Mail address. The Geoportal extension data download page will then take the data from the input fields and use them as inputs to the data download geoprocessing service. When the request has been completed, an E-Mail message will be sent to the user with an attached ZIP file of their data (or alternatively, a link to a virtual directory to pick up the file can be sent instead. This customization is discussed in 'Option: Send Link to Virtual Directory'). For more information on how to use the feature, see How to Use the Data Download Feature.
The figure below shows the primary components of the Data Download functionality and the communication interfaces among them.
IMPORTANT:
The Data Download customization does not come standard as part of the default Geoportal. The sample discussed in this section should be used as a
starting point
to create a customized task that suits your organization's needs. To implement the task, you can use the clip-zip-ship functionality provided with the Geoportal extension installation files, or you can configure Data Download with your own geoprocessing task.
For Data Download to be functional in the Geoportal, the following must be present and configured:
- Map service to provide the view of the downloadable data
- A Geoprocessing Service to extract and process the selected data. The geoprocessing service must have the following parameters defined, and follow conventions of the GP Service example: Clip and ship
- A mail server to send the clipped and zipped data to the requesting user via email
- The ArcGIS SOC account must have access to the data sources used in your two mxds. Access must be Full Control (Read, Write, and Execute). If your data is in SDE, then the ArcSOC account must have these same privileges to the data. The ArcSOC account must also have Full Control privileges to the Clip and Ship folder and the arcgisserver folder.
- The ArcGIS Server machine must have access to the JavaScript API reference found in your gpt.xml file at the <interactiveMap jsapiUrl parameter. By default, this refers to the JavaScript API hosted on ArcGIS Online. If your geoportal will not have external internet access, you may have to deploy a local instance of the JavaScript API. Instructions for installing the JavaScript API locally are part of the ArcGIS JavaScript API product.
- Data Interoperability extension installed and enabled in ArcGIS Desktop. The Geoprocessing task used in this sample calls the Quick Export tool in the Data Interoperability toolbox. This tool is available only when the Data Interoperability Extension is installed (an option when you run the ArcGIS Desktop installation) and enabled. Full licensing for the Data Interoperability Extension is not required for this tool to be available. After verifying that this extension has been installed, enable the extension using the Tools\Extensions menu in ArcMap. Then, add the Data Interoperability Tools Toolbox to your list of toolboxes in ArcMap when you author the mxd documents used in the map service and geoprocessing maps.
- Optional: Fully licensed Data Interoperability extension for ArcGIS Desktop and ArcGIS Server to provide certain additional output formats.
Configuration and customization of python files will be necessary. For information on how to customize geoprocessing tasks using python, see
GP Service example: Clip and ship,
Python scripts to zip and unzip data, and the
Geoprocessing Resource Center.
Configure DataDownload Tab
This section describes how to configure the Geoportal to enable data download from a custom map document using the Clip and Ship geoprocessing task. This is a sample, and may require customization and testing by your organization to suit your organization's needs. Configuring Data Download for the Geoportal entails four major steps:
- Create the necessary map service and geoprocessing service maps
- Configure the ClipAndShip task itself for use in the geoprocessing service
- Publish the maps as ArcGIS Server map and geoprocessing services
- Configure the Geoportal to use the services in the Data Download tab
For detailed descriptions of topics discussed in this document, please read the following ArcGIS Desktop Help topics. To access the first three, open ArcGIS Desktop Help and activate the "Contents" tab. Open the section on "Geoprocessing", and then the section titled "Geoprocessing with ArcGIS Server".
- An overview of geoprocessing with ArcGIS Server
- Preparing map documents containing tool layers
- Publishing geoprocessing services
- Using Data Interoperability with ArcGIS Server
The final section addresses how to get additional information on ArcGIS publishing and configuration topics mentioned in this document.
Create the necessary map service and geoprocessing service maps
Two map documents must be prepared for the ClipAndShip task. The documents can be named whatever suits your organization. In this guide, the first document is called "Data_for_Download.mxd", and will be used to create a map service (within ArcGIS Server) that will appear on the Download Data page of the Geoportal. The second map document will be called "ExtractData_GeoProcessTask.mxd" in this guide, and will be the basis for a Geoprocessing (GP) service created within ArcGIS Server. This GP service will be used to clip and deliver the data to the end user. The ExtractData_GeoProcessTask.mxd will have the same layers as the Data_for_Download.mxd except for the additional geoprocessing tool layer.
- These instructions for the ClipAndShip geoprocessing task will not work with raster data. Therefore, the two mxd's that you prepare below should not contain raster data layers. Note: For a Data Download page with raster data, it is recommended working with ESRI Professional Services for a custom project. Contact portal@esri.com to discuss your project.
- The Geoportal Data Download page can only display layers within one level of a Group layer in the Map Service. For example, below are three screenshots of the Table of Contents in ArcMap for three different mxd map documents. The one on the left would display all layers for download in the Geoportal. The one in the middle would also display all the layers, even though they are within a Group layer. The one on the right would not display the layers in the second Group layer, shown in red, because they are a Group within a Group.
 Prepare Map Documents
- Prepare Data_for_Download.mxd
To prepare the "Data_for_Download.mxd" document, do the following:
- Open a map document (a new one or existing one that you want to use for "Data_for_Download.mxd") in ArcMap, and add the feature layers the map will use.
- Save the document as an mxd file and name it "Data_for_Download.mxd".
- Prepare ExtractData_GeoProcessTask.mxd
- Copy the ClipAndShip.zip file from your <Geoportal Distribution CD>\Desktop Tools\Geoprocessing Tools folder and onto your local machine.
- Unzip ClipAndShip.zip into the file system of the machine running ArcGIS Server. For example, you can unzip the zip file under C:\ drive of the Windows server running ArcGIS Server.
Ex: C:\ClipAndShip
- Make a copy of the map that you used for "Data_for_Download.mxd", and rename it to "ExtractData_GeoProcessTask.mxd".
- In ArcMap, verify that the same layers you used in your "Data_for_Download.mxd" are present in the "ExtractData_GeoProcessTask.mxd" file.
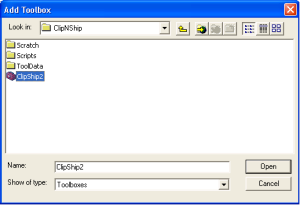
- In ArcMap, import the tool "ClipShip2" into an ArcToolBox panel. You can import the tool by opening the ArcToolbox window. Then, right click on the ArcToolbox at the top level of tools in the ArcToolbox window, and select "Add Toolbox". Browse to the folder where you unzipped the ClipAndShip.zip file, select the ClipShip2 toolbox, and click the 'Open' button.
- In the Toolbox window, expand the "Clip and Ship version 2" toolbox name, and then expand the "Clip, Zip, and Email utilities" tool.
- Drag and drop the "ExtractDataTool" script into the ArcMap table of contents, placing it just below the Data Frame heading (in this case, the Data Frame is named "Layers"):

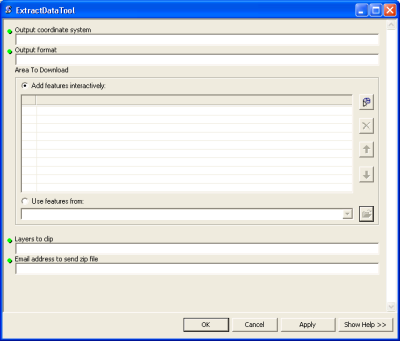
- Right-click the ExtractDataTool layer and click Open. You should see a dialog box similar to the one shown below.
- Close the dialog box and save the file as "ExtractData_GeoProcessTask.mxd".
Configure the ClipAndShip task itself for use in the geoprocessing service
Before the tool is published, some customization needs to take place. Follow the steps below to prepare the ClipAndShip Task to be used in the geoprocessing service.
Set Polygon Parameters
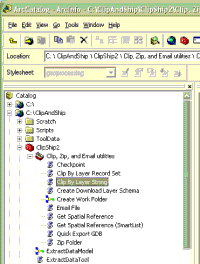
- Open ArcCatalog and connect to the unzipped ClipAndShip file, using the "Connect to Folder" button.
- Navigate to the ExtractDataTool script under the "ClipShip2" toolbox, as shown below.
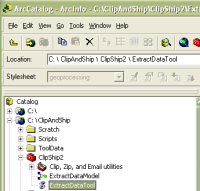
- Right click "ExtractDataTool", and click "Properties" in the pop-up menu.
- Highlight the "Area To Download" attribute in the "Parameters" tab.
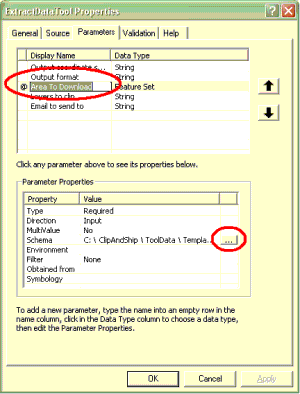
- In the "Parameter Properties" for Area to Download, find the "Schema" property. Click the "..." next to it in the "Value" column. A browsing window will open.
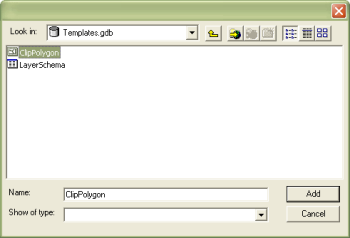
- Navigate to your unzipped ClipAndShip folder, then to the "ToolData", and then to "Templates.gdb". Then, click the "ClipPolygon" feature class, and click the "Add" button.
- Click "OK" to close the ExtractDataTool Properties dialog box.
- Expand "Clip, Zip, and Email Utilities" in ArcCatalog, right click "Clip By Layer String" script, and select "Properties" from the menu.
- Highlight the "Clip Features" attribute in the "Parameters" tab.
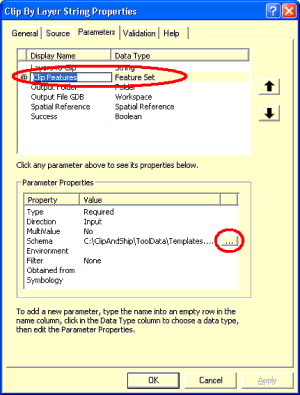
- In the "Parameter Properties" for ClipFeatures, find the "Schema" property. Click the "..." next to it in the "Value" column. A browsing window will open.
- Navigate to your unzipped ClipAndShip folder, then to the "ToolData", and then to "Templates.gdb". Then, click the "ClipPolygon" feature class, and click the "Add" button.
- Click "OK" to close the ExtractDataTool Properties dialog box.
Configure the Email Server
The geoprocessing task should be configured with your specific email server information. You can also customize the email title and message. The tool scripts below configure the messages that are sent to users who will download data from your Portal.
- Configure the "ExtractDataTool" Script
The Email configuration in this script is used to send error notification emails to a user if the user's data download request fails. It also sets the filepath of the Extract Data Tool's toolbox. To configure the settings for this file, do the following:
- In ArcCatalog, browse to the ExtractDataTool script (it will be in the red toolbox labeled ClipShip2), and right click the script. Select "Edit".
- The python script will open for you to edit.
- Inside of the python script, change the toolbox_path to reflect the location of unzipped ClipAndShip folder and toolbox name. In this example, it should be toolbox_path="C:\ClipAndShip\ClipShip2.tbx"
- Configure the Email server you are going to use. Change the "server" parameter to match your email server:
" server = "your.email.server.com"
- Configure Email: input your own organization name ("send_from"), the subject string ("subject_str"), and the custom message for the body ("email_body").
- send_from = "your organization name"
- subject_str = "We are not able to handle your request."
- email_body = "We are not able to handle your request, etc. (insert your own message)".
- Save the file and close it.
- Configure the "Email File" Script
The Email configuration in this script is used when the geoprocessing tool sends the data to a user. There are three scenarios that can occur when the data download request is successful:
- The data is zipped and emailed successfully to the user.
- The data is zipped but the user's email address does not accept the large zipped file.
- The data is not zipped, but is instead made available for user access from a link. This final option is not standard Data Download configuration, and requires custom python programming not documented in this guide.
To configure this script, do the following:
- In ArcCatalog, browse to the "Email File" script, located in the ClipShip2 toolbox, under the "Clip, Zip, and email utilities" tool in ArcCatalog. Right click the "Email File" script and click "Edit".
- Inside the python script, edit the following parameters with your own information:
- your email server: _email_server = "your.email.server.com"
- the sending organization name: _email_send_from = "Your Organization Name"
- a subject for the email: _email_subject = "Example: Your ZIP file containing your area of interest"
- a body message for a successful zipped data email: _email_body_zip_file_attached = " Example: Attached is a zip file containing the data in the area of interest you specified."
- a body message for if the zip file is over the mailbox size limit: _email_body_zip_file_oversize = "Example: The resulting zip file is too large (%sMB). Must be less than 5MB. Please digitize a smaller Area of Interest."
Note: If you want to include a file size limit in your email_body_zip_file_oversize parameter, do not change the coding for "(%sMB)". This is python coding that will insert the file size of your deliverable zip file.
- a body message for data that is accessible via a link instead of attached to the email, if this functionality is available:_email_body_link_attached = "Example: Click the link below to open zip file containing the area of interest you specified."
- Save the file and close it.
Test the Script Configurations by Running the ExtractDataModel
IMPORTANT:
This next step will test that you have correctly configured the data download scripts. If this test does not result in a zip file successfully mailed to your email inbox, then do not proceed to the next step. This test will fail if there are problems with how the scripts are configured, or communication problems with your smtp server.
- Open the mxd that has the Geoprocessing Task as a layer.
- In the Table of Contents in ArcMap, right click on that ExtractDataTool layer, and select "Open" from the menu. An interface with input fields should appear.
- Enter the information below:
- Output Coordinate system: WGS 1984
- Output Format: GMLSF - (.gmlsf)
- Area To Download: Select the "Add features interactively" radio and define an extent to clip from the map
- Use Features From: do not select this radial
- Layers to Clip: the name of the layer you want to clip, exactly as it is shown in the ArcMap Table of contents
- Email address: your email address
- After inputting the parameters, click OK.
- If it runs successfully, then do not save any changes. Close the map document. If it does not run successfully, then you must resolve the geoprocessing errors before proceeding. To resolve the errors, check the scripts that you edited earlier and communication with the smtp server. If you make any edits to the scripts, make sure that you save the edits and that the updates are present in the ExtractDataTool in your ExtractData_GeoProcessTask.mxd.
- When the script runs successfully from ArcMap, then close the map document and proceed to the next step.
Publish the maps as ArcGIS Server map and geoprocessing services
You can use ArcGIS Server manager or ArcCatalog to publish the "Data_for_Download.mxd" and the "ExtractData_GeoProcessTask.mxd" files. Please read instructions from the ArcGIS Desktop Help topic "Publishing geoprocessing services" for the detailed process to publish into ArcGIS Server.
You will publish "Data_for_Download.mxd" as a map service, and "ExtractData_GeoProcessTask.mxd" as a geoprocessing service, following the instructions below. You must be a member of the agsadmin group on the ArcGIS Server machine in order to publish the services.
Publish the Data_for_Download.mxd as a Map Service
- Open ArcCatalog.
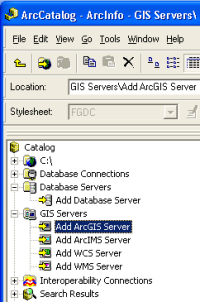
- In the table of contents window at the left, connect to the machine hosting ArcGIS Server by expanding the "GIS Server" node and double clicking "Add ArcGIS Server".
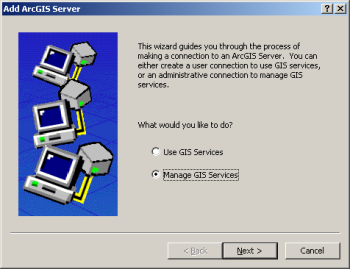
- The following wizard should appear. Select "Manage GIS Services" and Click Next.
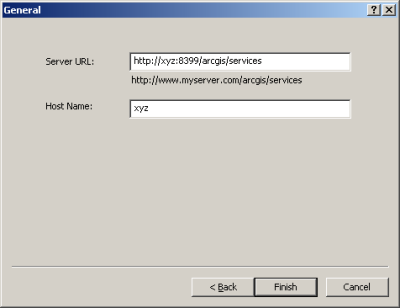
- At the next screen, input the URL to the ArcGIS Server, and its host name (in the example below, the ArcGIS Server machine is called "xyz"). Click Finish.
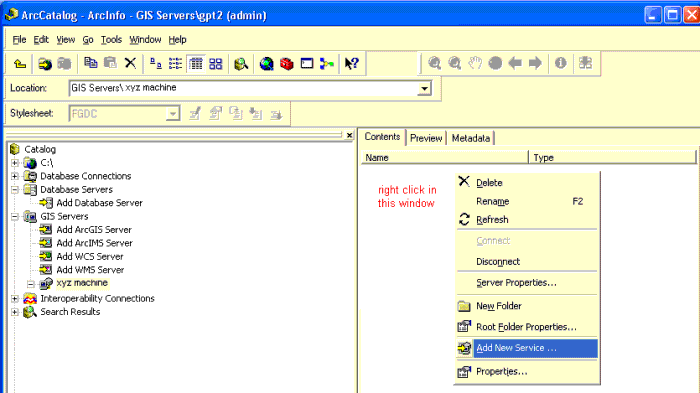
- Highlight the ArcGIS Server machine that you just connected to, and then move the mouse to the window to the right. With the "content" tab active in this window, right click on a blank space in the window and select "Add New Service", as shown below:
- A wizard will open. Populate the first window of the wizard with the name of your extract data service ("Data_for_Download" in this example). Select "Map Service" from the "Type" dropdown list. See the example below:

- Click Next.
- In the next window, browse to the "Data_for_Download.mxd" file in your ClipAndShip folder. Leave the rest of the input fields as default, except the final dropdown. Select the default ArcGIS Server cache folder location, as shown below:
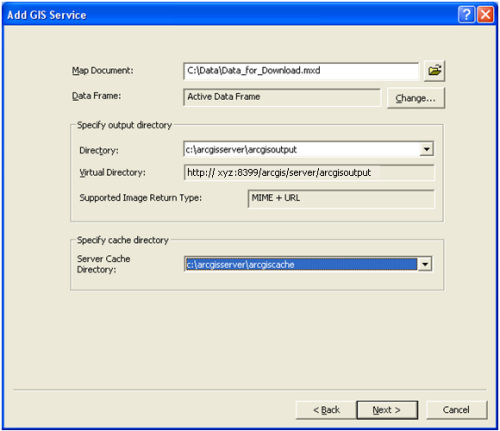
- Click Next.
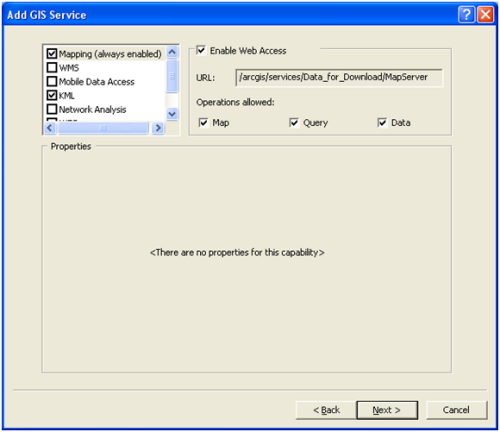
- In the next window, accept the defaults and click Next:
- In the next window, also accept the defaults and click Next:
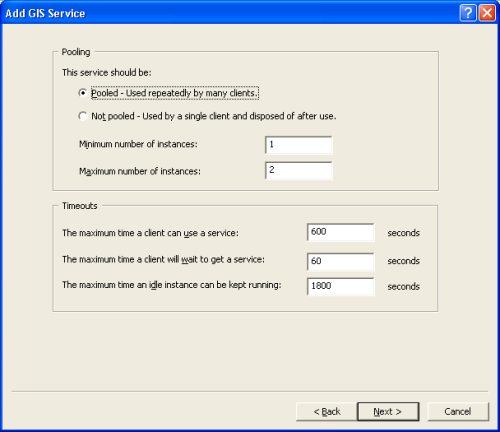
- In the next window, also accept the defaults on the next panel, and click Next:

- Accept defaults on final screen and click Finish:
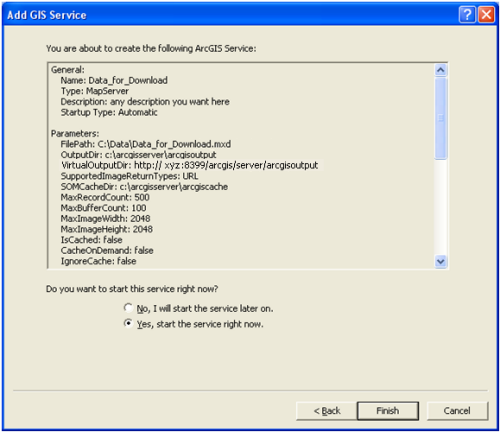
- Your Data_for_Download.mxd is now published as a map service.
Publish the ExtractData_GeoProcessTask.mxd as a Geoprocessing Service
- Open ArcCatalog if it's not already open.
- In the table of contents window at the left, connect to the machine hosting ArcGIS Server using a "GIS Server" connection, like you did previously when you had to publish the Data_for_Download map service.
- In the "content" window to the right, with the "Content" tab active, right click on a blank space in the window and select "Add New Service". A wizard will open.
- Populate the first window of the wizard with the name of your extract data geoprocessing service ("ExtractData_GeoProcessTask" in this example). Select "Geoprocessing Service" from the "Type" dropdown list. See the example below:
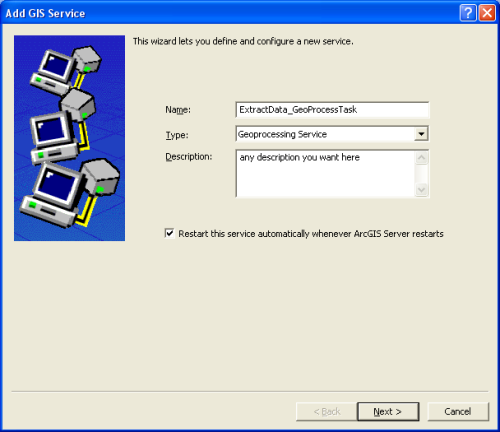
- Click Next.
- In the next screen, select the "A Map" radial button, and browse to the ExtractData_GeoProcessTask.mxd. Set the other input fields as shown below (substituting "xyz" for your ArcGIS Server machine name):
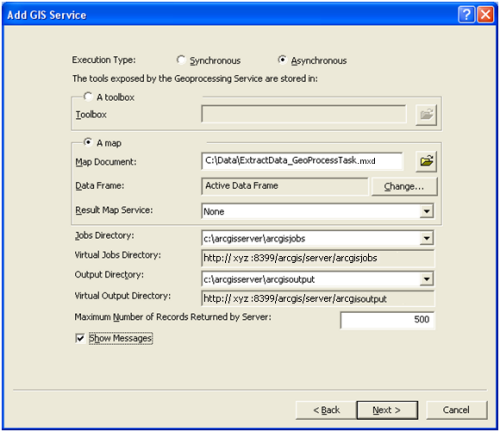
- Click Next.
- Accept defaults as shown below, and click Next.
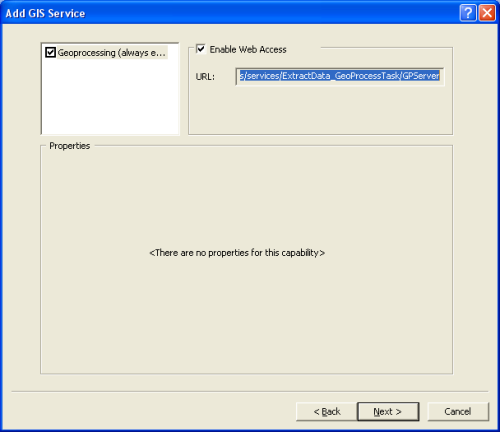
- Accept defaults as shown below and click Next.
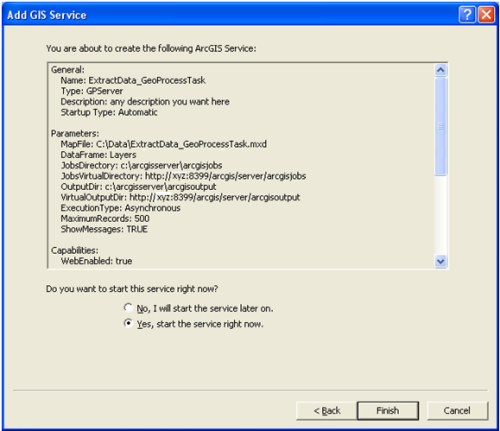
- Accept defaults as shown below and click Next.
- Accept settings on final screen and click Finish.
Refresh ArcGIS REST Cache
After publishing the two services, it is necessary to refresh the ArcGIS REST Cache so they can be accessed by your geoportal.
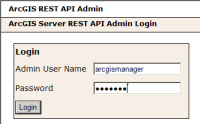
- Open a web browser and type the following (substituting your ArcGIS Server machine name for "xyz"): http://xyz:8399/arcgis/rest/admin
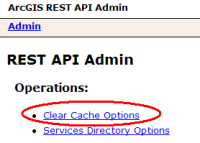
- The ArcGIS REST API Admin page should appear. Log in to the page with your ArcGIS Server admin account.
- After logging in, you will see the REST API Admin page. Select the "Clear Cache Options" link:
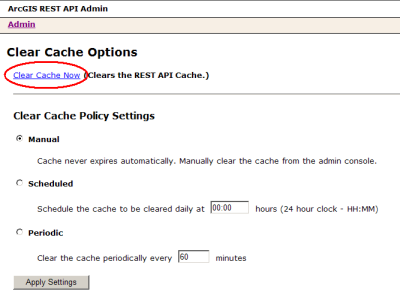
- On the next page, click the "Clear Cache Now" link:
- Logout and close the browser.
Configure the Geoportal to use the services in the Data Download tab
You will likely want to configure the Geoportal to set up a list of output file formats and a list of output projections on the Data Download tab.
The ClipAndShip configuration is located in the "<downloadData>" element in your gpt.xml file, located in the \\geoportal\WEB-INF\classes\gpt\config folder. To configure this element, do the following:
- Open gpt.xml file in a text editor and scroll to the "<downloadData>" element.
- Find the <taskUrl> element, and update it with the ArcGIS Server REST URL to your published ExtractData_GeoProcessTask geoprocessing service. To get the REST URL, to the ExtractDataTool, open a web browser and enter the following address (entering your server instead of "xyz"): http://xyz:8399/arcgis/rest/services/. The ExtractData_GeoProcessTask service should be listed in this list. Click on the "ExtractDataTool" link in the middle of the page. When the page redirects, copy the url that is in the web browser and paste it in the <taskUrl> element, as shown below.
In this example:
taskUrl="http://xyz:8399/arcgis/rest/services/ ExtractData_GeoProcessTask/GPServer/ExtractDataTool"
- Find the <mapServiceUrl> element and update it with the ArcGIS Server REST URL to the published Data_for_Download. You can get the REST URL to the map service by going to the same ArcGIS REST services link as you did for the geoprocessing service (http://xyz:8399/arcgis/rest/services/) and clicking on the link to your map service.
In this example:
mapServiceUrl="http://xyz:8399/arcgis/rest/services/Data_for_Download/MapServer"
- Find the <mapServiceType> element and update it with the value "dynamic". This represents your data download map service's type, usually tiled or dynamic. Even if your map is a tiled map, enter "dynamic" as the value, as the display map will not display correctly if this value reads "tiled".
- Find the <projections> element, and enter the projections that you want to support. For more information on defining a list of projections, see the "Additional projections support" information later in this Section.
In this example:
<projections>
        <projection key="Mercator (world)" alias="54004" resKey="catalog.download.projection.54004"/>
        <projection key="WGS 1984 UTM Zone 10N" alias="32610" resKey="catalog.download.projection.32610"/>
        <projection key="WGS 1984 Web Mercator" alias="102113" resKey="catalog.download.projection.102113"/>        <projection key="WGS 1984" alias="4326" res
Key="catalog.download.projection.4326"/>
      </projections>
- Find the <formats> element, and enter the supported output formats. For more information on defining a list of output formats, see the "Additional Output Format Support" later in this document.
In this example:
<formats>
<format key="GML - (.gml)" alias="gml" resKey="catalog.download.outputFormat.gml"/>
        <format key="GMLSF - (.gml)" alias="gmlsf" resKey="catalog.download.outputFormat.gmlsf"/>
                <format key="MIF - (.mif)" alias="mif" resKey="catalog.download.outputFormat.mif"/>
        <format key="ACAD - (.dwg)" alias="dwg" resKey="catalog.download.outputFormat.acad"/>
        <format key="IGDS - (.dgn)" alias="dgn" resKey="catalog.download.outputFormat.igds"/>
</formats>
- Save the file and close it.
- Restart the geoportal web application.
Additional Projections Support
To add more projections, you must copy the corresponding projection files you wish to support from ArcGIS installation folder into the ClipAndShip folder. Do this by following the steps below:
- Go to the Coordinate Systems folder in your ArcGIS installation folder (ex: "C:\Program Files\ArcGIS\Coordinate Systems").
- From the sub folders of Coordinate Systems folder, copy the projection (.prj) files and paste them into CooSys folder under ClipAndShip\ToolData folder (ex: C:\ClipAndShip\ToolData\CooSys).
- Open the gpt.xml file (located at \\geoportal\WEB-INF\classes\gpt\config folder) in a text editor.
- Add a new <projection> element into the <projections> element; the new <projection> element should include the following attributes:
- "key": the exact projection file name. For example, if you add the projection file called NAD 1983 UTM Zone 10N.prj, key should be NAD 1983 UTM Zone 10N.
- "resKey": used to reference a display name for this projection. This display name will show up in a dropdown list in Download Data tab. It has a naming convention that puts "catalog.download.projection." and appends the alias string. You do not have to follow the naming convention, but it is recommended in order to organize the names of your projections in the interface. Whatever new name you use in this file must be referenced as a new key in the gpt.properties file.
- alias: an optional field and it is additional identifier for each projection. The number you can use for alias is in http://resources.esri.com/help/9.3/arcgisserver/apis/javascript/arcgis/help/jshelp/pcs.htm
For example, in the code below, we have added the last <projection> element, for NAD 1983 UTM Zone 10:
 <projections>
        <projection key="Mercator (world)" alias="54004" resKey="catalog.download.projection.54004"/>
        <projection key="WGS 1984 UTM Zone 10N" alias="32610" resKey="catalog.download.projection.32610"/>
        <projection key="WGS 1984 Web Mercator" alias="102113" resKey="catalog.download.projection.102113"/>
        <projection key="WGS 1984" alias="4326" resKey="catalog.download.projection.4326"/>
        <projection key="NAD 1983 UTM Zone 10N" alias="26910" resKey="catalog.download.projection.26910"/>
   </projections>
- Open the gpt.properties file in your \\geoportal\WEB-INF\classes\gpt\resources folder
- Add the display names for the added projections in the "# download data" section, using your "resKey" described above as a guide. For example, we could add the key below to match the resKey in the gpt.xml file:
catalog.download.projection.26910 = NAD 1983 UTM Zone 10 North
- Save the gpt.properties file and the gpt.xml file. You will have to restart the geoportal web application for you changes to take effect.
Additional Output Format Support
Shapefile and Geodatabase
It is possible to add other formats to the Format drop down list in the Data Download interface. Three common formats that many users may want are shapefile, personal geodatabase, and file geodatabase. To add these to the list of formats, paste the three new <format> entries shown below into the gpt.xml file within the <formats> element, and update gpt.properties to reference the three new resKey values. For details on what the attributes for the <format> elements represent, and specifics on updating the gpt.properties, see instructions in the "Other Formats" subsection further below:
 <format key="GEODATABASE_MDB - (.mdb)" alias="mdb" resKey="catalog.download.outputFormat.mdb"/>
<format key="GEODATABASE_FILE - (.gdb)" alias="gdb" resKey="catalog.download.outputFormat.gdb"/>
      <format key="SHAPE - (.shp)" alias="shp" resKey="catalog.download.outputFormat.shape"/>
Other Formats
For other output formats, the ESRI Data Interoperability extension must be installed and enabled in ArcGIS Desktop for the map service basemap and geoprocessing task basemap. Also, the Data Interoperability extension for ArcGIS Server must also be installed on the machine hosting ArcGIS Server. Finally, you will have to alter the Data Download Task python scripts to handle the additional data format. This requires some python programming knowledge. Because this customization is not included in the Geoportal extension general documentation, the
Geoportal extension User Forum is a good place to find out how other users may have added additional data types for download.
If you have licensed the Data Interoperability extension and configured the python scripts to handle an additional data type, adding the data type to your Geoportal interface is comparatively simple. The steps below describe how to add additional output formats to the formats list in your gpt.xml file so they display in the list on your Geoportal's Data Download page.
- The Data Interoperability extension uses Feature Manipulation Engine (FME) technology from SafeSoftware. To get the information that you will need to update the list of output formats, you will need to reference the FME website. Our example below shows adding the ESRI ArcInfo format to the list.
- Obtain the format identifier and file extension information by accessing the FEM website and clicking the link next to the format in which you are interested. This will redirect to a .pdf file giving additional details.
- Find "Format Identifier" and "Typical File Extensions". For ESRI ArcInfo Export, format identifier is "E00" and typical file extension is ".e00".
- In the gpt.xml file, insert an additional <format> element with the following attributes into the <formats> element to include the supported output format.
- "key": {Format Identifier} - ({typical file extension}). In the ArcInfo example, it should be E00 - (.e00)
- "alias": optional - repeat the file extension.
- "resKey": assigns the key for referencing the display name as defined in gpt.properties for this format. Should be unique. In this example, resKey is catalog.download.outputFormat.e00.
- The new E00 entry has been added to the default list in the example below:
	<formats>
        	       <format key="GML - (.gml)" alias="gml" resKey="catalog.download.outputFormat.gml"/>
        	       <format key="GMLSF - (.gml)" alias="gmlsf" resKey="catalog.download.outputFormat.gmlsf"/>
        	       <format key="MIF - (.mif)" alias="mif" resKey="catalog.download.outputFormat.mif"/>
        	       <format key="ACAD - (.dwg)" alias="dwg" resKey="catalog.download.outputFormat.acad"/>
        	       <format key="IGDS - (.dgn)" alias="dgn" resKey="catalog.download.outputFormat.igds"/>
	      <format key="E00 - (.e00) " alias = "e00" resKey="catalog.download.outputFormat.e00"/>
      	</formats>
- Open the gpt.properties file in your \\geoportal\WEB-INF\classes\gpt\resources folder
- Add the display names for the added format in the "# download data" section, using your "resKey" described above as a guide. For example, we could add the key below to match the resKey in the gpt.xml file:
catalog.download.outputFormat.e00= E00 - (.e00)
- Save the gpt.properties file and the gpt.xml file. You will have to restart the geoportal web application for you changes to take effect.
Option: Send Link to Virtual Directory
IMPORTANT: Before continuing with this customization, it is recommended that you first complete the standard Data Download customization previously discussed, as the following customization assumes critical steps have already been carried out.
The default Data Download sample sends the user an email with a zip file output from the data download clip-zip-ship process as an attachment. This solution works for small data sets, but will fail with large data sets (e.g. greater than 5 Mb) due to mail server limitations on file sizes of attachments. This document outlines a procedure with code to customize the Geoportal Data Download sample that sends the user an email with a web link to the output zip file. This custom process allows the user to request large data download packages (greater than 5 Mb). Users can pick up the zip file at their convenience without clogging up their Mail Server inbox with large file attachments. For the Geoportal hosting organization, this process allows for greater service provision and greater security control.
System Requirements
In addition to the requirements for implementing a Geoportal with the Clip-Zip-Ship (CZS) Data Download sample, the hosting organization will need to provide a web server or FTP server with a directory that will be used for posting and user-pickup of output CZS zip files.
Customization Details
Customizations were limited to changes to Clip-Zip-Ship toolbox, specifically, the sendmail.py Python script. At issue with the sample CSZ toolbox is that the zip file created is removed from the file system at the end of the geoprocessing execution. A second issue is that the name of the resulting zip file is the same for all users.
The sendmail.py Python script was edited to make a copy of the CSZ zip file with a unique file name and store it on a file system directory that will be used for hosting the Web/FTP directory for user pickup. The script appends the web-accessible URL link to the file to the email and forwards the email to the mail server for delivery to the user.
Steps to Configure
-
Change the sendmail.py script of the Clip-Zip-Ship toolbox
- Open (using ArcMap) the map document used for the Data Download geoprocessing. In our example, it is called ExtractData_GeoProcessTask.mxd.
- Open the ArcToolbox window, and navigate to the ExtractDataTool script within the Clip and Ship version 2 toolbox.
- Right-click on ExtractDataTool and select 'Edit…' from the contextual menu. Two windows will open: the callextractdatamodel.py and the Python Shell. Close the 'Python Shell' window so that the 'callextractdatamodel.py' window is visible.
- Look for the value of the toolbox_path (e.g. toolbox_path = r"C:\ArcData\ClipAndShip\ClipShip2.tbx"). This is the location of the CSZ toolbox used by the ExtractData_GeoProcessTask.mxd during geoprocessing.
- Open Windows Explorer and navigate to the 'Scripts' folder within the directory specified in toolbox_path.
- Rename sendmail.py to sendmail.py.bak. This creates a backup copy of the original sendmail.py script in case you need to recreate the original sample.
- Go back to ArcMap and locate the 'Email File' script within the 'Clip, Zip, and Email utilities' toolbox folder. Right-click on 'Email File' and select 'Edit…' from the contextual menu. Two windows will open … sendmail.py and the Python Shell.
- Close the 'Python Shell' window so that the 'sendmail.py' window is visible.
- At the top of the file, just under the text that reads 'import arcgisscripting, smtplib, os, sys, traceback', paste the following two lines:
import shutil
import uuid
- Scroll down in sendmail.py to the section that reads "# If sendZip is true, the zip file will be attached to the email.# If false, the URL to the zip will be in the body of the email."
- Under that text, you will see a parameter called sendZip. By default, it is set to True. Change its value to False.
- Now scroll down to the section that reads "# Send URL instead of .zip file. The jobs and virtual directory can be found# in service's properties dialog box. UNIX note: this code converts pathnames # to lower case to do the string replace."
- Under this section, there is a text parameter and a jobsDir parameter. You will delete the entire jobsDir parameter, and then also delete the virtualDir and the first url parameter as well. So now, this section of the sendmail.py should look like the example below:
# Send URL instead of .zip file.  The jobs and virtual directory can be found
            #  in service's properties dialog box.  UNIX note: this code converts pathnames
            #  to lower case to  do the string replace.
            #
            text = "Click the link below to open zip file containing the area of interest you specified."
            url = url.replace("\\", "/")
 send_mail(_email_send_from, [sendto], subject, text, url, _email_server, sendZip)
- Now just below the text parameter and above the url parameter, paste the following section of code:
#--- start custom change to Send URL ---#
            # Purpose:  Copy zipfile to URL virtual directory
            #    AND give the zipfile a unique filename
            # Requires import shutil and import uuid
            downloadDir = r"C:\Inetpub\wwwroot\dnld"
            virtualDir = "http://yourDirectory/dnld"
            # First generate a filename with a random unique identifier using uuid.uuid4()
            zipDownload = os.path.join(downloadDir, str(uuid.uuid4()) + ".zip")
            # Next copy the Source zipfile to the new Destination zipDownload
            shutil.copy2(zipfile, zipDownload)
            # Finally replace the local file system path with the web-accessible directory URL path
            url = zipDownload.replace(downloadDir, virtualDir)
            # Replace backslashes with URL forward slash convention
- Edit the value of downloadDir to point to the file system folder that will be used for hosting the web virtual folder or FTP folder used for user pickup. Note: keep the "r" character at the start of the string so that Python understands that it is a string literal (i.e. interprets backslashes as characters, not an escape-sequence).
- Edit the value of virtualDir to be the web-accessible URL path that users can use for linking to the data download pickup folder.
- Save and close 'sendmail.py'
- Save the ExtractData.mxd.
- Close ArcMap.
-
Update the ExtractData service on ArcGIS Server
- Restart the ExtractData_GeoProcessTask service.
- Clear the ArcGIS Server REST cache.
-
Set up your web or FTP server to host the downloadDir folder
This example is for IIS:
- Open the 'Internet Information Services' management console window
- Expand the directory tree to find the Default Web Site.
- Right-click on 'Default Web Site' and select 'New > Virtual Directory…' from the contextual menu.
- Follow the Virtual Directory Creation Wizard to specify the WWW folder alias (specified in virtualDir), browse to the file system directory folder specified for downloadDir, set Access Permissions to allow "Read" access, but leave all others unchecked for security control.
- Close the 'Internet Information Services' management console window.
Installation should be complete. You should check the new operation of the Data Download on your Geoportal.
Security Recommendations
Users should not be allowed to browse the Web or FTP folder used for hosting the Clip-Zip-Ship zip file outputs. If allowed, they could pick up other user's data request packages. This can be mitigated by setting access permissions on the folder to Read-only. If some data sets need to be restricted further, consider setting up a SSL-enabled web folder that requires a user to log in with user authentication credentials when they try to access the CSZ output file from the email link.
Operations and Maintenance Recommendations
Create a scheduled process to periodically remove and delete zip files on the downloadDir folder that are older than a certain date.
Hide Data Download from Anonymous Users
If you only want registered users to be able to use the Data Download tab in your geoportal, there are three things that should be considered:
- The Data Download tab can be hidden from anonymous users.
- The download page itself can be protected from access by specifying a security constraint within \\geoportal\WEB-INF\web.xml (a commented out example is provided by default). This requires container based authentication (i.e. it's a container like Tomcat that actually protects the resource, setting up the Geoportal in single sign-on mode requires container based authentication).
- The ArcGIS Server service's associated with data download might also need protection.
Below, instructions for hiding the download tab from anonymous users is described. See your servlet container documentation for how to protect the download page itself, and ArcGIS Server documentation for how to protect the data download service.
- Navigate to the \\geoportal\catalog\skins\tiles directory and open primaryNavigation.jsp in a text editor.
- Find the line:
rendered="#{not empty PageContext.applicationConfiguration.downloadDataConfiguration.taskUrl}"/>
- Change the line to the following:
rendered="#{not PageContext.roleMap['anonymous'] and not empty PageContext.applicationConfiguration.downloadDataConfiguration.taskUrl}"/>
- Save the file. Restart Tomcat, and notice that the next time you launch the geoportal web application, you do not see the Download tab until after logging in.


