An overview of editing in ArcMap |
|
|
Release 9.1
Last modified January 25, 2006 |


|
In addition to mapmaking and map analysis, ArcMap is the application for creating and editing geographic data as well as tabular data. With ArcMap, you can edit shapefiles and geodatabases all with one common user interface. You can even edit an entire folder of data at once. ArcMap contains sophisticated, CAD-like editing tools that help you construct features quickly and easily while maintaining the spatial integrity of your geographic information system (GIS) database.
Whether you're using ArcView, ArcEditor, or ArcInfo, you use the same editing tools in ArcMap to work on your geographic data. In cases where your organization has multiple users simultaneously editing on a shared geodatabase, ArcMap, in concert with ArcSDE, provides the tools necessary to manage long editing transactions, as well as to manage versions and resolve potential conflicts.
NOTE: Some advanced editing tools are not available with ArcView.
Two ways to view a map
ArcMap provides two ways to view a map: data view and layout view. Each view lets you look at and interact with the map in a different way. Data view hides all the map elements on the layout, such as titles, North arrows, and scale bars. In layout view, you'll see a virtual page on which you can place and arrange map elements. You can edit your geographic data in either data view or layout view.
In data view, you can open a magnifier window to get a closer view of a small area without changing the map extent or open an overview window to see the full extent of your map. The magnifier window can be turned on before or during the creation of new features and modification of existing features. You can click the heading of the magnifier window and drag it while holding on to the same sketch or modification already in progress. To learn more about using these windows, see Opening magnifier and overview windows.
If you've collected data from a variety of sources, chances are that not all layers contain the same coordinate system information. Using ArcMap, you can set the coordinate system for a data frame. As you add layers to your map, they are automatically transformed to that projection. That means you can edit the shapes and attributes of a layer regardless of the coordinate system it was stored in.
When you're finished editing, you can save any changes you've made or quit editing without saving. You can also save the edits you've made at any time by clicking Save Edits from the Editor menu.
Whenever you want to edit data in ArcMap, you will follow the general steps outlined below. To find out more about each step, click the links following each step.
- Start ArcMap. Learn more about starting ArcMap
- Create a new map or open an existing one.
- Add the data you want to edit to your map. If there are no existing layers for the feature classes you want to edit, you can create them using ArcCatalog.
- Add the Editor toolbar to ArcMap.
- Start your edit session.
- Create or modify features, their attributes, or both.
- Stop your edit session and save your edits. There is no need to save the map—all edits made to the database will automatically be reflected the next time you open the map.
Learn more about creating a new map
Learn more about opening a map
Learn more about creating a layer
Learn more about adding data
Learn more about adding the Editor toolbar
Learn more about starting an edit session
Exploring the Editor toolbar
The Editor toolbar contains the various commands you will need to edit geographic features in your database. You must add the Editor toolbar to ArcMap before you can begin editing.
View the Editor toolbar
An edit sketch lets you perform various editing tasks such as adding new features, modifying features, and reshaping features. Tasks are listed in the Current Task dropdown list (shown below).
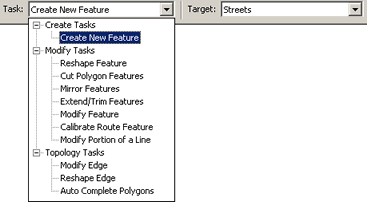
Task examples
You can use the tasks in the Current Task dropdown list in conjunction with a sketch you create to edit your geographic data in ArcMap.
Here are some examples:
- The Create New Feature task uses a sketch you create to make the new feature.
- The Select Features Using a Line task uses a sketch you create to select features; the features the line intersects are selected.
- The Cut Polygon Features task uses a line sketch you draw to cut a polygon.
View illustrations of how these tasks are used
Creating new features
You can create three main types of features with the Editor toolbar: points, lines, and polygons.
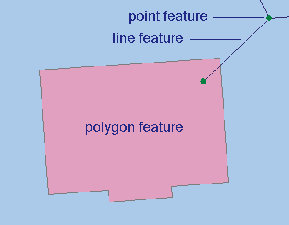
To create a line or polygon, you must first create a sketch. A sketch is composed of all the vertices and segments of the feature. Vertices are the points at which the sketch changes direction, such as corners; segments are the lines that connect the vertices.
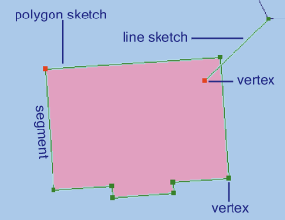
You can create a sketch by creating the vertices and segments that make up the features. Vertices are marked in green, with the last vertex added marked in red.
The Sketch tool is the tool you will use most often to create a sketch. It has an accompanying context menu that helps you place vertices and segments more accurately. The Arc tool, the Distance–Distance tool, and the Intersection tool (located with the Sketch tool on the tool palette) also help you create vertices and segments using other construction methods.
Explore the tools on the tool palette
The target layer
When you're creating a new feature, the target layer determines the layer where a new feature will be stored. After copying a feature, the target layer is also the layer you will be pasting into. When you're editing existing features, the target layer is the one you will be modifying, cutting, or reshaping.
The Target layer dropdown list (shown below) contains the names of all the layers in the datasets with which you're working. Subtypes are also listed, if applicable. For instance, if you set the target layer to Buildings: Commercial, any features you create will be part of the Commercial subtype of the Buildings layer.
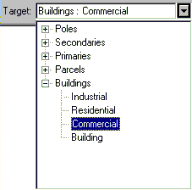
You must set the target layer whenever you create new features—whether you're creating them with the Sketch tool, by copying and pasting, or by buffering another feature. It is also important to set the target layer when you are editing existing features, so you can modify the features in the correct layer.
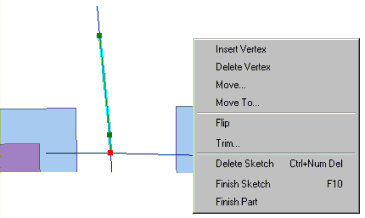
For every feature on the map, there is an alternate form—a sketch. In the same way you must create a sketch to create a feature, to modify a feature you must modify its sketch. Because the vertices are visible in a sketch, you can edit the feature in detail; you can move the vertices, delete them, or add new ones using the Sketch context menu. This is illustrated in the graphic below.
Using a new sketch to modify features
Besides editing a feature by working with its sketch, you can also use another sketch you create to modify the feature for certain tasks. An example of this type of task is Cut Polygon Features (click here to see an illustration), in which a sketch you construct is used to divide one polygon into two.
Simple modifications to features, such as moving, copying, or deleting, can be made by selecting the feature and choosing the appropriate tool or command.
Attributes can be created or edited in the Attributes dialog box. After selecting the features whose attributes you want to edit, click the Attributes button ![]() on the Editor toolbar to see the dialog box (shown below).
on the Editor toolbar to see the dialog box (shown below).
