Data support in ArcGIS > Tables and attribute information > Creating tables and managing attribute information
Joining tables |
|
|
Release 9.2
Last modified January 10, 2008 |


Print all topics in : "Creating tables and managing attribute information" |
About joining tables
Joining data is typically used to append the fields of one table to those of another through an attribute or field common to both tables. You can choose to define the join based either on attributes, a predefined geodatabase relationship class, or by location (also referred to as a spatial join). You will only see join by relationship class listed if you are joining geodatabase data for which a relationship class has already been defined in the geodatabase.
Several tables or layers can be joined to a single table or layer and relationship class joins can be mixed with attribute joins. When a join table is removed, all data from tables that were joined after it are also removed, but data from previously joined tables remain. Symbology or labeling that is based on an appended column is returned to a default state when the join is removed.
In most cases, appended columns are named "TableName.FieldName". This naming convention helps prevent duplicate field names when the target table and a join table have common field names. Field aliases set in ArcMap prior to a join are ignored but can be reset after the join. This is useful if the field names prove to be too long for some of the field lists in ArcMap. Field aliases set in the geodatabase prior to the join are used to define the field aliases for the joined columns.
Learn more about joining and relating tables
Summarizing your data before joining it
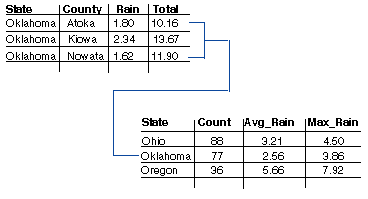
Depending on how your data is organized, you may have to start by summarizing the data in your table before you join it to a layer. When you summarize a table, ArcMap creates a new table containing summary statistics derived from your table. You can create various summary statistics including count, average, sum, minimum, and maximum.
For example, suppose you want to create weather maps by state instead of county, but the weather information you have is organized by county. You could summarize the county data by state—for instance, finding the average rainfall for all counties within a state—then join the newly created output table to a state layer to create a weather map of rainfall by state.
Editing and joining tables
When you start an edit session and have joined data, columns from the target table can be edited, but you can't directly edit the data in the appended columns. If you add a field, it is added to the target table or layer and has no effect on the join tables. Appended columns can be referenced when calculating values in the columns of the target table, however.
To edit the joined data, you must first add the joined tables or layers to ArcMap. You can then perform edits on this data separately. These changes will be reflected in the joined columns.
Performance tips for joining data
Data from appended fields can be used to symbolize and label features, perform queries and many other operations. Accessing the joined data will be slower than accessing data from the target table because of the additional work needed to maintain the join.
The following tips can be used when working with joined data to improve performance:
- You can perform a join with either the Join Data dialog box accessed by right-clicking a layer in ArcMap or a set of geoprocessing tools. Use the join geoprocessing tools when working with particularly large datasets to get the best performance. You can also include these tools in geoprocessing models and scripts when you want to automate repetitive or complex steps involving joins. As these tools perform the actual behind-the-scenes join processing slightly differently than the Join Data dialog box, use the tools if you encounter any unexpected issues with the join functionality in that dialog box. The geoprocessing tools are:
Analysis Tools > Overlay > Spatial Join tool
- Create attribute indexes on the join fields. If your joins involve only shapefiles, dBASE files, or coverages or INFO files, indexing will not improve performance when drawing or working with the table window. Performance will be improved while editing, however. In all other cases, attribute indexes will improve overall performance.
- When joining data from the same geodatabase, you should click the Advanced button and choose "Keep only matching records". In some cases, this option will produce different results, but allows the join to be processed by the database. You will find that this is normally faster for operations that require accessing the data in the joined columns (such as symbolizing, labeling, and so on).
The default "Keep All Records" option always performs processing on the client. Performance is normally good for operations that don't require accessing joined data (such as drawing with default symbolization). An operation may become much slower, though, if accessing joined data is needed. - Cross database joins, where the target table and the join table are from different data sources, may have poorer performance. This is especially the case where the join table is from a geodatabase or an OLE DB connection. Performance is much better when the join table is from a file based data source (such as, shapefiles, dBASE files, and coverages) and the target table has an ObjectID field (most data sources).
- Joining multiple tables or layers to a single layer can be costly in terms of performance. If all of the data is from the same ArcSDE server and you chose "Keep only matching records" when joining, performance should not be greatly affected.
Data Management Tools > Joins > Add Join tool
Data Management Tools > Joins > Remove Join tool
Reasons joining tables may fail
After performing a join, the values in the fields from the joined table might appear empty or Null. Null values can be the result of several factors:
- Values in the specified fields for the join do not match.
Joins are case sensitive, so be aware when using string fields to create a join. For example, 'NEW YORK' will not join with 'New York'. To convert string values to the proper case, see the task in Making field calculations. - The name of the table or feature class, or field names in the table or feature class, include spaces or special characters.
Special characters include hyphens such as in x-coord and y-coord, parentheses, brackets, symbols such as $, %, and #, and so on. Essentially, eliminate anything that is not alphanumeric or an underscore, but avoid starting field names with a number or an underscore. Be sure to edit the field names in delimited text files or other tables to remove unsupported characters before trying to use the files in ArcGIS. - The field names in the table are Microsoft Access reserved words.
Some examples include date, day, month, table, text, user, when, where, year, and zone. For a list of reserved words, see the following Microsoft support article. - The table is stored in a Microsoft Access database that is not a personal geodatabase.
You should access Microsoft Access tables in ArcGIS through an OLE DB connection, rather than attempt to add the database directly to ArcMap. See Working with Microsoft Access files in ArcGIS to learn how to add an OLE DB connection.
Geodatabase feature class, table, and field names can be up to 64 characters. (More specifically, you can only enter up to 52 characters for a personal geodatabase feature class name because the system appends characters to total 64.) Shapefiles and .dbf field names can be up to 10 characters long. For INFO tables, use up to 16 letters or numbers.
See Adding and deleting fields for more field naming guidelines.
How to join tables
Joining attributes in one table to another
- Right-click the layer or table you want to join, point to Joins and Relates, and click Join.
- Click the first drop-down arrow and click Join attributes from a table.
- Click the second drop-down arrow and click the field name in the layer on which the join will be based.
- Click the third drop-down arrow to choose the table to join to the layer.
If the table is not currently part of the map, click the Browse button to search for it on disk. - Click the fourth drop-down arrow and click the field in the table on which to base the join.
- Click OK.
The attributes of the table are appended to the layer's attribute table.
| Tips |
|
Managing joined tables
- Right-click a layer or table in the table of contents and click Properties.
- Click the Joins & Relates tab.
All the joins for the layer or table are listed on the left side of the dialog box. You can add new joins or remove existing ones.
Removing a joined table
- Right-click the layer containing a join you want to remove and point to Joins and Relates.
- Point to Remove Join(s) and click the join you want to remove.