Using the Pan-sharpen process |
|
|
Release 9.2
Last modified April 14, 2008 |


|
About the Pan-sharpen process
Panchromatic sharpening uses a higher-resolution panchromatic image (raster band) to fuse with a lower-resolution, multiband raster dataset. Panchromatic sharpening increases the spatial resolution and provides a better visualization of a multiband image using the high-resolution single-band image where the two rasters fully overlap. Several imaging companies provide low-resolution, multiband images and higher-resolution panchromatic images of the same scenes.
| Original color image
(240 cm resolution) 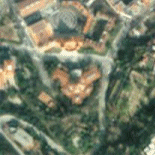
|
Panchromatic image
(60 cm resolution) 
|
| Pan-sharpened color image
(60 cm resolution) 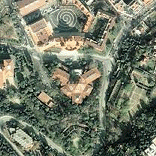
|
Pan-sharpened infrared image
(60 cm resolution) 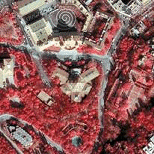
|
This process is applied to the panchromatic (single-band) image. Basically, the panchromatic image is assumed to be the base image, which is colored with the multiband image. This method is used to preserve the resolution of the panchromatic image throughout the panchromatic sharpening process.
ArcGIS Image Server provides three image fusion methods from which to choose to create the pan-sharpened image: the Brovey transformation, the IHS transformation, and the ESRI pan-sharpening transformation. Each of these methods use different models to improve the spatial resolution while maintaining the color, and each is adjusted to include a weighting so that a fourth band can be included (such as the near-infrared band available in many multispectral image sources). By adding the weighting and enabling the infrared component, it has been found to improve the visual quality in the output colors.
The Brovey transformation is based on spectral modeling and was developed to increase the visual contrast in the high and low ends of data's histogram. It uses a method that multiplies each resampled, multispectral pixel by the ratio of the corresponding panchromatic pixel intensity to the sum of all the multispectral intensities. It assumes that the spectral range spanned by the panchromatic image is essentially the same as that covered by the multispectral channels.
In the Brovey transformation, the general equation uses red, green, and blue (RGB) and the panchromatic bands as inputs to output new red, green, and blue bands. For example:
Red_out = Red_in / [(blue_in * green_in * red_in) * Pan]
However, by using weights and the near-infrared band (when available), the adjusted equation for each band becomes:
DNF = (P - IW * I) / (RW * R + GW * G + BW * B)
Red_out = R * DNF
Green_out = G * DNF
Blue = B * DNF
Infrared_out = I * DNF
where the inputs are:
P = panchromatic image
R = red band
G = green band
B = blue band
I = near infrared
W = weight
The IHS transformation is a transformation of RGB and intensity, hue, and saturation. Each coordinate is represented by a 3D coordinate position within the color cube. Pixels having equal components of red, green, and blue lay on the gray line, a line from the cube to the opposite corner (Lillesand and Keifer, 2000). Hue is the actual color; it describes the shade of the color and where that color is found in the color spectrum. Blue, orange, red, and brown are words that describe hue. Saturation describes the value of lightness (or whiteness) measured in percent from 0% to 100%. For example, when mixing red with a saturation of 0% it will be as red as it can be. As the saturation percent is increased, essentially more white is added and the red will change to a pink. If the saturation is 100%, the hue is meaningless (essentially, red loses its color and turns to white). Intensity describes a value of brightness based on the amount of light emanating from the color. A dark red has less intensity than a bright red. If the intensity is 0%, the hue and saturation are meaningless (essentially, the color is lost and becomes black).
The IHS transformation converts the color image from an RGB color model to an IHS color model. It then replaces the intensity values with values obtained from the panchromatic image being used to sharpen the image, a weighting value, and the value from an optional, near-infrared band. The resultant image is then output using the RGB color mode. The equation used to derive the altered intensity value is:
Intensity = P - I * IW
The ESRI pan-sharpening transformation uses weighted averaging (WA) and the additional near-infrared band (optional) to create its pan-sharpened output bands. The weighted averaging is calculated by using the following formula:
WA = (R * RW + G * GW + B * BW + I * IW) / (RW + GW + BW + IW)
The result of the weighted average is used to create an adjustment value (ADJ), which is then used in calculating the output values. For example:
ADJ = pan image - WA
Red_out = R + ADJ
Green_out = G + ADJ
Blue_out = B + ADJ
Near_Infrared_out = I + ADJ
For the ESRI pan-sharpening transformation, the weight values of 0.166, 0.167, 0.167, 0.5 (R, G, B, I) provide good results when using QuickBird imagery. It has been found that by changing the near-infrared weight value, the green output can be made more or less vibrant.
Pan-sharpen can be applied when some raster datasets are added to the image service, such as Landsat and QuickBird Basic. Pan-sharpening can also be applied as part of the process chain using the Pan-sharpen process.
The pan-sharpen method can also be used to fuse different types of data, such as the hillshade of an elevation model with a color image.
Pan-sharpening can be applied to some raster types when the raster data is added to the image service. Additionally, the Pan-sharpen process can be added to any of the process chains after the data has been added.
How to apply the Pan-sharpen process
Applying the Pan-sharpen process to an image service
This process describes using two image services—one containing the panchromatic images and one containing the multispectral images (such as a three-band TIFF).
- Create a panchromatic image service and a multispectral (color) image service. Optimize and compile these services and publish them on a service provider.
- Add these image services to ArcMap, as a client.
- Right-click each layer and click Save As .ISRef File, to save each layer as in image service reference file.
- Create a new image service by clicking the Image Service drop-down menu, pointing to Advanced, then clicking New Service Definition.
This image service should be created using the same parameters as the multispectral image service. For example, the color space will likely be RGB and the number of bands will likely be 3. This image service will be used to combine the panchromatic image service and the multispectral image service. - If you have more than one image service open, click the Layer drop-down arrow on the Image Service Editor toolbar, and select the image service you just created.
- Click the Image Service drop-down menu, point to Advanced, then click Add Raster Dataset.
- Double-click the Georeferenced Imagery folder.
- Click Image Service and click OK.
- Click the Select Folder Browse button, navigate to the location of the two .ISRef files, then click OK.
- Click the Open Service Table button
 .
.
- Copy the number in the RasterID column corresponding to the multispectral image service.
- Select the gray button next to the row corresponding to the panchromatic image service to select the row.
- Close the service table.
- Click the Raster Properties button
 .
.
- Click the Processes node.
- Uncheck Validator—ExtractBands in the Processes Selected list.
This process was automatically added to adjust the pixel type of the panchromatic raster dataset to the pixel type of the service definition. You don't need this anymore because you will be using the Pan-sharpen process to achieve the same result. - Click the Rasters node.
- Click the Process tab.
- Click Pan-sharpen in the Processes Available list and click the Add button
 .
.
- Click Pan-sharpen in the Processes Selected list and click the Edit Process Definition button
 .
.
- Type or paste the multispectral RasterID number (from step 11) in the Multispectral Image ID text box and type ".1" after the Raster ID string to indicate that the first raster from this dataset is to be used.
- Click the Method drop-down arrow and choose a pan-sharpening method.
- Optionally, edit the band weights.
- Click OK.
- Click OK to close the Raster Properties dialog box.
- Click Selection on the Main menu and click Clear Selected Features.
- You can now build, optimize, compile, and publish this image service.
Applying pan-sharpening at all scale ranges using weights
To apply pan-sharpening to the imagery at any scale, you can apply channel weights to the process. You should do this before building any service overviews to ensure that the process is used in creating the overviews. A suggested set of weights is as follows:
Band 1 Weight: 0.166
Band 2 Weight: 0.160
Band 3 Weight: 0.166
Band 4 Weight: 0.3
- Click the Layer drop-down arrow on the Image Service Editor toolbar and select the image service you want to work with (if there are more than one).
- Click the Select Features button
 on the Tools toolbar.
- Select the footprint of the raster to which you want to add weight values.
- Click the Raster Properties button .
- Click the Rasters node in the list on the left side of the Raster Properties dialog box.
- Click the row corresponding to the panchromatic channel in the list on the left. This would be the row where ID = 8 if it were a Landsat-7 image.
- Click the Process tab.
- Click Pan-sharpen in the Processes Selected list.
- Click the Edit button .
- Click the Band Weight tab on the Pan-sharpen Process Definition dialog box.
- Type the numbers above in the first four Band Weight text boxes.
- Click OK, then click OK again to close the dialog box.
Applying pan-sharpening at all scale ranges by adjusting pixel sizes
To apply pan-sharpening to the imagery at any scale, you can alter the minimum and maximum pixel sizes. The steps below can be applied to a Landsat-7 image.
- Click the Layer drop-down arrow on the Image Service Editor toolbar and select the image service you want to work with (if there are more than one).
- Click the Select Features button on the Tools toolbar.
- Select the footprint of the raster you want to edit.
- Click the Raster Properties button .
- Click the Rasters node in the list on the left side of the Raster Properties dialog box.
- Scroll through the list on the top left side and click the panchromatic raster. With Landsat-7, this would be the row with ID = 8.
- Delete the value in the Max. Pixel Size text box.
- Change the value in the Min. Pixel Size text box to "14.25".
- Click OK.