Mapping and visualization > Symbolizing data > Styles and symbols
Working with color ramps |
|
|
Release 9.2
Last modified January 4, 2008 |


Print all topics in : "Styles and symbols" |
About working with color ramps
ArcMap color ramps provide the means to apply a range of colors to a group of symbols. Color ramps are used, for example, in the Graduated colors layer symbology option. ArcMap has a range of color ramps already defined in the Color Ramp styles folder. Some are created for specific applications such as to display elevation or precipitation, but you can also create your own.
There are four types of color ramps:
- Algorithmic color ramps are a specific type of ramp that traverses the color spectrum between two colors.
- Preset color ramps are defined by a sequence of exactly 13 individually specified colors. They are designed to mimic the behavior of color ramps in ArcView 3.x.
- Random color ramps provide you with the most distinct colors that traverse a color spectrum.
- Multipart color ramps are containers storing a sequence of any of the other three color ramps in any combination.
The image below shows an example of a color ramp:
The three algorithms for the color in color ramps
The three ArcMap color ramp algorithms represent different methods for traversing the color spectrum. Each method provides slightly different effects, and which one you use depends on how well it suits your needs.
HSV: The hue, saturation, value (HSV) method is a linear traverse of colors between pairs: Color1 H to Color2 H, Color1 S to Color2 S, and Color1 V to Color2 V. Essentially, all intervening colors are shown. The HSV algorithm was used for color ramps in ArcView 3.x and is perhaps the easiest color model to understand but may not be the most intuitive for map reading purposes.
CIE Lab: This method blends two colors without traversing intervening hue space. The result is a smooth progression from Color 1 to Color 2. In many cases, this produces a very desirable smooth ramp between two colors. This algorithm takes the shortest path through the color spectrum. If you think of the color spectrum as a wheel of color progression beginning and ending with red, colors are chosen among the shortest distance on the circumference of the wheel to create the color ramp. One deficiency in this algorithm is that sometimes the colors near the middle of the ramp can appear muddy when Color 1 and Color 2 are extremely different, that is, when approaching the maximum distance possible on the color wheel.
Lab LCh: This algorithm is very similar to the CIE Lab but does not seek the shortest path between colors. Instead, it works similarly to the HSV model but softens the effect of color transition considerably.
How to work with color ramps
Defining a color ramp with the Style Manager
- Click Tools, point to Styles, and click Style Manager.
- Click the Color Ramps folder to view its contents.
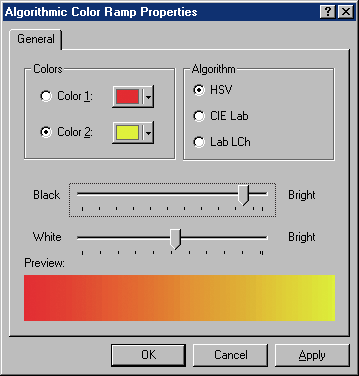
- Right-click on the Contents window, click New, then click Algorithmic Color Ramp.
- Click Color 1 in the Algorithmic Color Ramp Properties dialog box and set the start color for the ramp.
- Click Color 2 and set the end color for the ramp.
- Adjust the value of black and white brightness throughout the ramp.
- Click OK.
- Type the name of the new color in the Contents window.
| Tip |
|
Ramping colors in the Layer Properties dialog box
- Right-click the layer in the table of contents that shows a quantitative value and click Properties.
- Click the Symbology tab.
- Click Quantities and click Graduated colors.
- Choose a Value field and a Normalization field if desired.
- Set the number of Classes or change the classification scheme by clicking Classify.
- Double-click the top symbol in the list and set the start color for the ramp.
- Click OK.
- Double-click the bottom symbol and set the end color.
- Click OK.
Optionally, double-click any middle symbol to set its color. - Click all the middle symbols for which you've set the color.
By selecting one or more middle symbols, the color of those symbols is included in the new ramp; otherwise, ArcMap uses only the top and bottom symbols. - Right-click a symbol and click Ramp Colors.
Optionally, if you want to use the new color ramp on another layer, right-click the Color Ramp drop-down and click Save to style to save your new ramp to your default style. - Click OK.
This lets you create a multipart color ramp.
| Tip |
Learn about drawing features to show quantities |