Show Navigation
|
Hide Navigation
You are here:
Geodatabases and ArcSDE > Administering ArcSDE geodatabases > Connecting to an ArcSDE geodatabase
Geodatabases and ArcSDE > Administering ArcSDE geodatabases > Connecting to an ArcSDE geodatabase
Setting up clients for a direct connection |
|
|
Release 9.2
Last modified December 3, 2010 |


Print all topics in : "Connecting to an ArcSDE geodatabase" |
Related Topics
About setting up clients
NOTE: ArcSDE Enterprise only
You will first create your database and install ArcSDE. When your database software is installed and the database is created and configured for ArcSDE, you are ready to set up your client machines.
You must configure each client machine from which you want to make a direct connection to the geodatabase. The steps you follow to set up a client machine to connect directly to an ArcSDE Enterprise geodatabase on each supported database management system (DBMS) are detailed below. Click the appropriate link to go directly to that section.
-
Set up clients to an Oracle database
-
Set up clients to a SQL Server database
-
Set up clients to a DB2 database
-
Set up clients to an Informix database
How to set up clients to connect directly
To a geodatabase in Oracle
Oracle Net is required on each client machine you want to directly access your DBMS.
- Use Oracle tools to install and configure Oracle Net to connect to an Oracle instance with SQL*Plus.
Follow the directions in your Oracle documentation to install Oracle Net. - Test that Oracle Net was installed successfully by typing the following at a command prompt on the client machine:
- For each client machine, there are system environment variables you must set, such as the ORAHOME and Path variables. If necessary, ask your system administrator to find out how to set environment variables on your systems.
- Test the connection by adding a spatial database connection from ArcCatalog. Instructions for this can be found in the topic Creating spatial database connections.
sqlplus <user name>/<password>@<Oracle Net service name>
where <user name> is a valid Oracle user name, <password> is that user's password, and <Oracle Net service name> is the service name of the Oracle database to which you want to connect. (This is usually the global database name.)
If you get the SQL prompt when you execute the command, the Net client is working and you are ready to go to the next step. If you do not get the SQL prompt, consult the Oracle documentation's troubleshooting information.
| Tips |
The sde:oracle** tells the ArcSDE client API which driver you are looking for, not to which database you are connecting. In other words, an Oracle9i driver will connect to an 8i database and vice versa. The drivers differ in the version of Oracle with which they were built. If you have Oracle8i client software on the local machine, use: sde:oracle If you have Oracle9i client software on the local machine, use: sde:oracle9i For connections from a local machine with the Oracle 10g client, use the syntax: sde:oracle10g If you have Oracle9i or Oracle 10g client software on the local machine and try to connect with the server string: sde:oracle you will get the following error message: Failed to Connect to Specified Server. Underlying DBMS Error [ Unknown Error. No extended error] mypassword@<Oracle Net Service name> Top of page |
To a geodatabase in SQL Server
- Be sure you have a valid installation of the Microsoft Data Access Components (MDAC) on the client machine. If you do not, you will need to install the latest Microsoft Data Access Components. Check msado15.dll in \program files\common files\system\ado or download the component checker from www.msdn.microsoft.com and search for Data Access Downloads.
(MDAC versions beyond 2.8 are included with updates to your operating system, so if your client's operating system is up-to-date, you should have the correct components.) - If you have the SDEHOME environment variable set, make sure there is an etc folder in it. If it is not set, you can add an etc folder in your ArcGIS installation location. This etc folder is where log files containing error messages for direct connections are stored by default.
- Test the connection by adding a spatial database connection from ArcCatalog. Instructions for this can be found in the topic Creating spatial database connections.
| Tips |
Variable:	SDEHOME
Value:  C:\Program Files\ArcGIS\sql
From an ArcGIS client, set neither and let the search default to: HKEY_LOCAL_MACHINE\SOFTWARE\ESRI\CoreRuntime\InstallDir. The direct connect process will search for the appropriate driver in the bin directory of the path specified. Top of page |
To a geodatabase in DB2
- Use the DB2 Configuration Assistant to configure the client to connect directly to a DB2 instance. The Configuration Assistant comes with DB2 and lets you configure and maintain the database objects that you or your applications will be using. It is available as part of the DB2 Administration Client and DB2 Application Development Client. Please refer to DB2's documentation for all information on using the DB2 Configuration Assistant to connect directly to a DB2 instance.
- Test the database connection that you created using the Configuration Assistant.
Open the Databases page in the DB2 Configuration Assistant. Select the database with which you want to work and from the Selected menu, click Test Connection. When the Test Connection notebook opens, click the type of connections that you want to test. In the User ID field, type a user ID that can connect to the database. Type the password for the user ID in the Password field. If you do not specify a user ID and password, the system password will be used for the connection. Click Test Connection. The Results page opens, displaying the results of the connection test. - Create a local user account.
For direct connect to work successfully with ArcGIS, a local user with the same user name as specified for the connection to the server must be present on the client machine. This user does not require any special permissions. - Test the connection by adding a spatial database connection from ArcCatalog. Instructions for this can be found in the topic Creating spatial database connections.
If the connection is successful, you will get the following message:
This process creates an entry in the db2cli.ini file that will look like this. This file resides under the %DB2PATH% dir.
[SDEQUART]
DBALIAS=SDEQUART
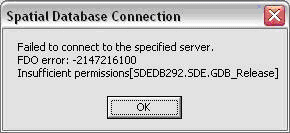
To create a local Windows user, refer to Microsoft's Windows documentation. If you do not create a local Windows user account on the client machine with the same user name and password as the one specified for the server, you will receive the following message when attempting a connection through ArcCatalog:
For Unix platforms, refer to the platform-specific commands and procedures (for example, useradd).
| Tip |
Top of page |
To a geodatabase in Informix
- Install the Informix Client SDK or the I-Connect application on each remote client machine you want to direct connect to your database. This makes the Informix client setup files you need available to you. Consult your Informix documentation for further information or help on how to install these applications.
- Be sure that the user on each client machine you want to connect directly to your database has the Connect permission on the database server.
- Set up an ODBC driver connection.
For Windows - Test the connection by adding a spatial database connection from ArcCatalog. Instructions for this can be found in the topic Creating spatial database connections.
If the Informix server is running on the same host as the client application, you can skip this step.
Use SetNet32 to configure the client so that it can work with the available objects. Also use SetNet32 to add a new Informix server.
For Unix
Set up the $INFORMIXDIR and add the appropriate database server entry in the sqlhosts file in the $INFORMIXDIR\etc directory.
Consult your Informix documentation for further information or details on how to set the ODBC driver connection.
| Tip |
Top of page |