Mapping and visualization > Symbolizing data > Applying symbology
Working with symbol levels |
|
|
Release 9.2
Last modified August 15, 2007 |


Print all topics in : "Applying symbology" |
About working with symbol levels
Symbol level drawing allows you to achieve special cartographic effects by giving you control over the drawing order of feature symbology. You specify the order that symbols and symbol layers for multilayer symbols are drawn on your map—overriding the default ArcMap drawing sequence. With symbol level drawing, the drawing order is based on each feature's symbol and the position of that symbol in the symbol level drawing order. Symbol level drawing parameters may be set individually for each feature layer or group layer.
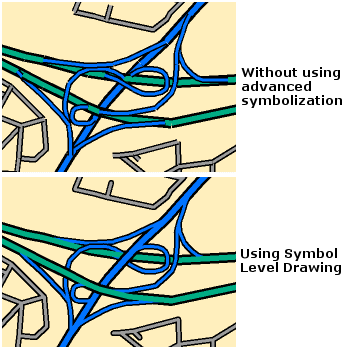
Using symbol level drawing is useful for achieving some graphic effects that can give your maps a polished cartographic look. You can use symbol level drawing to symbolize overlapping and intersecting line features with cased-line symbols. For example, on a large-scale reference map with intersecting streets, you can create high-quality representations of streets. Where streets intersect, you can blend the symbology for connectivity; otherwise, you will represent an overpass.
You can work with symbol levels in two different views: default view and advanced view. Default view lets you quickly create maps with common cartographic effects by setting Join and Merge settings for your symbols. Advanced view allows you to create more complex effects.
What are symbol levels?
Symbol level drawing lets you control the drawing order of feature symbology, but its true power is that you can create special cartographic effects by specifying the drawing order of symbol layers for multilayer symbols. This lets you create, for example, a reference map with cased-line streets, and where these streets intersect, you can either blend their symbology, representing connectivity, or not, representing an overpass or underpass.
The first conceptual step in creating such a map with connected streets is to connect like streets. By specifying in ArcMap that a given multilayer symbol is joined, you achieve this effect. When a symbol is joined, all features assigned to the symbol have the connectivity effect when they intersect with each other on the map. In a real-world example, if your highway symbol is joined, this means that all your highway features will be connected when they connect to each other on the map.
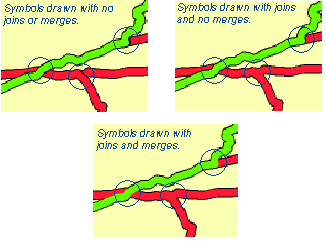
Conceptually, you can take this one step further by specifying that a given symbol will show a connectivity effect when it intersects one other type of symbol but not another type of symbol. To continue the real-world example, you can specify that your highway features only show the connectivity effect when they intersect your highway ramp features (all symbolized with your highway ramp symbol). However, when highway features intersect all other street types, for example, surface streets, they will not be connected. In ArcMap terminology, this scenario is stated that the highway symbol is merged with the highway ramp symbol, but it is not merged with the surface street symbol.
What can you do with symbol level drawing?
-
Symbolize overlapping and intersecting line features (for example, streets or roads) with cartographic quality, cased-line symbology
-
Draw features in a specified order
-
Symbolize polygon features such that boundary lines between polygons with like attribute values are dissolved
Highways and streets on a large-scale map are the classic example of where you should use symbol level drawing. On these maps, highways and streets are not represented by a single line, but instead they have a thickness. Use symbol level drawing to symbolize the intersections of highways, streets, or both on such a map so that the symbols are blended together where desired to represent connectivity but not blended in other situations to represent disconnectivity—for example, where a highway passes under a surface street.
NOTE: Symbol level drawing does not affect network connectivity for analyses. Rather, it is a tool that can be used to represent connectivity on your maps.
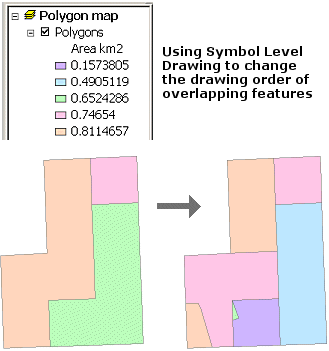
Using unique values symbology together with symbol level drawing, you can specify the exact drawing order of (overlapping) features. You might do this is if you have a layer of overlapping polygons. By drawing these features in order from largest to smallest, you increase the number of visible features on your map. In ArcMap, you can do this using symbol level drawing. This functionality is equivalent to the ArcPlot SORT command in ArcInfo Workstation.
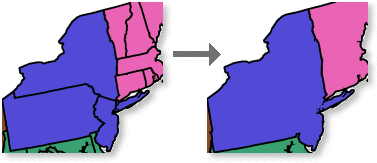
Using symbol level drawing in ArcMap, you can eliminate boundaries between polygon areas with the same attribute value. This is equivalent to the ArcPlot DROPLINE command in ArcInfo Workstation. This achieves the same visual effect as dissolving features based on an attribute without affecting feature geometry.
How does symbol level drawing work?
When you use symbol level drawing, you override the ArcMap default drawing sequence. In the default sequence, features are drawn first by layer according to the order of layers in the table of contents. Then, within each layer, features are drawn based on the table order, that is, the order that features are stored in the feature class table or the order that they are returned from the database. When you enable symbol level drawing, you are overriding this mechanism.
You can work with symbol level drawing in ArcMap at two levels: feature layer and group layer. By default, symbol level drawing is off for all layers. You should turn on symbol level drawing only for layers where you want the effect.
Opening an existing map with Advanced Drawing Options
Symbol level drawing replaces the Advanced Drawing Options functionality that existed in ArcGIS 8.
When you open a .mxd file with Advanced Drawing Options enabled that was created in ArcGIS 8, you have two options. The recommended option is to upgrade your document to use ArcGIS symbol level drawing. The second option is to leave the Advanced Drawing Options present and work with these settings if necessary.
When you save a copy of an ArcGIS 9 .mxd for use in ArcGIS 8.3, the supported aspects of the layer's symbol level drawing are retained and added to the data frame's Advanced Drawing Options dialog box.
Learn more about saving to previous versions of ArcGIS
How to work with symbol levels
Turning on symbol level drawing for a feature layer
- Right-click the layer or group layer you want to draw using symbol levels in the table of contents and click Properties.
- Click the Symbology tab.
- Click the Advanced button and click Symbol Levels from the drop-down list.
If you're working with a group layer, click the Symbol Levels button. - Check Draw this layer using the symbol levels specified below.
- Click OK.
| Tips |
|
Turning on symbol level drawing for a group layer
When you enable symbol level drawing for a group layer, you specify the draw order for each symbol for all the feature layers contained by the group layer. Drawing occurs similarly to the feature layer case. The draw order of all the features in all the feature layers in the group layer will no longer be based on table order. Instead, the symbol level drawing order will control the drawing sequence. In a sense, all the symbols (or symbol levels) for all the layers contained by the group layer are put on a list, and you are able to specify the order in which your feature symbology is drawn by arranging the order of this list.
- Right-click the group layer in the table of contents you want to draw using symbol levels and click Properties.
- Click the Group tab.
- Click the Symbol Levels button.
- Check Draw this layer using the symbol levels specified below.
- Click OK.
| Tips |
|
Setting symbol levels in default view
- Open the Symbol Levels dialog box for your layer or group layer and turn on symbol level drawing.
If you're working in advanced view, click Switch to Default View. - Double-click a symbol to change its properties.
- Change the symbol drawing order by moving symbols up and down in the symbol list with the arrows or by dragging and dropping them.
Symbols at the bottom of the list are drawn before symbols at the top. - Check the Join box next to a symbol to achieve a blending effect for all features drawn with the symbol.
- Check the Merge box next to a symbol to blend that symbol with the symbol directly above it in the symbol list. Use Merge to achieve a blending effect for features drawn with different symbols.
- Click OK to close the Symbol Levels dialog box.
- Click OK to apply these changes to your layer.
| Tips |
|
Setting symbol levels in advanced view
- Use the advanced view of the Symbol Level Drawing dialog box if you require more control over the drawing order of symbol levels.
- Open the Symbol Levels dialog box for your layer or group layer and turn on symbol level drawing.
If you're working in default view, click Switch to Advanced View. Advanced view contains a matrix of symbols and their layers. - Double-click a symbol to change its properties.
- Type numbers into the Layer columns to set the drawing order.
Lower numbers are drawn before higher levels. A layer with a level value of zero will be drawn first. In advanced view, drawing order is determined by the values you type in the columns, not the order of the symbol list. - Click the arrow in the Symbol column, if you have multilayer symbols, so you can view the layers.
When you click a layer of a multilayer symbol, its cell in the Layer column is selected so you can type a value to set its drawing order. - Click OK to close the Symbol Levels dialog box.
- Click OK to apply these changes to your layer.
This view shows the complete list of symbol levels for all the symbols in the layer, and you are able to enter numeric values on the dialog box to specify where each level will be positioned in the draw order. More combinations are possible in advanced view than in default view.
| Tips |
|
Using symbol level drawing: Symbolizing streets and roads with cased lines
- Symbolize your line features so that you have a different symbol for each combination of road types—for example, interstate, state highway, surface street—and levels.
For levels, if you have complicated interchanges, your list of levels may include ground level, ramp, overpass, and so on. - Open the Symbol Levels dialog box for your feature layer or group layer and turn on symbol level drawing.
- Click Switch to Default View if you're working in advanced view.
- Change the draw order of your symbols based on the order that you want your lines represented on the map. Symbols at the top of the list are drawn last.
- Set your Join and Merge settings.
Generally, if symbolizing roads, you will want all symbols to be joined. However, only merge a symbol if you want the symbol to appear to be connected on the map with the symbol directly above it in the list. Otherwise, for an overpass/underpass effect, specify no merge. - Click OK.
- Click OK.
| Tips |
|
Using symbol level drawing: Drawing features in a specified order
- Symbolize your features with unique values symbology based on a field that indicates the desired draw order. Using this method, features with lower values will be drawn before features with higher values. To reverse this, right-click any value in the list and select Reverse sorting.
Your features are now assigned symbols based on the desired drawing order. You will use symbol level drawing to specify the drawing order of these symbols. - Open the Symbol Levels dialog box for your feature layer or group layer and turn on symbol level drawing.
- Check Draw this layer using the symbol levels specified below.
- Arrange the order of your symbols by using the arrow buttons or by selecting symbols and dragging and dropping them, if necessary, and click OK.
- Click OK.
Using symbol level drawing: Symbolizing polygons with dissolved boundaries between features with like attributes
- Right-click your layer and click Properties.
- Click the Symbology tab.
- Click Categories in the Show list and click Unique values.
- Click the Value Field drop-down arrow and click a field.
- Click Add All Values.
- Click the Symbol column heading and click Properties for all Symbols from the pop-up menu.
- Click Properties and click the + button to add an empty symbol layer.
- Click the top symbol level and specify an outline width of zero.
- Click the small padlock symbol next to the top symbol level to unlock this level.
- Click the bottom symbol level.
- Click the Color drop-down arrow and click No Color.
- Click the Outline Color drop-down arrow and click a color.
- Specify an outline width of to be twice as wide as you want it to appear on your map.
- Click the small padlock symbol next to the bottom level to lock this level.
- Click OK to close the Symbol Property Editor.
- Click OK to close the Symbol Selector.
- Click the Color Scheme drop-down arrow and click a color scheme.
- Click Advanced and click Symbol Levels.
- Check Draw this layer using the symbol levels specified below.
- Check Join for all your symbols.
- Uncheck Merge for all your symbols.
- Click OK.
| Tip |
|
Opening an existing map document with Advanced Drawing Options
- Open an existing map document (.mxd) saved in ArcGIS 8.x that has Advanced Drawing Options enabled.
- Right-click a data frame and click Advanced Drawing Options.
- Click the Symbol Drawing tab.
- You have two choices:
- Click Upgrade and click OK to use symbol level drawing instead of Advanced Drawing Options.
This is recommended. After clicking Upgrade, open the Symbol Levels dialog box to work with the symbol draw order and Join/Merge settings. - Optionally, if you choose not to upgrade, you can work with the symbol draw order and join/merge settings on this tab. You can upgrade at any point by clicking Upgrade, reopening the Advanced Drawing Options dialog box, and clicking Upgrade.
- Click OK.
- Repeat the above steps for each data frame in your map where you have Advanced Drawing Options enabled.
| Tips |
|