Mapping and visualization > Symbolizing data > Applying symbology
Working with variable-depth masking |
|
|
Release 9.2
Last modified August 15, 2007 |


Print all topics in : "Applying symbology" |
About masking
The term mask means to conceal from view or to hide. In ArcMap, variable-depth masking is a drawing technique for hiding parts of one or more layers.
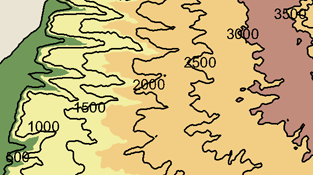
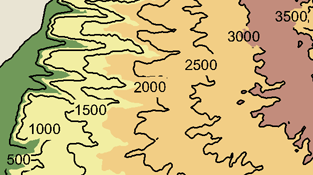
One common use for masking is to clarify the legibility of a map that is densely packed with text and feature symbology. You can create a polygon mask layer based on an annotation layer, then mask out some feature symbology to make the map more readable. With variable-depth masking, only some layers are hidden by the masks. In the contour map example shown below, the contour line labels and the contour lines run together. However, when using a mask for the text annotation, those sections of contour lines are hidden, but elevation shading appearing behind those layers is still visible.


Masking will be maintained on any of the ESRI-supported map export formats.
There are several geoprocessing tools you can use to create masks. For more information, follow these links:
Cul-de-Sac Masks
Feature Outline Masks (described in more detail below)
Intersecting Layers Masks
About creating a masking layer
NOTE: The Cartography tools are available in ArcInfo only; they are not available in ArcView or ArcEditor.
You can use any polygon feature class as a masking layer; however, you may want to create specific masks from the symbology or annotation of a layer. The ArcGIS toolbox provides the Feature Outline Masks tool to perform this task.
This tool works on the associated symbology of a layer. Therefore, this tool uses a layer open in ArcMap or a saved layer file (.lyr). The output is a polygon feature class saved within a geodatabase.
The mask is created by identifying a margin, or the area between the feature and the edge of the mask, and using an outline method. The outline methods include
- Exact—The mask is created to represent the shape, including internal holes, and will follow text exactly.
- Convex Hull—The mask is created to represent the shape, not including internal holes. For example, it will represent words, not each letter within a word.
- Box—The mask represents the shape as a rectangular bounding box.
About using a masking layer
You can use any polygon feature class to create masks. This feature class must be added to your map as a layer in the table of contents.
From a data frame's Advanced Drawing Options dialog box, you can turn the masking on or off by checking or unchecking the box to Draw using masking options specified below.
The masking layers can also be set to mask one or more layers. Each layer to be masked can be checked in the Masked Layers list when the mask layer is highlighted in the Masking Layers list.
About printing and exporting maps with masks
When creating masks, it is important to know that adding masks to maps adds complexity that will slow map drawing and affect map printing and exporting. Generally, there are three things to consider when creating masks for a map: (1) the number of masks, (2) the complexity of the masks, and (3) whether or not the masks will be used to mask polygon features filled with marker or line symbols. An increase in the number of masks, having more complex masks, and/or masking against marker or polygon fill symbols will result in slower drawing on your screen. Additionally, printing and exporting performance can be poor and even fail to produce valid output, first, because of the large amount of processing required to print and export maps with masks, and second, because of known limitations in how graphic file formats store map export results that have many complicated masks.
When seeking to improve drawing performance as well as to improve printing and exporting performance and reliability, the most important guideline to follow is to use the simplest masks necessary for the purposes of your map. In particular, when masking annotation text, you will find that CONVEX_HULL type masks are sufficient for many map purposes. If you need more detailed text masks, then use the EXACT_SIMPLIFIED type. Generally, when masking a lot of text on a relatively large map, avoid using the EXACT type mask because it will create too many complicated masks to produce valid output efficiently.
How to work with masking
Creating a masking layer
NOTE: The Cartography tools are available in ArcInfo only; they are not available in ArcView or ArcEditor.
- Click the Show/Hide ArcToolbox button
 on the Standard toolbar to show ArcToolbox.
- Expand the Cartography tools.
- Expand the Masking toolset.
- Right-click the Feature Outline Masks tool and click Open.
- Click the Input Layer drop-down arrow and click a layer or click the Browse button
 to choose a layer file.
- Type the name and location for the Output Feature Class or click the Browse button
 to create it.
- Type a value in the Reference Scale parameter.
If you're using an annotation layer, the reference scale will be automatically set. - Click the Spatial Reference Query button
 to set or change the spatial reference.
- Type a value in the Margin parameter, click the Margin drop-down arrow, and select a unit of measure.
- Click the Mask kind drop-down arrow and click a mask kind.
If using a point or annotation layer, you have three choices; otherwise, the default is Exact. - Optionally, check Create masks for unplaced annotation.
Click OK.
Using a masking layer
- Click the Add Data button
 to add the masking layer to the data frame.
- Right-click the data frame in the table of contents and click Advanced Drawing Options.
- Check Draw using masking options specified below.
Uncheck if you want to turn off masking. - Click the layer you want to use as a mask in the Masking Layers list
- Check the layers you want to have affected by the mask in the Masked Layers list.
- Click OK.