Show Navigation
|
Hide Navigation
You are here:
Mapping and visualization > Animation > Building animations
Mapping and visualization > Animation > Building animations
Animating scene properties |
|
|
Release 9.2
Last modified January 13, 2009 |


Print all topics in : "Building animations" |
Related Topics
About animating scene properties
In ArcScene, you can create an animation that changes ArcScene properties. The animation you create is contained within a scene track.
Reasons to create a scene track:
- To view a scene as it progresses through one day by gradually changing the background applied to a scene from blue to black (day to night) using multiple keyframes, and setting the azimuth and altitude (inclination) to values representing the sun position at multiple times throughout the day.
- To exaggerate the terrain in a scene.
To create the scene track, you create the keyframes it will contain. Keyframes are the most fundamental elements of an animation. A series of keyframes is assembled into a track. Create a keyframe to make a snapshot of the properties of the object or objects to which the track is bound. If the object is the scene, create keyframes to make snapshots of scene properties, such as the scene background color, as it changes through the animation.
Scene properties that can be animated
How to animate scene properties
Step 1: Create the scene track
Scene tracks can only be created by creating keyframes using the Create Keyframes dialog box.
- Right-click Scene layers and click Scene Properties to open the Scene Properties dialog box.
- Alter the scene property (vertical exaggeration, background color, azimuth, altitude (inclination), or contrast).
- If the Animation toolbar is not present in your application, click View on the Main Menu of the application, point to toolbars, then click Animation.
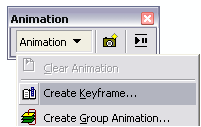
- Click the Animation drop-down arrow and click Create Keyframe.
- Click the Type drop-down arrow and choose Scene.
- Click New to create a new track with a default name, or type a name for a new track into the Destination track text box, then click New.
- Click Create to create the first keyframe.
You can change a scene property on the Scene Properties dialog box, then create a new keyframe repeatedly without closing the Create Animation Keyframe dialog box. You need at least two keyframes to create a track that will show change. - Click Close.

| Tips |
|
Step 2: Play the animation
-
Play the animation automatically using the Animation Controls dialog box
-
Play the animation manually using the Time View slider
- There are two ways to play the animation:
| Tip |
|