Extensions > Survey Analyst > Cadastral Editor > Fabric editing, parcel construction, and Least Squares Adjustments
Creating parcels using construction line work |
|
|
Release 9.2
Last modified August 23, 2007 |


Print all topics in : "Fabric editing, parcel construction, and Least Squares Adjustments" |
About the parcel construction environment
Unlike in the parcel traverse environment, where you are working with a single parcel, the parcel construction environment allows you to work with multiple construction lines to generate many parcels, for example, splitting a parcel subdivision.
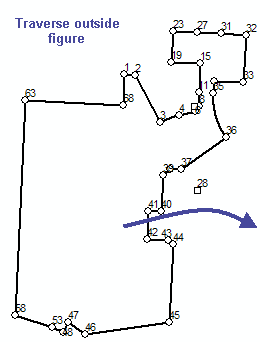
The parcel traverse environment uses a one-parcel-at-a-time approach where parcel record lines are defined separately for each individual parcel. The parcel construction environment uses a network of lines to build a set of parcels. This environment favors workflows where lines representing parcels are available electronically as vectors that can be imported and inversed (such as a CAD file). Another example for the parcel construction environment, would be where the requirements for a subdivision plan entry are to enter the outside figure first and then to split the outside figure into its subdivided parcels using internal line work.
Like the parcel traverse environment, the parcel construction environment works with line work, in a local coordinate system, outside of the cadastral fabric. No set of coordinates or knowledge of a spatial reference is needed to construct parcels from line work. All that is required are the parcel the dimensions, which are on the plat or record of survey. Newly generated parcels exist in unjoined space, outside of the cadastral fabric until they are joined and become part of the cadastral fabric.
Adding construction lines to the parcel construction environment
There are several ways of adding construction lines to the parcel construction environment:
- Digitizing line work
You can digitize straight lines in a freehand approach in the parcel construction environment. As each line is added, the line is inversed and the inversed dimensions are populated in the parcel construction line grid. - Copying line work from an external data source
You can copy lines from external source such as a feature class and paste the lines into the parcel construction environment. This is an easy way of bringing CAD line work into parcel construction environment. - Traversing construction lines
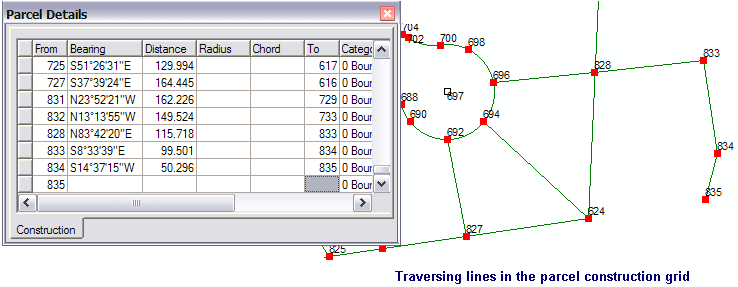
You can traverse in construction lines by entering a sequential set of dimensions in the construction line grid. You can traverse in any number of construction lines in the construction line grid, however you cannot generate misclose information like you can in the parcel traverse grid, as you are not working with an individual parcel. The purpose of the construction line grid is to store a network of construction lines, from which parcels can be generated. - Adding construction lines between construction points
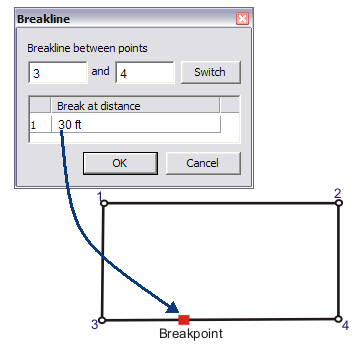
You can add construction points to an existing construction line or parcel line using the Breakline tool. The Breakline tool adds construction points at specified distances from the starting point of a parcel or construction line. Once you have construction points, you can add new construction lines between the points. For example, you would use the Breakline tool to split an existing parcel into smaller, subdivided parcels. - Adding construction lines using the construct parallel line tool
You can add new construction lines that are parallel to existing construction lines or parcel lines. For example, the construct parallel line tool can be used when creating easement parcels, which often have boundaries that are parallel to existing parcel boundaries. - Add construction lines at a specified angle to an existing line
You can add construction lines at a specified angle and length from an existing construction point or parcel point. This is useful for creating parcels using internal angles instead of bearings. - Converting existing parcels to construction lines
Any existing parcel in the Parcel Explorer can be unjoined converted into its construction lines. For example, you would convert an existing subdivision block into its construction lines if you wanted to use new construction lines to split the block into its subdivided parcels and right-of ways. When a parcel is converted into construction lines, the original parcel is preserved and unchanged.
Generating parcels from construction lines
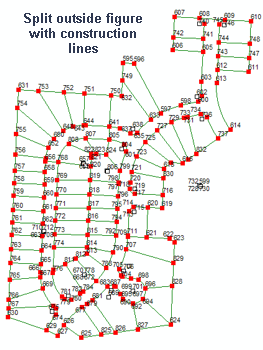
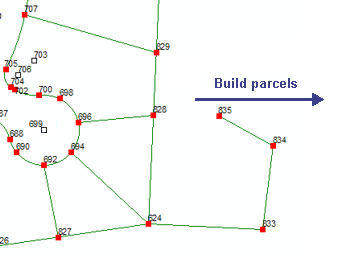
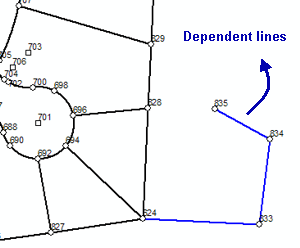
Once you have added the necessary construction lines to the parcel construction environment, you can generate or build parcels from your construction line work. The build process currently uses the Split method, which generates new parcels from each closed loop detected in your construction lines. You can also add your own build methods through ArcObjects, where you can build parcels based on selected lines and/or line types and so on. An example of a custom build method would be to build an overlapping easement parcel from a single construction line drawn across an existing parcel.
If the build process detects construction lines that are not part of a closed loop, i.e. dangling lines, the build process will keep the dangling lines as attached Dependent lines. Parcels are not constructed from dangling construction lines.
How to add construction lines to the parcel construction environment
Digitizing construction lines
- In an edit session in ArcMap, open an existing cadastral fabric job or create a new one.
- In the Parcel Explorer, right-click the plan node to which you want to add construction lines and click Construction. To create a new plan, right-click in empty space in the Parcel Explorer and click New Plan.
The map display switches to the Parcel Construction environment, with the starting construction point drawn at 0,0 coordinates. - Right-click the empty map display and click Digitize to turn on the digitizing functionality.
- Click the existing starting construction point (point 1) and then click the position of your To point to create your construction line. The Construction Line grid on the Parcel details dialog box is populated with the inversed dimensions of your digitized construction line.
- Continue to add construction lines by clicking the position of the To point of your construction lines. Each time you click on the map, a construction line will be drawn from the To point of the previous construction line to the position of your mouse click.
Traversing construction lines
- In an open cadastral fabric job, right-click the Plan node in the Parcel Explorer to which you want to add traversed construction lines and click Construction.
You can also select an existing parcel in the Parcel Explorer, unjoin the parcel, convert the parcel to its construction lines and start traversing in new construction lines using the existing parcel construction as a starting point. - In the Construction grid on the Parcel Details dialog box, click the Bearing/Angle field to type the bearing of your first traverse line.
- Push <Enter> on your keyboard to type a Distance in the Distance field.
- Continue to traverse in your construction lines in the same manner as you would when entering a parcel traverse in the parcel traverse environment.
Entering traverse lines in the Construction grid follows the same rules as entering traverse lines in the parcel traverse grid.
Learn more about entering traverse lines
| Tips |

|
Copying and pasting line work into the parcel construction frame
- In an open cadastral fabric job, right-click the plan node in the Parcel Explorer to which you want to paste line work, and click Construction.
The map display switches to the Parcel Construction data frame. - Load your feature class, CAD file or any other supported vector line source as a layer into ArcMap.
- On the Editor toolbar, click the Edit Tool
 and select the lines you want to copy.
- Right-click the map display and click Copy.
- In the Parcel Construction data frame, right-click in empty space in the Construction grid in the Parcel Details dialog box
- Click Paste.
Your selected lines are pasted into the construction environment and the inversed dimensions of the line work are populated in the Construction grid.
Copy your line work from your external data source.
| Tips |
|
Splitting parcels using the Breakline tool
- In an open cadastral fabric job, Click the Select Cadastral Features tool
 on the Cadastral Editor toolbar.
- Select the parcel you want to split or subdivide in the Parcel Explorer. You can also select the parcel on the map.
- Right-click and click New From Parent.
The parcel is opened in the parcel construction environment. - Click the Construction Tool
 on the Parcel Construction toolbar, right-click the parcel line you want to split and click Breakline.
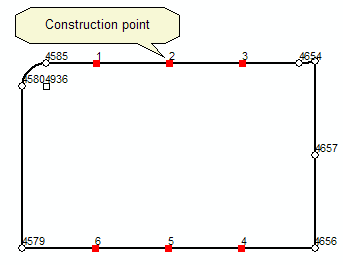
- In the Breakline dialog box, click the first field under the Break at Distance column and type the distance along the selected line where you want to place your first construction point. Push <Enter>.
- Type a distance to place your second construction point along the line
- Continue entering distances until you have placed all your construction points on the selected line.
- Click OK on the Breakline dialog box to create the construction points.
- Add corresponding construction points to the opposite parcel line.
- To create a construction line between two construction points, click the construction point you want as the from point of the construction line and then click the construction point you want as the to point of your construction line.
The construction line is added to the parcel and its dimensions are inversed and populated in the Construction line grid.

After you have added your construction lines, you can now generate parcels from your construction line work.
| Tips |
|
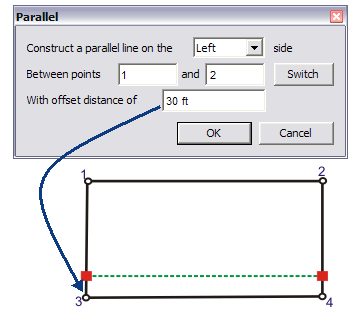
Adding construction lines using the Parallel tool
- In the parcel construction environment, click the Construction tool on the Parcel Construction toolbar.
- Right click a construction line or a parcel line (when using New From Parent), and click Parallel.
- On the Parallel dialog box, choose which side of the construction or parcel line you want to add a new construction line.
- Enter an offset distance and click OK.
The new construction line is created and its dimensions are inversed and populated in the Construction line grid.
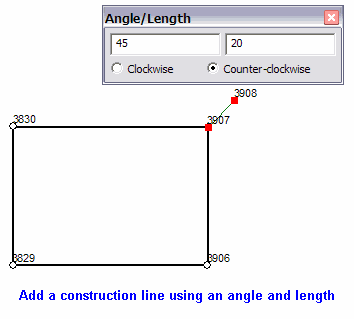
Adding construction lines using an angle and length
- In the parcel construction environment, click the Construction tool on the Parcel Construction toolbar.
- Right click a construction line or a parcel line (when using New From Parent), and click Angle/Length.
- On the Angle/Length dialog box, type an angle and a distance.
- Choose whether you want to construction line to be drawn at an angle clockwise or counter-clockwise to the selected construction or parcel line.
- Push <Enter> to create the construction line
The new construction line is created from the end-point (to point) of the selected construction or parcel line.
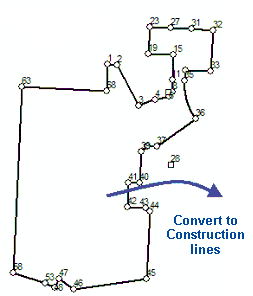
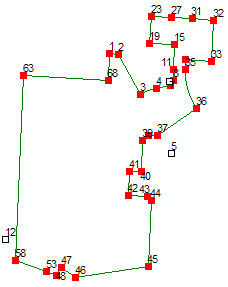
Converting parcels to a set of construction lines
- In an open cadastral fabric job, click the Select Cadastral Features tool on the Cadastral Editor menu and select the parcel (on the map or on the Parcel Explorer) you want to convert to construction lines.
- Right-click the selected parcel and click Unjoin to unjoin the parcel from the Parcel Explorer.
- Right-click the unjoined parcel and click Construction.
The parcel is displayed as a set of construction lines in the parcel construction environment.
| Tip |
|
Saving construction lines
- In the parcel construction environment click the Keep changes to parcel data command
 on the Parcel construction toolbar to save your construction lines as a new Construction set.
The data frame switches back to the open fabric job and a new Construction node containing your construction lines appears in the Parcel Explorer in unjoined space.
Building parcels from construction lines
- In the parcel construction environment, click the Build parcels using construction lines tool
 on the Parcel Construction toolbar.
Parcels are generated from the construction lines and the first parcel generated is selected on the map. - Under the Properties tab on the Parcel Details dialog box, enter a parcel name or accept the default. You can also enter other attribute information such as the Legal start date (which will be the recorded date on the associated plan).
Misclose Ratio, Misclose Distance and Misclose Bearing are populated automatically from the parcel misclose. - Click the Keep changes to parcel data command on the parcel construction toolbar to save your newly generated parcels.
The data frame switches back to the open fabric job and the new parcels are saved to the cadastral fabric.
| Tip |
|