Show Navigation
|
Hide Navigation
You are here:
Geoprocessing > Using geoprocessing tools > Batch processing
Geoprocessing > Using geoprocessing tools > Batch processing
Example of using batch processing |
|
|
Release 9.2
Last modified November 9, 2006 |


Print all topics in : "Batch processing" |
Related Topics
This section gives an example of using the batch window and grid. More details can be found in Using the batch grid control.
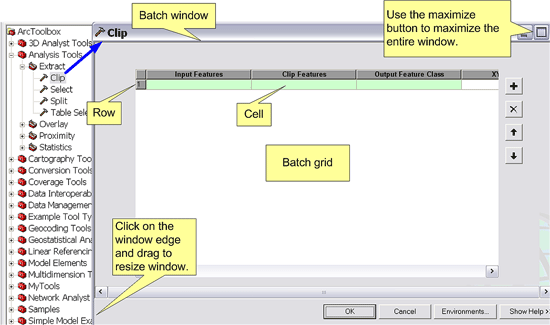
In ArcCatalog or ArcToolbox, right-click a tool and click Batch. This will open the batch window, where you can set up multiple runs for the tool. When you open the batch window for a tool, one row is automatically added, ready to accept input. The following example uses the Clip tool.

Resizing the batch window and grid
The first thing you'll want to do is to resize the window in order to show as many columns as possible in the batch grid, because most tools have more parameters than the number of columns visible in the window. To resize the window, click the outside edge of the window and drag to resize, or maximize the window using the controls in the upper right of the window. You can also change the width of individual columns by clicking and dragging the column separators.
Entering parameters
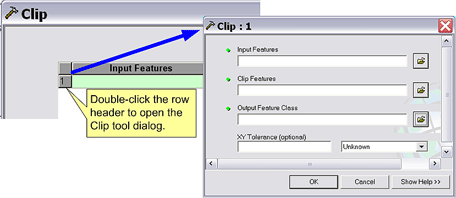
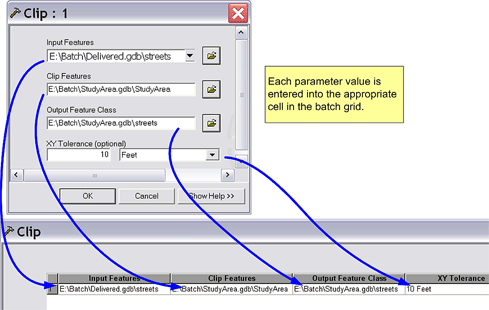
To enter the parameters for an entire row, double-click the row header to open the tool's dialog, as shown below. Alternatively, you can right-click the row header and click Open. Use the dialog to enter one or more of the parameter values.

After clicking the OK button on the tool dialog, the row in the batch grid contains the parameters you entered.

Adding more processes
Each row in the batch grid represents a process. A process is simply a tool plus the data needed to execute the tool. To add another process, click the Add button
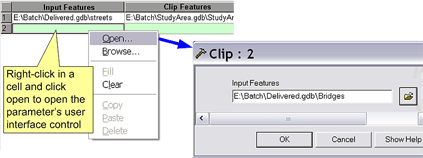
You could double-click on the row header as before to open the tool dialog, but you can also right-click any cell and click Open. The parameter control will open allowing you to enter the value for the cell. In the following example, the Input Features control is opened.

Easier yet, since the parameter is for a dataset, you can right-click the cell and click Browse to browse directly to the dataset. You can also drag and drop data into the cell.
After clicking OK and returning to the batch grid, it appears as follows (the Output Feature Class path name was automatically generated when the Input Features parameter was entered):
Note that the Clip Features cell is green, meaning that input is required. In this example, all data is to be clipped to the same Clip Features— E:\Batch\StudyArea.gdb\StudyArea. There are a number of ways you could enter a value for the Clip Features parameter in the second row. You could:
- Right-click in the cell and click Browse.
- Right-click in the cell and click Open to open the parameter control.
- Drag and drop a dataset from ArcCatalog or a layer from ArcMap.
- Select and copy the text from the cell above.
- Type in the value.
- Double-click the row header to open the tool dialog and enter the Clip Features parameter.
- Select the row by clicking the row header, then right-click on the Clip Features cell in the first row and click Fill. This will use the value of the cell to fill in the parameter value.

Illustration after using Fill:

Executing
After filling the batch grid, execute by clicking OK. The tool will execute once for each row, starting with the first row. The progress dialog will show the messages for each execution.