Adding a WMS service layer to ArcMap |
|
|
Release 9.2
Last modified August 5, 2010 |


|
- About GIS servers and services
- Connecting to GIS servers
- An overview of GIS service layers
- WMS service layers and coordinate systems
- Querying features from a WMS service layer
- Organizing service layers in the table of contents
- Changing the rendering of service layers
- Printing or exporting maps containing service layers
- Adding an ArcIMS service layer to ArcMap
- Adding an ArcGIS Server service layer to ArcMap
About adding a WMS service layer
A Web Map Service (WMS) layer in ArcMap is based on data from an Open Geospatial Consortium (OGC), WMS server. OGC WMS is an OpenGIS standard specification for interactive mapping based on requesting map images from a server over the Internet. OGC WMS client support in ArcGIS allows you to access these services over the Internet and add them to your maps as layers. OGC WMS services work in a similar way to ArcIMS Image services.
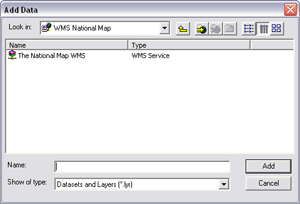
After connecting to a WMS server, WMS services are shown in the Add Data dialog box with this icon: ![]() . When you first add a WMS service into ArcMap, the first 20 layers in any WMS service will be turned on automatically, since a WMS service doesn't define which of its layers are visible. In this way, you are likely to see something useful when you first add the service to a map, without having a large number of individual layers to turn on or off. When you initially zoom in on WMS services, bear in mind that you won't necessarily see more detail unless the layers providing more detailed data happen to be in those first 20 layers. Similarly, if you preview a WMS service in ArcCatalog, you will see first the 20 layers in the service.
. When you first add a WMS service into ArcMap, the first 20 layers in any WMS service will be turned on automatically, since a WMS service doesn't define which of its layers are visible. In this way, you are likely to see something useful when you first add the service to a map, without having a large number of individual layers to turn on or off. When you initially zoom in on WMS services, bear in mind that you won't necessarily see more detail unless the layers providing more detailed data happen to be in those first 20 layers. Similarly, if you preview a WMS service in ArcCatalog, you will see first the 20 layers in the service.
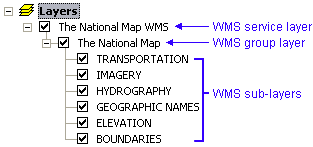
Unlike ArcIMS Image services, the layers that make up a WMS service may be organized into different groups by the author of the service. When added to ArcMap, the WMS service layer's entry in the table of contents is contracted to save space, but you can expand it and its groups to see the individual layers it contains.
A WMS service layer is made up of three types of layers that are arranged hierarchically in the table of contents. At the top is the WMS service layer, which holds all the other WMS layer types. There is only one service layer per WMS service. The next level is WMS group layers, whose only function is to organize WMS sub-layers into related groups. There can be any number of WMS group layers and nested groups within groups. WMS group layers do not hold any map features—it is the third group, WMS sub-layers, which actually contains the map features.
Each of these types of WMS layers has its own Layer Properties dialog box with different options available. The properties for WMS service layers, group layers, and sub-layers are described below.
WMS symbology and legend information
When a WMS service includes legend information, you can view the WMS sub-layer's symbology in the table of contents by clicking the expansion control next to a layer in the service. The legends for the layers in WMS services are all hidden by default in the table of contents, since accessing a legend for one layer in a WMS service requires sending a request to the server. For each additional layer, it is an additional request to the server. Having the symbol information expanded by default for all the layers in a service would take too long, as each request has to be sent separately.
Some WMS services do not include legend information about the symbols used by the layers in the service. When legend information is not available, no symbology is shown for the layers in the table of contents. These layers will be listed in the table of contents without expansion controls next to them.
The size of WMS legends can vary greatly. Sometimes the size of the legend specified by the server is too large to be displayed in the ArcMap table of contents. This usually happens when the legend for a layer contains multiple symbols, such as a transportation layer displaying symbology for the different types of roads. With WMS services, the legends for layers are transmitted over the Internet as one image containing all the symbols. Although ArcMap supports legend entries with multiple symbols in its table of contents, ArcMap expects these entries to contain multiple images, one image per symbol. ArcMap also places a limit on the size, height, and width (in pixels) of an image it will display in the table of contents. When the image received for a layer in a WMS service exceeds this limit, no legend is displayed for the layer. These layers are therefore listed in the table of contents without symbology and without expansion controls.
Properties of WMS service layers
The Layer Properties dialog box for a WMS service layer (top of the hierarchy) has four tabs: General, Source, Layers, and Advanced.
From the General tab, you can view or change the service layer name, description, and visible scale range. The Description box is initially populated with an abstract, when one is provided by the service. You can change the description for WMS service layers, but the Description text box for group and WMS sub-layers within the WMS service are read-only. You can also set a scale range for the service layer, which will be respected by all WMS sub-layers within the service layer.
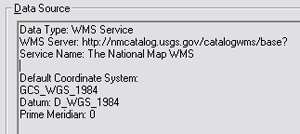
The Source tab provides information about the WMS service layer. This includes the service's extent, type, URL, name, and default coordinate system.
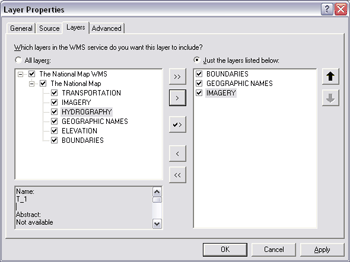
The Layers tab displays all the members of the WMS service. Information provided by the WMS server for each WMS layer is displayed in a box in the lower left. From this dialog box, you can choose which WMS service sub-layers to display in your map. You can also control layer visibility and drawing order. To learn how to work with this tab, see Organizing service layers in the table of contents.
The Advanced tab allows you to change the display of the service layer, including changing the background color and setting transparency. To learn how to work with this tab, see Changing the rendering of service layers.
Properties of WMS service sub-layers
The Layer Properties dialog box for a WMS service sub-layer has two tabs: General and Source.
On the General tab, you can check the Visibility box to change whether or not a WMS sub-layer displays on the map. All other information, including layer name, description, and scale ranges, is read-only.
Visible scale ranges for WMS sub-layers are supported in ArcMap. As with other layers with a visible scale range, the table of contents check box for the sub-layer will be gray with a dimmed scale bar underneath it when the sub-layer is not being drawn because the current map scale is outside the scale range. However, not all WMS services provide scale range information—even though the layer may have a scale range set in the service and will not draw at scales outside this range. When this information isn't provided by the WMS server, ArcMap can't show the scale range on the Layer Properties dialog box, and the layer's check box will be available in the table of contents. See Changing the rendering of service layers for more information.
The Source tab provides information about the WMS service sub-layer. This includes the URL for the WMS service, the service's name, the layer name, the default coordinate system, and a list of server-supported coordinate systems for this particular sub-layer. The layer name shown may not be the same as what is in the table of contents and on the General tab. This is because the text used for the layer name on the Source tab is taken from the <Name> tag in the WMS service capabilities file, which is the file used to describe the service. However, ArcMap uses the more descriptive <Title> tag from the capabilities file to populate the layer name for the table of contents and the General tab.
How WMS server errors are handled
You may sometimes get an error message from particular WMS services when you add them into a map. As with any live Web mapping service based on images, when ArcMap attempts to draw a WMS service in a map, it sends a request for an image to the WMS server providing that service. If the server returns an error instead of an image, ArcMap will display that error message. These error messages, which appear each time you redraw the map, reflect problems with the WMS service and normally can't be remedied in ArcMap. ArcMap displays these messages to warn you that something about the WMS service is not working as ArcMap expects and also to provide a basic diagnostic capability. However, because these errors can vary widely between different WMS servers, it is difficult for ArcMap to tell you the exact problem. As a result, the error messages are fairly generic, and what the problem is may not be obvious. For example, the error may be caused by a particular layer belonging to the WMS service or to a particular combination of layers.
If you get an error message, you can stop it from appearing again by simply unchecking the WMS service in the table of contents or removing it from your map. Sometimes, you may be able to tell which layer in the WMS service is causing the problem. In that case, try turning off that particular layer in the table of contents to prevent the error message from appearing.
Note that if you get an error message from a WMS service, it doesn't necessarily mean that you won't be able to draw this service in your map at all. For example, some WMS services may return the error "Bounding box has an invalid area" when you try to draw them at a very small scale, but the service will draw okay and the error message won't appear when you zoom in to larger scales. In this situation, it is recommended that you specify a scale range for the WMS service layer using the General tab of its Layer Properties dialog box so the layer is not drawn at very small scales. This will prevent the error messages from appearing when the layer can't be drawn.
How to add a WMS service layer
- Click the Add Data button
 .
.
- Click the Look in drop-down arrow and navigate to the GIS Servers folder.
- Double-click GIS Servers. This will give you a list of servers you have previously used.
- Scroll the list until you see the WMS server you want to use.
- Double-click the WMS server you want to access.
- Click the WMS service (not the WMS server).
- Click Add.
If you don't see the server you want, double-click Add WMS Server. For more information on connecting to a WMS server, see Connecting to GIS servers.