Show Navigation
|
Hide Navigation
Importing existing data for use with MOLE |
|
|
Release 9.3
Last modified December 4, 2009 |


|
Related Topics
ArcGIS and MOLE offer a variety of data import methods. As long as at the end of the import process, the data meets the minimum requirements for MOLE, you can use any of the import methods, then add the data to an ArcMap or ArcGlobe map using the Add MOLE Data toolbar button ![]() .
.
Adding data with this button allows the data to be symbolized according to the military specification you chose.
This topic provides:
- Instructions for importing data that has fields that give X and Y data:
- A table that lists other import methods you can use
Importing data using a combination of geoprocessing tools
In this procedure, you create an event layer from a table that contains a field named "X" and a field named "Y", convert the event layer to a feature class, then add MOLE fields to the feature class.
Step 1 - Create an event layer from a table that contains a field (column) named "X" and a field named "Y":
-
Open ArcToolbox.
- In ArcToolbox, navigate to Data Management Tools > Layers and Table Views > Make XY Event Layer.
- Double-click Make XY Event Layer to open it.
- In the Make XY Event Layer window, click the Open button
 in the XY Table area and navigate to a table that contains X and Y columns. This table can be in any ArcGIS-supported table format, including a Microsoft Excel spreadsheet.
- In the Layer Name or Table View text box, type the path and file name where you want the tool to save the layer file. Note: The tool does not create an actual layer; rather, it saves the layer in memory for use with another tool that will convert the layer file into a feature class.
- Click OK to save the new layer into memory. In-memory layers like this one are known as event layers.
The X Field and Y Field text boxes will display "X" and "Y" respectively, indicating that the tool has read your X and Y fields.
If you don't have fields named "X" and "Y" in your table but you have fields with x and y values that are named with names other than "X" and "Y", you can click the drop-down menus to indicate which field contains your x values and which contains your y values.
Step 2 - Convert the event layer to a feature class:
- In ArcToolbox, navigate to Conversion Tools > To Geodatabase > Feature Class to Feature Class.
- Double-click Feature Class to Feature Class to open it.
- In the Feature Class to Feature Class window, click the Open button in the Input Features area and navigate to the event layer you created in step 1. You may have to click the drop-down menu and select the event layer.
- Click the Open button in the Output Location area.
- In the Output Location dialog box, navigate to the directory that contains the geodatabase in which you want to save the new feature class. Highlight the geodatabase, then click OK.
- In the Feature Class to Feature Class window, type a name for the new feature class in the Output Feature Class text box.
- Click OK.
Note: A feature class is contained in a geodatabase, so if you don't already have a geodatabase for this feature class, you must create one. Another option is to save to a shapefile.
The geoprocessing tool runs, converting the event layer to a feature class. This feature class is a simple ArcGIS feature class (a non-MOLE feature class). It is saved to the directory you specified in the Output Location text box. To use it with MOLE, you must add MOLE fields to it to make it a MOLE feature class. For information on what makes data MOLE data (or a feature class a MOLE feature class), see MOLE data: an introduction.
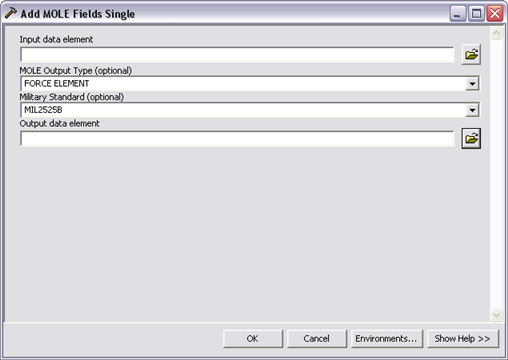
Step 3 - Add MOLE fields to a non-MOLE feature class:
- In ArcToolbox, navigate to Military Overlay Editor Tools > Utilities > Add MOLE Fields Single (that is, single feature class).
- Double-click the Add MOLE Fields Single tool to open it.
- Click the Open button in the Input data element area and navigate to the directory you specified in step 2 as the output location.
- Click the MOLE output type drop-down menu and select FORCE ELEMENT to create a MOLE force element layer (feature class) or TACTICAL GRAPHIC to create a MOLE point tactical graphic layer. For information on determining which MOLE feature class type you should import your data to, see Determining MOLE feature class type for new graphics.
- If you want to mark the MOLE layer you are creating with a military specification, click the Military Standard (optional) drop-down menu and select MIL2525B or APP-6A. For more information about marking a layer, see Marking a layer MIL-STD-2525B or APP-6A.
- Click the Open button in the Output data element area and navigate to the directory in which you want to save the new MOLE feature class. A feature class is contained in a geodatabase, so if you don't already have a geodatabase for this feature class, you must create one.
- Click OK to run the Add MOLE Fields geoprocessing tool.
The process described above can be put into a geoprocessing model and run in one step. You can drag and drop the above geoprocessing tools into a new model, then order them in the order you used them above. For more information, see Creating a simple model.
Import data into ArcMap using the Display XY Data command
In this procedure, you use the Display XY Data command on a Microsoft Excel spreadsheet that has x and y fields and the minimum required fields for MOLE, then convert the spreadsheet to a feature class or shapefile (to pick up the required ArcGIS requirements), then re-import it.
Step 1 - Say you have a spreadsheet or a comma separated file, such as an .xls, .csv, or .txt file, with XY coordinate data that you want to use in MOLE.
- Symbol_ID
- Name
- Parent
- X
- Y
- For simplicity's sake, we'll use a spreadsheet with only five fields, or columns, in it:
Your sample spreadsheet looks like this:

Because your spreadsheet has the minimum data requirements to be read by MOLE as a force element feature class/layer, you do not have to modify or add fields to make your data "MOLE ready".
Note: If your spreadsheet had not metthe minimum requirements, you could have used the Add MOLE Fields Single (Military Overlay Editor) geoprocessing tool to add the required fields plus all MOLE fields. Further, if your spreadsheet had not used the same field names the MOLE schema uses but otherwise adhered to the schema, after you ran the geoprocessing tool you could have mapped your field names to MOLE names provided the spreadsheet contained a 15-character text field named Symbol_ID.
Step 2 -Import the spreadsheet into ArcMap:
- If you haven't already, start up ArcMap and add the MOLE toolbar.
- Click the ArcMap Add Data button
 .
.
- In the Add Data dialog box, navigate to your spreadsheet (.xls file), then double-click it.
- In the table of contents, right-click the table (in the above image, you'd right-click Sample_spreadsheet$), then click Display XY Data.
- In the Specify the fields for the X and Y coordinates area, click the X Field drop-down menu to select the field name of the field that contains your X coordinate data. In our sample, the name of the field is "X".
- Click the Y Field drop-down menu to select the field name of the field that contains your Y coordinate data.
- Click OK.
- In the Display tab of the table of contents, right-click the table and click Data > Export Data.
- In the Export Data dialog box, in the Output shapefile or feature class area, click the Browse button .
- Navigate to the directory you want to store the output.
- Click the Save as type drop-down menu to select feature class or shapefile (either format will work).
- Click Save.
- In the Export Data dialog box, click OK.
The table in your spreadsheet is listed in the Source tab of the ArcMap table of contents, as shown in the following image.

The Display XY Data dialog box appears.
The table now appears in the Display tab of the ArcMap table of contents.
In the Saving Data dialog box:
The table is exported to the file format you selected. You can now add it as a layer in ArcGIS and it will display military symbology at the X and Y locations in your spreadsheet.
Additional import methods
| For this import method | See the instructions in |
| Typical ArcGIS import methods | - Import feature classes
- Importing tables - Importing datasets - Import raster datasets - Import from an XML workspace document - Use a wizard to load data in ArcCatalog - Use a wizard to load data in ArcMap |
| Add MOLE fields to one non-MOLE feature class or shapefile at a time using the Add MOLE Fields Single (Military Overlay Editor) geoprocessing tool | For detailed field descriptions, see the help provided with the tool (in the tool's dialog box).
For help getting started with the tool, see chapter 3 of Installing and Getting Started with Defense Solutions. For descriptions of the geoprocessing tools that come with MOLE, see Editing MOLE data using ArcToolbox. |
| Add MOLE fields to more than one non-MOLE feature class or shapefile at once | For detailed field descriptions, see the help provided with the tool (in the tool's dialog box).
For help getting started with the tool, see chapter 3 of Installing and Getting Started with Defense Solutions. For descriptions of the geoprocessing tools that come with MOLE, see Editing MOLE data using ArcToolbox. |