Extensions > Military Overlay Editor
Installation and setup |
|
|
Release 9.3
Last modified December 4, 2009 |


Print all topics in : "Military Overlay Editor" |
This topic provides an abbreviated version of the installation and setup documentation available in the Installing and Getting Started with Defense Solutions guide.
Installing MOLE
Detailed installation instructions are provided in the Installing and Getting Started with Defense Solutions guide.
Updating MOLE datasets
You must update your existing MOLE dataset if:
- You want to use pre-9.0 MOLE data in MOLE 9.0 or greater. See the Update Older MOLE database toolbar description for more information.
- You want to use wind barbs (meteorological graphics for wind) and your dataset was created in MOLE 9.0 or earlier.
For detailed instructions on updating your MOLE dataset, see chapter 3 of the Installing and Getting Started with Defense Solutions guide.
Starting with a shapefile
You can use shapefiles with MOLE, but it is recommended that you use geodatabases (single-user or multiuser) with MOLE instead, whenever possible. For more information on using MOLE with shapefiles, see Geodatabase versus shapefile.
Use your existing attribute data (labels) in MOLE
MOLE lets you use your existing attribute data—whether it be text labels, graphic modifiers, or any attribute data you want MOLE to use. If your field names don't match the names MOLE requires, you can instruct MOLE to use your existing field names instead.
Your first task is to add a Symbol_ID field to your data if it’s not already there. The field must be named Symbol_ID, it must be 15 characters in length, and it must have a type of Text or Character.
Once your dataset has the Symbol_ID field, you can open it in MOLE and use MOLE to map your other field names to MOLE field names. For MOLE to recognize point features as force elements, the point features must have a Parent field. Also see Minimum data requirements for MOLE.
For the procedure for mapping your existing fields to fields with names MOLE uses, see To map your field names to MOLE field names.
Creating new shapefiles for use with MOLE on non-Windows platforms
You can create a new shapefile for use with MOLE on non-Windows platforms such as Linux or Solaris. However, it is recommended you use the file geodatabase format instead.
Setting preferences
The following procedures describe the preferences you can set in MOLE:
-
To choose a default military specification
-
To change how graphics appear when selected
-
To change the default Symbol ID code used for new MOLE graphics
Choose a default military specification
By default, MOLE uses MIL-STD-2525B Change 2 specifications to render a layer's MOLE graphics in the map display and prompts you when it encounters an unmarked MOLE layer. An unmarked layer is a MOLE layer/feature class for which you haven't yet chosen a military specification.
When MOLE encounters an unmarked layer, it uses the military specification you've chosen as your default to display the layer's graphics in the map display. If you've checked Prompt, as needed, for standard, MOLE will always prompt you to choose a specification when it encounters (when you open) an unmarked layer.
You can have mixed layers within a map. For example, you can have a MIL-STD-2525B Change 2 layer and an APP-6A layer within the same map (.mxd file or .3dd file).
-
Install MOLE, start up ArcMap, then add the MOLE toolbar.
- On the MOLE toolbar, click MOLE > Options.
- In the Options dialog box, click to select one of the following options.
- Click OK.
The MOLE Options dialog box appears.
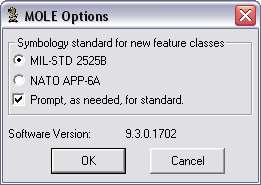
| Option | Description |
| MIL-STD-2525B Change 2 | If you want MIL-STD-2525B Change 2 to be your default military specification. MOLE will always use MIL-STD-2525B Change 2 specifications to mark unmarked layers it encounters. It will then render the MOLE graphics in the layer (and future unmarked layers it encounters) according to MIL-STD-2525B Change 2. |
| NATO APP-6A | If you want NATO APP-6A to be your default military specification. MOLE will always use APP-6A specifications to mark unmarked layers it encounters. It will then render the MOLE graphics in the layer (and future unmarked layers it encounters) according to APP-6A. |
| Prompt, as needed, for standard | If you want to be prompted to choose a specification every time MOLE encounters an unmarked layer. |
This setting will be preserved from session to session for your installation of ArcMap or ArcGlobe. You cannot store this setting in an individual .mxd or .3dd document.
Another way to set your default military specification is through the Select a Symbology Standard dialog box, which appears every time you open an unmarked feature class. See Marking a layer MIL-STD-2525B Change 2 or APP-6A for more information.
You can view which military specification a MOLE layer has been marked with by opening its Layer Properties dialog box and viewing the General Information area of the Graphic Cache tab.
Change how graphics appear when selected
For a layer, you can change the color of the outline MOLE uses to highlight selected MOLE graphics. You can also further customize how selected graphics will appear for a layer.
-
Install MOLE, start up ArcMap or start up ArcGlobe, then add the MOLE toolbar.
-
Add at least one MOLE layer.
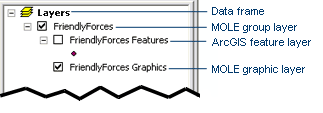
- In the ArcMap or ArcGlobe (Display tab) table of contents, double-click the MOLE graphic layer of a MOLE group layer.
- On the MOLE Layer Properties dialog box, click the Graphic Cache tab.
- On the Graphic Cache tab, in the Graphic Selection area:
- Adjust settings to specify how you want selected graphics to appear for the layer. For example, to change the fill color of selected graphics to a green gradient:
- In the Properties area, click the Type drop-down menu and select Gradient Fill Symbol.
- On the Gradient Fill tab that displays, in the Color Ramp area, click the Style drop-down menu to select the green gradient you want.
- When you are finished making changes, click OK to close the Edit Graphic Selection Symbol dialog box, then click OK to close the Layer Properties dialog box.
The MOLE Layer Properties dialog box appears.
| To: | Do this: |
| Change the color of the outline MOLE uses to highlight selected MOLE graphics | Clear the Use Specific Symbol checkbox, click the Selection Color drop-down list, then choose the color you want to use for selected graphics. Click OK to close the Layer Properties dialog box and skip the rest of the steps in this procedure. |
| Customize how selected graphics will appear for a layer (beyond the outline color) | Check the Use Specific Symbol check box and then click the Edit Symbol button Edit Symbol button |
The Preview area shows how the changes you made will appear.
Change the default Symbol ID code used for new MOLE graphics
When you create a MOLE feature class, you can set a default Symbol ID code for all new MOLE graphics in the feature class (in the layer).
- Start the procedure for creating a MOLE feature class. When you get to the fourth panel in the New Feature Class wizard (where field names, data types, and field properties are displayed), in the Field Name column, click Symbol_ID.
- In the Field Properties area, edit the value in the text box to the right of Default Value so that it reflects the Symbol ID code value you want MOLE to use for all MOLE graphics you create in the feature class.
- Click Finish.
The Field Properties area changes to reflect the Symbol_ID attribute's properties.
View illustration.
You can set other default values for fields using this same method.