Extensions > Military Overlay Editor > Advanced topics
Performance considerations |
|
|
Release 9.3
Last modified December 4, 2009 |


Print all topics in : "Advanced topics" |
This topic discusses ways to affect performance by:
Enabling tactical graphic renderers
If a layer is marked with the MIL-STD-2525B Change 2 specification, you can enable only the renderers you need for the layer (or need for your current task) and possibly improve performance. How much you can affect performance this way depends on how many tactical graphics are in your map and how frequently you perform full refreshes. You can re-enable the renderers at any time after you've disabled them.
Unlike force element layers, tactical graphic layers are drawn using custom renderers. Custom renderers allow you to add new or customized versions of tactical graphics, provided the associated renderer is enabled.
By default, MOLE enables the All Tactical Graphics renderer for all of the .mxd files you open or create in ArcMap, as well as for your current .mxd file. This renderer, also known as the all-in-one renderer, allows MOLE to display any type of MIL-STD-2525B Change 2 tactical graphic you want to add or that has already been added to the map. By default, this renderer is enabled for all tactical graphic types (point, line, and area).
The following procedure describes how to enable or disable renderers for an .mxd file. When you enable renderers using the procedure below, and then save the .mxd file, the list of enabled renderers is stored with the .mxd file.
Each renderer is responsible for drawing specific types of tactical graphic symbols. For example, the Multipoint Arrows renderer is required to display curved arrows. The renderers are listed on the Renderers tab of the tactical graphics Layer Properties dialog box. Each renderer can be expanded by clicking the plus sign (+) next to it to list each of the symbols that are supported by the renderer.
Each main type of tactical graphic (point, line, and area) has its own unique list of available renderers, and therefore, a slightly different looking Renderers tab than the other two types. However, the tab behaves the same, regardless of which type of tactical graphic layer you are working with.
- In the ArcMap table of contents, double-click a MOLE graphics layer of a MOLE tactical graphic group layer.
- Click the Renderers tab.
- If you want to enable a renderer, in the Available Compatible Renderers list area, click the renderer to highlight it, then click the right-pointing arrow
 to move it to the list area to the right.
- Repeat step 3 until you're finished enabling or disabling renderers.
- You can change the order that the renderers appear in the Associated Renderers list by clicking a renderer to highlight it, then clicking the up or down arrow buttons

 .
.
- Click OK.
The MOLE Layer Properties dialog box appears.
The disabled renderers are displayed in the Available Compatible Renderers list area, while the enabled renderers are displayed in the Associated Renderers list area.
View illustration of the default line tactical graphic Renderers tab.
or
If you want to disable a renderer, highlight it in the Associated Renderers list area, then click the left-pointing arrow
If the All Tactical Graphics (2525B) renderer is disabled, MOLE applies the renderers in the order they appear in the Available Compatible Renderers list area.
The order of the renderer names in the Associated Renderers list matters; if there is a conflict between two renderers in the list, the one closer to the top of the list has priority. For example, for a line tactical graphic layer, say you move both the Linear Obstacles (2525B Green) renderer, which uses green for linear obstacles, and the Linear Obstacles (2525B) renderer, which uses black for linear obstacles, over to the Associated Renderers list. If the Linear Obstacles (2525B Green) renderer is above the Linear Obstacles (2525B) renderer, linear obstacles will display as green symbols.
View illustration of the line tactical graphic Renderers tab after the all-in-one renderer has been disabled and the Multipoint Arrows and Boundaries (2525B) renderers have been enabled.
-
Additional information on tactical graphic renderers is provided in Line tactical graphic rendering.
- As you hover the mouse pointer over a renderer or a symbol name, a description of the selected item appears in the message bar.
- The Text Height text box displays the current height in map units of the label text for the tactical graphic layer. It also allows you to enter a new value for the text height.
- The Symbol Height text box displays the current height in map units of the symbols in the tactical graphic layer. It also allows you to enter a new value for the symbol height.
-
The Use Affiliation Color check box—MIL-STD-2525B Change 2 and APP-6A specify displaying tactical graphic symbols in colors that correspond to the force element's affiliation property. See the table below for colors and the corresponding affiliations. In practice, however, tactical graphics tend to be displayed in black. For this reason, by default, tactical graphic symbols are displayed in black by MOLE. You can override this by checking the Use Affiliation Color check box, which causes the symbols in the selected layer to be displayed in affiliation colors. The table and illustration below show how tactical graphic symbols appear when displayed in affiliation colors instead of the default black.
| Affiliation | Color |
| Friendly/Assumed Friend | Blue |
| Hostile/Joker/Faker/Suspect | Red |
| Neutral | Green |
| Pending/Unknown/Unspecified | Yellow |
Enabling periodic update of the graphic cache
You can specify a refresh interval for a layer, also known as enabling periodic update of the graphic cache.
This topic discusses:
When you should enable the refresh interval
You probably need to enable the refresh interval only under the following circumstances:
- When you are working in a multi-user database environment and one or more other users are editing the data (attribute fields) used by the map you are working in. In this case, assuming you have adequate system and network resources, you would enable the refresh interval and set the interval value as low as possible.
- System processes or automatic periodic processes (data merges, overnight data updates, and so on) affect the data (attribute fields) used by the map you are working in. In this case, assuming you have adequate system and network resources, you would enable the refresh interval and set the interval value as low as possible.
or
MOLE uses graphic caches to improve performance. When MOLE renders symbols in a map, it stores the graphics in a cache so it doesn't have to rerender them every time the display is refreshed during tasks such as panning and zooming. A MOLE layer's graphic cache is a snapshot in time of the state of a feature class (attribute table) in the database. When a local user edits the feature class, MOLE automatically performs a refresh. However, when more than one user is editing a feature class, the user who didn't make the edits to the feature class (the "non-local" user) will not see the changes until a refresh is performed. A refresh is performed when—
- The non-local user clicks the Refresh Graphics button on the MOLE toolbar.
- The interval of time the non-local user has specified as the refresh interval passes.
- Whichever occurs first.
or
or
Note that specifying a refresh interval (the second bullet) is optional.
How to specify a refresh interval
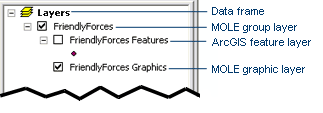
- In the ArcMap or ArcGlobe table of contents, double-click a MOLE graphic layer whose refresh interval you want to change. MOLE graphic layers are within MOLE group layers, as shown in the following illustration.
- Click the Graphic Cache tab.
- In the Graphic Update area, check the Enable Periodic Update check box.
- In the Update Interval in Seconds text box, type a value to indicate the number of seconds you want to pass before MOLE refreshes the layer. For example, if you type "5", MOLE will refresh the layer every five seconds. The lowest interval value you can enter is 1.
- Click OK.
- Repeat steps 1 through 5 for every layer whose refresh interval you want to change.
The MOLE Layer Properties dialog box appears.
MOLE will refresh the layer every time the interval of time you specified passes. MOLE does this by rebuilding and recaching all of the MOLE graphics in the layer.
This rebuilding includes the most recent changes to the underlying data (feature class/attribute fields) regardless of how many editors are editing the data, as well as changes to the layer settings, such as leadering, stacking, MOLE style, symbol height, and so on.
All MOLE graphics in the layer are refreshed, whether or not they are visible in the current extent and whether or not their visiblity is turned on.
The next time you save the map, the refresh interval(s) you specified will be saved in the layer information in the map. To save the refresh intervals you set, save the .mxd or .3dd file by clicking the Save button
Tips
- This type of refresh is the same as the one performed when you click the Refresh Graphics button on the MOLE toolbar, except that this refresh applies to only one layer. See Refresh one or more MOLE layers for more information.
- This refresh is also known as graphic cache update.