Extensions > Network Analyst > Performing network analysis
Finding the best route |
|
|
Release 9.3
Last modified March 2, 2010 |


Print all topics in : "Performing network analysis" |
About route analysis
Creating a route can mean finding the quickest, shortest, or most scenic route, depending on the impedance chosen. If the impedance is time, then the best route is the quickest route. Hence, the best route can be defined as the route that has the lowest impedance, or least cost, where the impedance is chosen by the user. Any cost attribute can be used as the impedance when determining the best route.
Accumulated attributes play no role when computing the solution. For example, if you choose a time cost attribute as the impedance attribute and also want to accumulate a distance cost attribute, only the time cost attribute is used to optimize the solution.
Finding the best route through a series of stops follows the same workflow as other network analyses.
Learn more about the network analysis workflow.
Learn about route analysis.
Route analysis layer
The route analysis layer stores all the inputs, parameters, and results of route analysis.
Creating a route analysis layer
You can create the route analysis layer from the Network Analyst toolbar by clicking New Route.
When you create a new route analysis layer, it shows up in the Network Analyst window along with its three categories—stops, barriers, and routes.
The route analysis layer also shows up in the table of contents as a composite layer, Route (or Route 1, Route 2, and so on), composed of three feature layers—Stops, Barriers, and Routes. Each of the three feature layers has default symbology that can be modified on its Layer Properties dialog box.
Components of a route analysis layer
Stops feature layer
This layer stores the network locations that are used as stops in route analysis. The Stops layer is symbolized by default in four types: Located Stops, Unlocated Stops, Error, and Time Violation Stop. You can modify the symbology in the Layer Properties dialog box of Stops. There is a new symbology category, Network Analyst Stops, added for the stops network analysis class. You can modify the symbol, color, or text symbol for any type of stop.

When a new route analysis layer is created, the Stops layer has no features. It is populated only when network locations are added into it.
Barriers feature layer
Barriers are used in route analysis to denote points where a route can't traverse. The Barriers layer is classified by default in three types: Located, Unlocated, and Error. The symbology of each can be modified in the Layer Properties dialog box of the Barriers layer. The Barriers layer functions as any other feature layer in ArcMap.
When a new route analysis layer is created, the Barriers layer has no features. It is populated only when network locations are added into it.
Route feature layer
The Route feature layer stores the resultant route of a route analysis. As with other feature layers, its symbology can be accessed and altered from the Layer Properties dialog box.
The Route layer on the Network Analyst window is empty until the analysis is complete. Once the best route is found, it is displayed on the Network Analyst window.
Network analysis classes for route analysis
Stops, Barriers, and Routes are the network analysis classes in the route analysis layer.
Learn more about network analysis classes.
Stop properties
ObjectID: The unique ID of the network location is assigned automatically.
Name: The name for a network location is assigned automatically when it is added to the map. You can rename the network location by clicking it, selecting the existing text, and replacing it with the new name.
- When a network location is added interactively to a new map, it is named Graphic Pick 1. Subsequent network locations interactively added in the session are named Graphic Pick 2, Graphic Pick 3, and so on.
- A geocoded stop is named with its address (for example, 1341 Parker Ave).
- When network locations are loaded from feature classes or feature layers (in ArcMap or using the Add Locations tool in ArcToolbox), the name of the locations can be assigned from any text field in the feature class. ArcGIS searches for and assigns the name field for the feature class based on a list of candidate fields.
RouteName: This represents the name of the route to which the stop belongs. Using this name property, stops within one route analysis layer can be assigned to multiple routes.
- If no name is present, all the stops belong to the same route.
- If some stops have route names, they are grouped into the route with the same name. In this case, if some stops do not have a route name assigned, then they are listed as unassigned and are not considered for routing.
Sequence: This number represents the order in which the stops are visited. Within a route, the sequence number should be greater than 0 but not greater than the maximum number of stops. Also, the sequence number should not be duplicated.
Status: If a stop is located on the network, the value of the status property is set to OK. If it cannot be located, the value of the status property is set to Unlocated. After a route has been solved, the stop status could change to Error or Time Violation. A stop status could change to Error if no path can be found to that stop. This can happen if there are barriers that prevent a path being found to the stop or the network is disconnected in some way. A time violation occurs when the time window start and end have been specified for the stop and the route does not reach that stop within that specified time window.
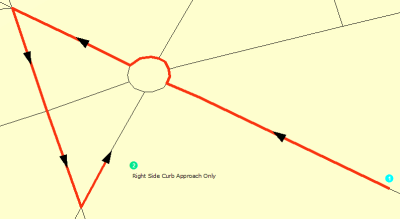
CurbApproach: The CurbApproach property allows approach to a stop from only one side of the vehicle. While routing school buses, you may want to allow stops to be approached only from the right side of the vehicle. In such a case, set this property to "Right side of vehicle." All stops that fall on the left side of the vehicle will not be directly approached. Instead, the route is likely to go around a block and approach those stops such that they fall on the right side of the vehicle.
ArriveCurbApproach: This property is set by ArcGIS Network Analyst. It indicates which side of the vehicle the curb is on when the route approaches the network location. If a stop has a "right side of vehicle curb" approach, then the ArriveCurbApproach would be set to Right side of vehicle. However, if the stop has an "either side of vehicle curb" approach, the ArriveCurbApproach could be right or left, based on the location of the previous stop.
DepartCurbApproach: This property is set by ArcGIS Network Analyst. It indicates which side of the vehicle the curb is on when the route departs from the network location. If a stop has a "right side of vehicle curb" approach, then the DepartCurbApproach would be set to Right side of vehicle. However, if the stop has an "either side of vehicle curb" approach, the DepartCurbApproach could be right or left.
Attr_[Impedance] (for instance, Attr_Minutes, where Minutes is the impedance for the network): This property stores the value of impedance for the network location. For example, if you are finding the best route through three stops using Drivetime as impedance, the property Attr_Drivetime can be used to store the amount of time spent at each stop. If you start from Stop 1, reach Stop 2 in 10 minutes, spend 15 minutes at Stop 2, and reach Stop 3 in another 5 minutes, then the total time to reach Stop 3 will be displayed as 30 minutes (10 + 15 + 5), even though it only takes 15 minutes of traveling to reach Stop 3.
Cumul_[Impedance] (for instance, Cumul_Minutes, where Minutes is the impedance for the network): This property of a stop is the total impedance it takes to reach that stop. This includes the impedance incurred in traveling to the stop, along with all the impedances on previous stops. In the example explained above, the Cumul_Drivetime for Stop 2 would be 25 minutes (10 minutes travel time + 15 minutes spent at Stop 2), and the Cumul_Drivetime for Stop 3 will be 30 minutes (25 minutes Cumul_Drivetime for Stop 2 + 5 minutes travel time from Stop 2 to 3).
Additional properties of stops while using time windows
These properties of stops are available when the Use Time Windows option is checked in the Analysis Settings on the Analysis Layer Properties dialog box.
TimeWindowStart: This property of a stop can be set by you. It stores the earliest time a route can visit the stop. If the TimeWindowStart is set to 10:00 A.M. and the route arrives at the stop at 9:50 A.M., there is a wait time of 10 minutes that is added to the total time.
TimeWindowEnd: This property of a stop can be set by you. It stores the latest time a route can visit the stop. The TimeWindowStart and the TimeWindowEnd together make up the time window within which a route can visit the stop. If a stop has a TimeWindowEnd of 11:00 A.M. and the earliest time the route can reach the stop is 11:25, then a violation of 25 minutes is noted. Additionally, the stop is symbolized to display that it has a time window violation.
NOTE: The time fields in Stops class can contain either time-only values or date-and-time values. If a time field, such as TimeWindowStart, has a time-only value (for example, 8:00 AM), the date is ignored. Using both date and time (for example, 7/11/2008 8:00 AM) allows you to specify time windows that span multiple days.
NOTE: A time window only states when a vehicle can arrive at an order, not when the service time must be completed. To account for service time and leave before the actual time window is over, subtract ServiceTime from the TimeWindowEnd1 field.
Learn about routing with time windows.
ArriveTime: When a route is calculated using time windows, the ArriveTime property stores the time at which the route visits the stop. The ArriveTime is dependent on the travel time from the origin to this stop as well as the wait time that was spent at prior stops.
DepartTime: This property stores the time at which the route departs from the stop. The DepartTime depends on the time it took to reach the stop. If the route arrives at the stop before the TimeWindowStart, then the DepartTime is set to the TimeWindowStart. For example, a stop has a time window from 10 A.M. to 11 A.M. The route arrives at the stop at 9:30 A.M. The arrive time at the stop will be 9:30 A.M. The Depart time for the stop will not be 9:30 A.M. Instead, it will be 10 A.M., because the stop can only be approached between 10 A.M. and 11 A.M.
Wait_[Impedance] where the impedance is based on time: This property stores the wait time at a stop where the route arrives before the TimeWindowStart.
CumulWait_[Impedance] where impedance is based on time: This property stores the cumulative wait time at all stops where the route arrived before the TimeWindowStart.
Violation_[Impedance] where impedance is based on time: This property stores the violation time at a stop where the route arrives after the TimeWindowEnd.
CumulViolation_[Impedance] where impedance is based on time: This property stores the cumulative violation time at all stops where the route arrived later than the TimeWindowStart.
Barrier properties
ObjectID: The unique ID of the network location is assigned automatically.
Name: The name for a barrier is assigned automatically when it is added to the map.
- When a barrier is added interactively to a new map with no other network locations, it is named Graphic Pick 1. Subsequent network locations added interactively in the session are named Graphic Pick 2, Graphic Pick 3, and so on.
- A geocoded barrier is named with its address (for example, 1341 Parker Ave).
- When network locations are loaded from feature classes or feature layers (in ArcMap or using the Add Locations tool in ArcToolbox), the name of the locations can be assigned from any text field in the feature class. ArcGIS searches for and assigns the name field for the feature class based on a list of candidate fields.
CurbApproach: The CurbApproach property of a barrier controls navigation on the network element on which the barrier is located. If a barrier has its curb approach property set to Either side of vehicle, the barrier will restrict traversal over the edge in both directions. If the curb approach is set to Right side of vehicle, the barrier will restrict all routes that have the barrier on the right. All routes that traverse the same edge but have the barrier on the left side of the vehicle will not be affected by the barrier.
Status: If a barrier is located on the network, the value of the status property is set to OK. If it cannot be located, the value of the status property is set to Unlocated.
Route properties
ObjectID: The unique ID of the route is assigned automatically.
Name: The name for the route is assigned automatically when the route problem is solved, either by reading the value from the RouteName property of the Stops class or if that value is null, by integrating the name of the first stop in the route and the name of the last stop, for example, Graphic Pick 1 – Graphic Pick 8. You can rename the route by clicking it, selecting the existing text, and replacing it with a new name.
FirstStopID: The ObjectID of the route's first stop.
LastStopID: The ObjectID of the route's last stop.
StopCount: The number of stops visited by the route.
Total_[Impedance] (for instance, Total_Miles or Total_Minutes): The total impedance from the beginning of the first stop to the end of the last stop. The total travel impedance and the Attr_[Impedance] of the visited stops are included in this value.
Additional properties of routes while using time windows
The following route properties are available when the Use Time Windows option is checked, which is found on the Analysis Settings tab of the Layer Properties dialog box.
TotalWait_[Impedance] where impedance is based on time: This property stores the route's overall wait time, which is the time spent at stops waiting for time windows to open.
TotalViolation_[Impedance] where impedance is based on time: This property stores the route's overall violation time at stops. Violation time is added when the route arrives at a stop after the time window has ended; it is the difference between the ArriveTime and TimeWindowEnd.
StartTime: The time the route begins.
EndTime: The time the route is complete.
Route analysis parameters
Analysis parameters are set up on the Layer Properties dialog box for the analysis layer.
The Analysis Layer Properties dialog box can be accessed by any of the following ways:
- On the Network Analyst window, click the Analysis Layer Properties button
 .
.
- On the Network Analyst window, right-click the analysis layer and click Properties.
- In the table of contents, right-click the analysis layer and click Properties.
- In the table of contents, double-click the analysis layer.
Analysis settings
The following parameters can be set for route analysis:
Impedance: Any cost attribute can be chosen as the impedance, which is minimized while determining the route. For instance, choosing the Minutes attribute results in the quickest route.
Learn more about cost attributes.
Restrictions: You can choose which restriction attributes should be respected for calculating the route. Restrictions, such as Oneway, should be used while finding the quickest route on streets. If your network dataset contains additional restriction attributes, such as weight limit or height limit, those could be used as well.
Learn more about restrictions.
Restriction attributes can also be used in conjunction with dynamic attributes. For example, an edge could be restricted if the vehicle is taller than the height of a tunnel.
Learn more about routing with parameterized attributes.
Start Time: A route can be assigned a start date and time. This option is available only when a time-based cost attribute has been selected to solve the route. This start time is used to specify when the route starts. After the solution, the start and end time of the route are populated in the output routes. These start and end times are also used when directions are generated. By default, the start time is set as 8:00 AM. A date and time can be specified as 10/21/05 10:30 AM. If the route spans multiple days, then the current date is used if it has not been specified.
Time windows: If a stop can be visited only during a particular time of day, its time window can be stored in the property of the analysis object (stop). This check box on the Route tab enables or disables the usage of those time windows. If time windows are enabled, the route will be modified such that it honors the time windows. If the route is unable to honor some time windows, the affected stops will be symbolized with a symbol for time window violations.
Learn about routing with time windows.
Reordering stops: By default, a route traverses stops in the order you define. However, you can choose to let Network Analyst find the best order based on a variety of variables such as time windows. Another option is to preserve the origin and destination while allowing Network Analyst to reorder the intermediary stops.
Allow U-turns: While calculating a route, Network Analyst can allow U-turns everywhere, nowhere, or only at dead ends (also known as cul-de-sacs). Allowing U-turns implies the route can double back on the same street.
Output shape type: The results of route analysis can be represented by either the true shape, a straight line, or none.
- True shape gives the exact shape of the result during the route analysis.
- Straight line results in a straight line between the stops. The route computed actually uses the street network and returns the same route cost as the previous case. However, the route feature is reflected as a single line.
- When the output shape type is set to None, no shape is returned. In all three cases, the properties for the route are the same. This means that in all three cases, only the shapes are different; the route cost (Total_Minutes) computed is the same.
Use hierarchy: If the network dataset has a hierarchy attribute, you can choose to use the hierarchy during analysis. Using hierarchy results in a route that prefers the hierarchy of the network and can be used to simulate situations such as traveling across a city, where someone might prefer to use the freeway instead of local streets. Not using a hierarchy yields the exact route across a network disregarding the hierarchy of the network.
Learn more about routing with hierarchy.
Ignore invalid locations: This allows you to ignore unlocated stops and find the route between located stops only. If this option is not used, you cannot find the best route until all stops are located.
Directions: With the Directions properties, you can set the units for displaying distance and, optionally, time (if you have a time attribute). Additionally, you can choose to open directions automatically after the generation of a route. (If you choose not to display directions automatically, you can click on the Directions Window button
Accumulation
Under the Accumulations tab, you can choose attributes that should be accumulated and added to the properties of the route.
Network locations
The Network Locations settings are used to find network locations and to set values for their properties.
Learn more about network locations.
Directions
Directions can be displayed in ArcMap after the generation of a route in route analysis and closest facility analysis.
To display directions, on the Network Analyst toolbar, click the Directions Window button ![]() .
.
- The Directions Window displays turn-by-turn directions and maps with the impedance.
- If the impedance was set to time, the Directions Window displays the time taken for each segment of the route. Additionally, the Directions Window can display the length of each segment.
- If the route supports time windows, the Directions Window displays the Attr_[time] and Wait_[time] attributes. However, the Violation_[time] and Attr_[length] attributes are not supported.
How to find the best route
Finding the best route in ArcMap
- Start ArcMap.
- Click Tools and click Extensions.
- Check Network Analyst.
- Click Close.
- Click the Add Data button
 .
.
- Navigate to the network dataset location.
- Click the network dataset and click Add.
- Click No to add only the network dataset to the map, or click Yes to add all the feature classes that participate in the network to the map.
- If the Network Analyst toolbar is not present, click the View menu, point to Toolbars, and click Network Analyst.
- If the Network Analyst window is not already open, on the Network Analyst toolbar, click the Network Analyst Window button
 .
.
- On the Network Analyst toolbar, click the Network Analyst drop-down menu and click New Route.
The Network Analyst window now contains empty lists of stops, routes, and barriers categories. Additionally, the table of contents contains a new route analysis layer. - There are two ways to add stops: from a point feature class or by adding points to the display.
- If you need to adjust a stop location, on the Network Analyst toolbar, click the Select/Move Network Location tool
 .
.
- There are two ways to add barriers: from a point feature class or by adding points to the display.
- If you need to adjust a barrier location, on the Network Analyst toolbar, click the Select/Move Network Location tool .
- In the table of contents, right-click the Route layer and click Properties.
- Click the Analysis Settings tab.
- Set the route properties to be used in the analysis.
- If you want to set properties for the directions, click the Directions tab.
- Click OK.
- If you have multiple analysis layers in your document, ensure you have the current route analysis layer visible on the Network Analyst window.
- Click the Solve button
 on the Network Analyst toolbar.
- i. In the Network Analyst window, right-click Stops and click Load Locations.
ii. Click the browse button and choose a point feature class.
iii. Click Add.
iv. Click OK.
- i. In the Network Analyst window, click Stops.
ii. On the Network Analyst toolbar, click the Create Network Location tool
iii. Click the locations on the display where you want to add stop locations.
- i. In the Network Analyst window, right-click Barriers and click Load Locations.
ii. Click the Browse button and choose a point feature class.
iii. Click Add.
iv. Click OK.
- i. On the Network Analyst window, click Barriers.
ii. On the Network Analyst toolbar, click the Create Network Location tool
iii. Click the locations on the display where you want to add barriers.
Finding the best route using a tool
- Start ArcCatalog or ArcMap.
- Click the Show/Hide ArcToolbox Window button
 to show the ArcToolbox window.
- Expand the Network Analyst toolbox.
- Expand the Analysis toolbox.
- Double-click Make Route Layer.
- Fill in the parameters for this tool.
Learn more about the Make Route Layer tool. - Click OK to run the tool.
- Double-click the Solve tool.
- Fill in the parameters for this tool.
Learn more about the Solve tool. - Click OK to run the tool.
| Tip |
|