Show Navigation
|
Hide Navigation
You are here:
Extensions > Network Analyst > Performing network analysis
Extensions > Network Analyst > Performing network analysis
Routing with time windows |
|
|
Release 9.3
Last modified March 2, 2010 |


Print all topics in : "Performing network analysis" |
Related Topics
Time windows in route analysis
What are time windows?
A time window is the duration in which a stop should be visited by a route. It is defined for a network location by its TimeWindowStart and TimeWindowEnd properties.
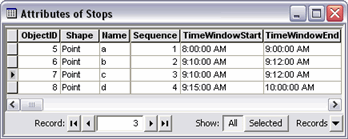
To better understand time windows, take the example of four stops—a, b, c, and d—for which a route needs to be found. The time window for each stop is given by the TimeWindowStart and TimeWindowEnd properties of each stop.

The route can begin from point a at any time between 8:00 A.M. and 9:00 A.M. However, it should not reach b before 9:10 A.M. As shown below, the route reaches b at 9:05:08 A.M.

Since b should be visited only between 9:10 A.M. and 9:12 A.M., the route waits at b for four minutes and forty seconds and then departs at 9:10 A.M. This wait time is stored in the Wait_Drivetime property of stop b, as 4.66 minutes, and is added to the total time taken for the route. The property Cumul_Drivetime for a stop stores the total time taken to reach it. The Cumul_Drivetime of b is 10 minutes (five minutes and twenty seconds of travel, and four minutes and forty seconds of waiting to honor the time window of stop b).

The route departs from stop b at 9:10 A.M. and reaches stop c at 9:15:20 A.M. However, stop c has a time window of 9:10 A.M. to 9:12 A.M. There is a violation of three minutes and twenty seconds, which is stored in Violation_Drivetime property as 3.33 minutes since the route is unable to honor the time window of stop c.

Stop c is symbolized with the time violation symbol
Time windows are treated as a "soft" constraint. This means that although the solver attempts to honor time windows, if necessary, it will violate the time windows of some stops in order to reach them. This is different from a "hard" constraint, in which there will be no route to the stop that has a time window violation. Hard time windows are not supported by ArcGIS Network Analyst.
A route solver attempts to find the least-cost route through a series of stops while respecting chosen restrictions on the network and honoring all time windows. If time window violations are inevitable, the solver attempts to minimize the total violation time.
How to create a route using time windows
Creating a route in ArcMap using time windows
Use the following workflow to use time windows in route analysis. Make sure you have an analysis layer and all required network locations for your analysis.
Learn more about finding the best route.
- On the Network Analyst window, double-click the analysis layer to bring up its properties.
- Click the Analysis Settings tab.
- Check the Use Time Windows check box.
- Click OK to close the Route Analysis Layer Properties dialog box.
- There are two ways to add stops: from a point feature class or by adding points to the display.
- If you need to adjust a stop location, click the Select/Move Network Location tool
 on the Network Analyst toolbar.
- In the table of contents, right-click the Route layer and click Properties.
- Click the Analysis Settings tab.
- Set the route properties to be used in the analysis.
- If you want to set properties for the directions, click the Directions tab.
- Click OK.
- If you have multiple analysis layers in your document, ensure you have the current route analysis layer visible on the Network Analyst window.
- Click the Solve button
 on the Network Analyst toolbar.
- i. On the Network Analyst window, right-click Stops and click Load Locations.
ii. Click the Browse button and choose the point feature class that you want to use to load stops.
iii. Click Add.
iv. For the TimeWindowStart attribute, under Location Analysis Properties, click in the Field column and select the field containing the start time for time windows for each stop.
v. For the TimeWindowStart attribute, click in the Default Value column and enter a default value for the start time for time windows.
vi. For the TimeWindowEnd attribute, under Location Analysis Properties, click in the Field column and select the field containing the end time for time windows for each stop.
vii. For the TimeWindowEnd attribute, click in the Default Value column and enter a default value for the end time for time windows.
viii. Click OK.
- i. In the Network Analyst window, click Stops.
ii. On the Network Analyst toolbar, click the Create Network Location tool
iii. Click the locations on the display where you want to add stop locations.
iv. On the Network Analyst window, right-click on the stop location and click Properties.
v. For the TimeWindowStart attribute, click in the Value column and enter a start time for the time window for the stop.
vi. For the TimeWindowEnd attribute, click in the Value column and enter a end time for the time window for the stop.
vii. Enter values of TimeWindowStart and TimeWindowEnd attributes for each stop for which you want a time window.