Extensions > Network Analyst > Performing network analysis
Network analysis with hierarchy |
|
|
Release 9.3
Last modified March 2, 2010 |


Print all topics in : "Performing network analysis" |
About network analysis with hierarchy
You can perform network analysis using the hierarchy of the network. The hierarchy classifies network edges into the following categories:
-
Primary roads (freeways and limited-access highways)
-
Secondary roads (major and arterial roads)
-
Local roads (collectors and local streets)

Benefits of hierarchical network analysis
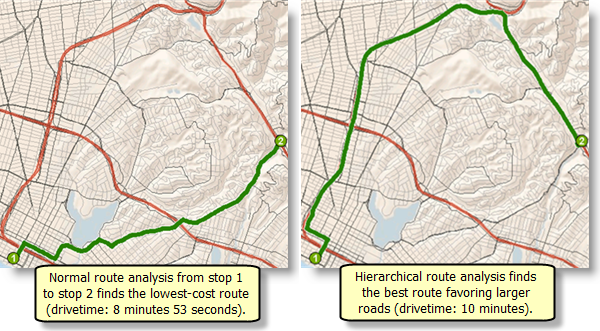
- It typically takes less time to compute a solution using a hierarchy. This time difference is especially pronounced when the network is large, your primary and secondary roads are thoroughly interconnected, and your stops are not clustered together on local roads.
- Driving directions for primary and secondary roads are often easier to follow since street signs are more visible and there are fewer intersections.
- The results from a network analysis using a hierarchy can emulate the preference of drivers on the road. For example, truck drivers typically prefer routes on primary roads since traveling on local roads increases the likelihood of difficult turning maneuvers and stopping, which consequently lowers their fuel efficiency and increases their emissions.
Even when you have the option of performing a hierarchical analysis, you can choose to ignore hierarchies. You should base your decision on your data and your particular network problem. If you aren't sure, run the analysis with and without the hierarchy, compare the results, and decide which results are the best fit for you.
How does hierarchy work?
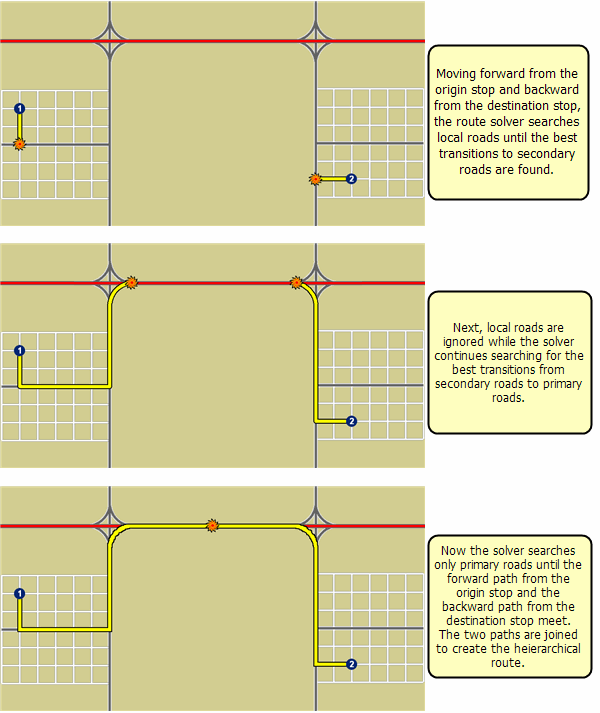
Hierarchical network analysis works by favoring primary roads over secondary roads and secondary roads over local roads. The route solver begins by simultaneously traveling forward from the origin stop and backward from the destination stop. Local roads are searched until the best transitions to secondary roads are found, from which point only secondary and primary roads are searched. The solver continues on secondary roads until the best transitions to primary roads are found. The solver then only searches primary roads, ignoring roads in the lower hierarchical classes, until the path from the origin meets the path going backward from the destination, thereby connecting the origin and destination and finding a route.
The objective of the solver is to minimize impedance while favoring a higher order of hierarchy. The graphic below demonstrates how the hierarchical solver functions.

If you place a barrier on a route that uses hierarchy, the solver tries to find an alternate course by either proceeding around the barrier or finding a completely different path—depending on which is shorter.
If the highway is disconnected, the route solver does not descend to the local street and connect. Instead, an error is returned. ArcGIS assumes that the highest order of hierarchy is connected.
Using hierarchy in network analysis
It makes more sense to use a time-based attribute as impedance when performing a hierarchical network analysis. If the impedance is not based on time, using a hierarchy may not produce realistic results. For analyses that don't minimize time, consider using nonhierarchical routes.
As long as the network dataset has a hierarchy attribute, you can set any network analysis layer you create to use the hierarchy by default. To change this setting, open ArcCatalog and then open the Network Dataset Properties dialog box. Click the Attributes tab, right-click on the hierarchy network attribute, and click Use By Default. You can also choose to enable hierarchies in ArcMap for each network analysis layer that you add by following these steps: open the Layer Properties for your network analysis layer, click the Analysis Settings tab, and click Use Hierarchy. Alternatively, you can perform a normal analysis by unchecking Use Hierarchy.
Additionally, you can modify the ranges that classify the network edges into the three ranks of hierarchy immediately before performing an analysis. This is useful when you change your study area to a place where the primary roads are sparse. For instance, in mountainous areas or countryside, the primary roads may be few and far apart. In such a situation, the streets that were assigned a default rank of major roads can be assigned a rank of primary roads. This allows the solver to favor both major roads and primary roads.
Setting up a hierarchical analysis
Adding a hierarchy to a network dataset
To perform an analysis using hierarchies, the network dataset needs to have a hierarchy network attribute. To set the hierarchy attribute, follow these steps:
- In ArcCatalog, use the Catalog tree to find your network dataset.
- Right-click the network dataset and choose Properties to open the Network Dataset Properties dialog box.
- Click the Attributes tab.
- Click Add to open the Add New Attribute dialog box.
- In the Name box, type a name for your hierarchy.
- Choose Hierarchy in the Usage Type drop-down list.
- Choose whether or not to use the hierarchy by default.
- Click OK.
- On the Network Dataset Properties dialog box, choose the hierarchy network attribute you just created and click Evaluators.
- Specify how the values that will be used to rank network edges into hierarchy classes should be assigned. This is done by choosing the proper Type and Value information on the Evaluators dialog box and, if necessary, filling in the required information in the text boxes on the Field Evaluators dialog box.
- Click OK to return to the Network Dataset Properties dialog box.
- Click Ranges.
- Classify the hierarchy network attribute values into ranges for primary, secondary, and local roads.
- Click OK to close the Hierarchy Ranges dialog box.
- Click OK to close the Network Dataset Properties dialog box.
Learn more about assigning hierarchies.
Set a hierarchy for an analysis layer
You can apply the following workflow to use hierarchy in route analysis, closest facility analysis, OD cost matrix analysis, or vehicle routing analysis. Ensure you have an analysis layer and all required network locations for your analysis.
Learn more about finding the best route.
Learn more about finding the closest facility.
Learn more about creating an OD cost matrix.
Learn more about solving a vehicle routing problem.
- On the Network Analyst window, double-click the analysis layer to bring up its properties.
- Click the Analysis Settings tab.
- Set the parameters to be used in the analysis.
- Check the Use Hierarchy check box to perform a hierarchical network analysis.
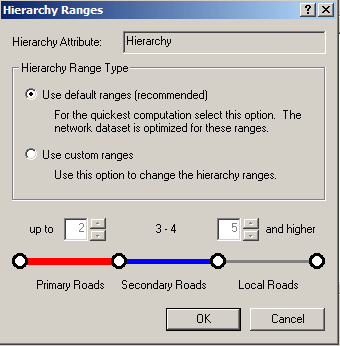
- If you need to adjust the ranges used to define the hierarchy attribute, click the Ranges button to open the Hierarchy Ranges dialog box.
- To modify the custom ranges, click the Use custom ranges button.
- Use the up or down arrow in the up to list to increase or decrease the hierarchy classes that will be classified as Primary Roads.
- Similarly, use the up or down arrow in the and higher list to increase or decrease the classes that will be classified as Local Roads.
Classes that are not classified as primary or local roads will be classified as secondary roads. - Click OK to return to the Layer Properties dialog box.
- Click OK to save these settings.
- On the Network Analyst toolbar, click the Solve button
 to generate results that use hierarchy.

The Hierarchy Range Type is set to Use default ranges (recommended).