Mapping and visualization > Page layout and map composition > Map output
Printing with the ArcPress printer engine |
|
|
Release 9.3
Last modified April 24, 2009 |


Print all topics in : "Map output" |
About printing with the ArcPress printer engine
Note:
This topic was updated for 9.3.1.
The ArcPress printer engine is designed to make printing large, complex maps possible on printers that may not have sufficient resources to process these maps. It can also help when printing maps that the Windows printer engine is unable to process. It does this by moving the processing of the map into a raster "picture" from the printer to your computer.
Using the ArcPress printer engine is a straightforward process. However, an understanding of the settings in ArcPress can help you attain your printing goals and avoid potential pitfalls.
Choosing the correct ArcPress driver for your printer
The ArcPress printer engine will automatically choose an ArcPress printer driver based on your printer model name when it is selected. ArcPress has specific drivers to support a variety of industry-standard printers. If ArcMap cannot match your printer type to an ArcPress driver, it will then prompt you to choose an ArcPress driver. However, the appropriate ArcPress driver for most large-format printers will be automatically selected.
If you are unsure about which driver to choose, check your printer manufacturer's documentation for raster language support. For example, printers from many companies support the HP RTL language, so you could choose an ArcPress HP RTL driver. Also, notice that a tip is displayed when you choose each driver from the ArcPress Properties dialog box, which will help you determine which driver is correct for your printer:
-
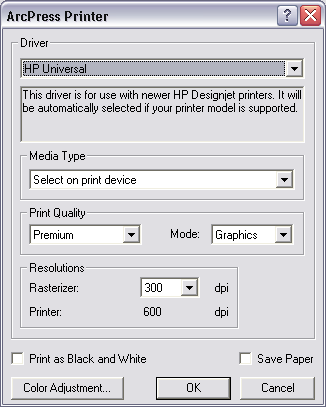
HP Universal: Use this driver for recent HP Designjet printers that support RTL or PCL3GUI languages. This driver will automatically be selected if your printer model is supported.
-
Epson Universal: Use this driver with Epson large-format printers. This driver will automatically be selected if your printer model is supported.
-
HP RTL (RGB) TrueColor: Use this driver for color printing on any true color RTL-capable printer that supports onboard dithering, which means some processing will occur on the printer. Choose this option if the HP Universal driver is not available for your printer model.
-
HP RTL (CMYK Color/B&W) Halftone: Use this driver for printing on printers that support RTL but do not support onboard dithering. This driver can also be used for monochrome printers that support RTL if the Print as Black and White option is chosen.
For more information on printers and drivers, see the knowledge base article #32745 FAQ: Which printers are supported by ArcGIS Desktop 9.x?
Output resolution
Resolution (measured in dots per inch, or dpi) is the size of the dot that is used to make up a print job. The print processing time and the time it takes to print will generally be longer when you select a higher value.
Increasing the resolution does not always ensure a higher-quality print, because the printed image might become too saturated, or the difference between the lower- and higher-dpi prints might not be varied enough to justify the longer processing time.
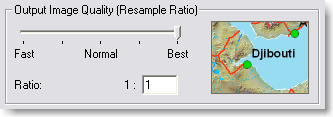
The ratio listed in the Output Image Quality control determines the effective resolution of raster content on output relative to the printer's selected resolution.
For the HP Universal and Epson Universal drivers, the resolution can be set individually for the rasterizer and output to the printer. These options can be changed by using the print quality options that best suit your print job's purpose and content. See the Additional settings for universal drivers section for more information regarding these options.
For the RTL and PCL drivers, the dialog box will automatically show output resolutions that are supported by your printer according to the installed printer driver.
About changing color parameters
While in most cases ArcPress should provide good color on the first print, you can use the ArcPress Color Adjustment options to alter the appearance of your map output. If the map document is saved with the Use Printer Paper Settings option (on the Page and Print Setup dialog box) checked, these settings will be saved with the map document. Note that these color parameters affect the entire map, both raster and vector information.

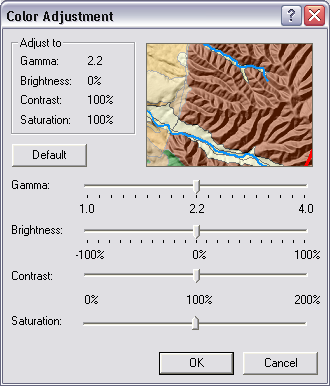
The ArcPress Color Adjustment dialog box has sliders for commonly used color correction parameters.
- Gamma—Gamma affects the intensity of midtones without affecting black and white. Increasing gamma will result in brighter colors overall. The default setting of 2.2 results in no change.
- Brightness—Brightness affects the overall intensity of the image, affecting black and white as well as midtones. The default of 0 percent results in no change.
- Contrast—Contrast affects the difference between light and dark areas in an image. Increasing contrast will make features more defined, but smaller variances in color and shading may be lost. The default of 100 percent results in no change.
- Saturation—Saturation affects the vividness of color. Increasing saturation will make the print appear more vibrant, but too much saturation can make colors seem overexaggerated. The default of 100 percent results in no change.
Additional settings for universal drivers
The HP Universal and Epson Universal drivers have additional settings.
-
Media Type: On supported printer models, the media type loaded into the printer can be chosen here. For some printers, this option cannot be set from ArcPress, and the settings that are chosen on the front panel of the printer are used.
-
Print Quality
(for the HP Universal driver): The print quality, mode, and media type settings affect the rasterizer resolution and output resolution for the print job. Always choose the print quality and mode that match your desired results and content. The CAD mode is meant for line work and vector data. The Graphics mode is meant for raster data. Always choose the appropriate media type according to the type of media loaded into the printer.
-
Print Quality (for the Epson Universal driver): The print quality, mode, and media type settings affect the rasterizer resolution and output resolution for the print job. Always choose the print quality and mode that match your desired results and content. Always choose the appropriate media type according to the type of media loaded into the printer.
-
Ink Type (for the Epson Universal driver only): On supported printer models, the ink type loaded into the printer can be chosen here. Be sure to choose the appropriate ink type according to what is loaded into the printer. Incorrect settings can cause errors at the printer on output.
How to print with ArcPress
Choosing the ArcPress printer engine
- Click the File menu and click Print.
- Click the Printer Engine drop-down arrow and click ArcPress Printer.
- Optionally, click the Properties button and modify any additional options such as the ArcPress printer engine selected. Click OK to apply these changes.
- Click OK to Print, or click Close to save your changes and close the Print dialog box.
The Printer Engine selection menu
| Tip |
|
Choosing the appropriate ArcPress driver
- Click the File menu and click Print.
- Choose ArcPress Printer in the Printer Engine drop-down list.
- Normally an ArcPress driver will be chosen for you. If you want to pick a different driver, click the Properties button. If a driver cannot be found for your printer's model name, the ArcPress Printer dialog box will appear automatically.
- On the ArcPress Printer dialog box, click the Driver drop-down arrow and click the ArcPress driver that best matches your printer.
- Modify any additional options such as the Print as Black and White option. Click OK to apply the changes or cancel to dismiss the ArcPress Printer dialog box.
- Click OK on the Print dialog box to print, or click Close to save your changes and close the Print dialog box.
The Printer Engine selector menu

The ArcPress Printer dialog box. Note the Driver selection drop-down list.
| Tips |
|
Setting the output resolution
- Click the File menu and click Print.
- Make sure you have chosen the ArcPress Printer engine in the Printer Engine drop-down list. Click Properties.
- For the RTL and PCL drivers, click the Resolution drop-down arrow and click the output resolution (dpi) that best suits your printer and output requirements. If the value you need does not appear, you can type the dpi you want to use.
- For the HP Universal and Epson Universal drivers, change the print quality options to match your output requirements.
- Optionally, make any other necessary modifications. Click OK.
- Click OK on the Print dialog box to print, or click Close to save your changes and close the Print dialog box.
Setting the output image quality
- Click the File menu and click Print.
- Move the Output Image Quality slider to the desired setting or type a value (for example, 1:5 for Fast quality) in the Ratio text box.
- Optionally, click the Properties button and modify any additional options. Click OK.
- Click OK on the Print dialog box to print, or click Close to save your changes and close the Print dialog box.

The Output Image Quality slider, along with graphic preview
| Tips |
|
Saving paper when printing
- Click the File menu and click Print.
- Click the Printer Engine drop-down arrow, select ArcPress Printer, then click Properties.
- If your map can be reoriented on the page to reduce paper usage, check the Save Paper check box. This will automatically rotate the map on the printer paper. This is useful in situations where the length of the longest side of a map is shorter than the width of the paper that is currently loaded.
- Modify any additional options. Click OK.
- Click OK on the Print dialog box to print, or click Close to save your changes and close the Print dialog box.
| Tip |
|
If your printer can print wider than 36 inches, you will need to be careful when using the Save Paper command. Some manufacturers' printer drivers do not store the installed printer paper width correctly. Using this option may cause your map to rotate off the actual printer paper and print clipped. |
Adjusting the color
- Click the File menu and click Print.
- Click the Properties button.
- On the ArcPress Properties dialog box, click the Color Adjustment button.
- On the Color Adjustment dialog box, move the Gamma, Brightness, Contrast, and Saturation sliders to adjust the color.
- Click OK to apply the color changes.
- Click OK on the Print dialog box to print, or click Close to save your changes and close the Print dialog box.

The ArcPress Color Adjustment dialog box
Choosing the media type (HP Universal and Epson Universal only)
- Click the File menu and click Print.
- Click Properties.
- On the ArcPress Properties dialog box, under Media Type, choose the appropriate type of media loaded into your printer or the closest match.
- Optionally, modify any additional options. Click OK.
- Click OK on the Print dialog box to print, or click Close to save your changes and close the Print dialog box.
| Tips |
|
Choosing the ink type (Epson Universal driver only)
- Click the File menu and click Print.
- Click Properties.
- On the ArcPress Properties dialog box, under Ink Type, choose the appropriate type of ink loaded in your printer.
- Optionally, modify any additional options. Click OK.
- Click OK on the Print dialog box to print, or click Close to save your changes and close the Print dialog box.
| Tip |
|
Choosing an ink type that does not match the ink loaded in the printer can result in errors at the printer. Be sure to choose the correct ink type according to what is currently loaded in the printer. |