Mapping and visualization > Publishing optimized map services in ArcGIS
Publishing optimized map services |
|
|
Release 9.3
Last modified April 24, 2009 |


Print all topics in : "Publishing optimized map services in ArcGIS" |
NOTE: This topic applies to 9.3.1, only.
ArcMap includes a series of tools that enable you to optimize and tune your ArcMap documents for publishing high performance, scalable map services to ArcGIS Server. As an ArcMap user, it's always important to explore ways to increase the display performance of your interactive map documents -- especially for maps that you plan to share with other users on the web.
There are a few key scenarios for ArcGIS Server where map optimization and performance are particularly relevant:
- Improving map display performance for dynamic map services that are generated on a request-by-request basis.
- Improving the computation time required to generate cached map services.
The purpose of this help section is to provide the steps to publish optimized services for these and other related situations.
Publishing optimized map services for ArcGIS Server
ArcMap includes a toolbar and workflow for analyzing and publishing optimized map services using a Map Service Definition (MSD). Using ArcGIS Server, MSDs can be used to publish high performance ArcGIS map services. These optimized map servicesare new at ArcGIS Server Version 9.3.1 and can support both real-time, dynamic map services as well as cached map services.
To support optimized map services using MSDs, ArcGIS includes a high performance, scalable mapping engine, which can generate dynamic, high performance maps on-the-fly (as well as cached map services) using the advanced cartography that you design and create in ArcMap. This work is accomplished through a simple workflow - generate a map in ArcMap, analyze and optimize it for performance, save it as an MSD, and publish the MSD as a map service to ArcGIS Server.
ArcMap includes the Map Service Publishing toolbar to perform each of these steps.
Using the Map Service Publishing toolbar
The Map Service Publishing toolbar helps you to analyze the drawing performance of your ArcMap documents. It is used perform all of the steps to publish an optimized map service to ArcGIS Server from ArcMap.
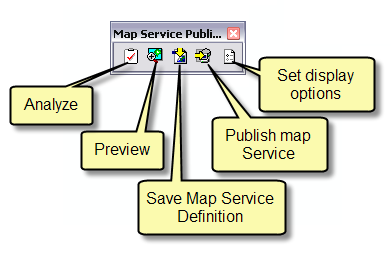
Right-click on the main menu in ArcMap to access the Map Service Publishing toolbar.
Steps
The process of creating and publishing an optimized map service uses a straightforward workflow:
First, design and create a map document in ArcMap. Then perform the following steps to publish a map service to ArcGIS Server.
-
Analyze your ArcMap document by clicking on Analyze (
 ) on the Map Service Publishing toolbar. Address errors and other issues identified in the map analysis. See Analyze and repair map drawing performance below for instructions on how to do this work.
-
Preview the map service (
 ).
).
-
Publish a map service using the MSD for ArcGIS Server (
 ).
).
- Over time, periodically assess your map document by following the steps above to ensure that you maintain map performance.
Analyze and repair map drawing performance
One of the important tasks that you can perform with the Map Service Publishing toolbar is to analyze your map document to identify potential performance bottlenecks and map errors that you will need to address before you can create an optimized map service from your ArcMap document.
Steps for performance analysis
- First, turn on the Map Service Publishing toolbar in ArcMap by right-clicking on the main menu and selecting this toolbar from the alphabetical list of toolbars.
- Next, click on Analyze (
 ).
).
-
Error messages (
 ). These are issues that must be fixed before you can publish the map document as an optimized map service with ArcGIS Server. Errors typically refer to your map's use of map layer types or display options that are not supported for optimized map services.
- Use of the Maplex Labeling Engine (with its sophisticated algorithms for calculating optimal locations for label placement)
- Use of some layer types (like topology layers) that are not supported for optimized map services in ArcGIS Server
- Use of some advanced symbology options that can potentially have sluggish display performance (like some statistical or chart symbology).
-
Warning messages (
 ). These are issues in which drawing performance or drawing appearance may be affected. For example:
- You may be able to increase performance by creating a spatial index for a map layer's feature class.
- An image format for a raster layer may be a data type that draws more slowly than others.
- An existing map layer may be projecting on-the-fly into the map's output coordinate system, which can cause map performance to slow down. Using a common coordinate system can speed up map drawing performance.
-
Information messages (
 ). These identify potential differences in the portrayal of your map display generated using Map Service Definitions (MSD's) and other informative messages to be aware of.
- Repair each of the errors and determine how to address each of the warning messages identified by the map performance analysis.
- Make a copy of your error messages and warnings.

This will generate a report that will appear in a scrolling panel at the bottom of your ArcMap application window.

The results of your map performance analysis will appear in a panel at the bottom of your ArcMap window and list potential errors and issues that can affect the display performance of your map.
This report identifies errors and other potential issues that you should address prior to publishing your map document as an optimized map service. It helps you to identify layer and symbology types that are not supported for optimized map drawing performance, warnings for issues that can potentially slow down display performance, and other information messages about your map document that can help you optimize its performance as a map service.
You will see three types of messages in this report:
For example, errors in your map document might include:
All errors must be repaired before you can publish a Map Service Definition.
You have the option to correct or ignore issues identified in warnings. If you choose to ignore a warning, you can mark it as an exception by right-clicking on the warning message and selecting "Mark As Exception" as shown here.
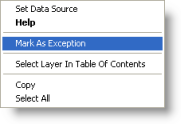

Right-click on each message to get a quick suggestion on how you can fix that specific issue as well as to access a help topic with more information about the issue (such as additional repair options). The item in bold in each list will provide the default approach for addressing each issue.
Addressing the display performance issues in some maps with many layers can be involved because of the large number of errors and warnings that will be listed. In these cases, you may want to save the error messages in a document for later use. You can select errors and then copy-and-paste their descriptions into a Microsoft Excel spread sheet or Word document to help manage these updates at a later time.
Preview your map service display in ArcMap
Once you have analyzed map performance, corrected errors, and made other changes in your ArcMap document, you should preview your map service to test its performance and responsiveness.
This step is performed with the Preview map service button on the Map Service Publishing toolbar. Here are the steps.
Steps for map service previewing
- Click the Preview button on the Map Service Publishing toolbar (
 ), and the Preview ArcGIS Server window will appear as shown here.
- Use the preview window to navigate around your map. This will help you to test its display performance.
- Optionally, you can specify the image format and examine the anti-aliasing settings in your MSD for previewing your map service. To set the image format, click on the top-right arrow button on the Preview panel and select Properties.
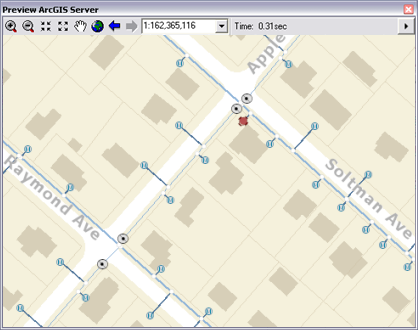
The map can be previewed in this panel. This uses the map service definition for map display. The Time field on the top menu bar shows display performance in seconds as you pan, zoom, and navigate around your map. This will help you to get a sense about your map display performance and help you to determine if additional performance warnings need to be addressed.
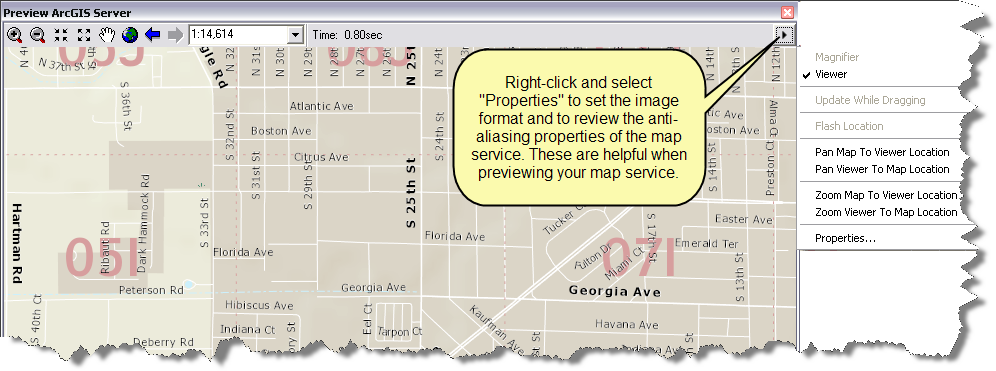
A dialog for setting the image format will appear. This dialog will also show the settings for anti-aliasing that will be saved in your MSD. See Anti-aliasing Map Settings below for how to set anti-aliasing properties.
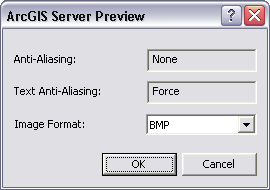
In ArcGIS Server, a map is generated on the server computer and streamed to the end user's application as a series of image tiles. The user's web client application may request the map in a number of image formats (such as PNG 8 or PNG 24). You can specify the raster format you want to use for previewing your map service.
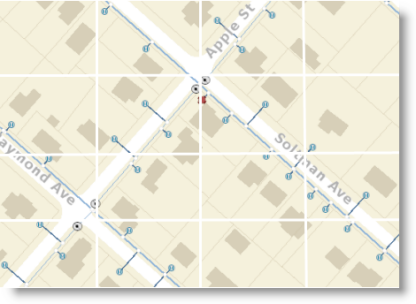
Image format options. The choice of image format is important because it can affect the amount of network traffic required for map delivery, the image quality, and image transparency. Here is a brief description of the preview options for image format.
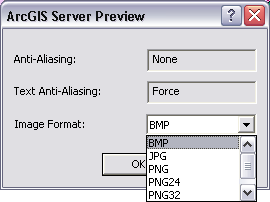
Here is a summary of the available image formats and their appropriate uses.
-
PNG. This is for choosing PNG 8. Use this format for overlay services that need to have a transparent background, such as roads and boundaries that will be overlaid on other services (e.g., on top of imagery). PNG 8 creates tiles of very small size on disk with no loss of information.
-
PNG24. You can use this format for overlay services, such as roads and boundaries, that have more than 256 colors (if you have fewer than 256 colors, we suggest using PNG 8). Do not use PNG 24 if your tiles will be viewed in Internet Explorer version 6 or earlier because some features of PNG24 are not supported.
-
PNG32. Use this format for overlay services, such as roads and boundaries, that have more than 256 colors. You should also use this format if you want full preservation of transparency into the output format. This format creates larger tiles than PNG24, but the tiles are fully supported in all browsers. PNG32 allows for full preservation of the map's transparent features in the output image. ArcMap will request PNG32 images from an optimized map service when it is viewed inside ArcMap.
-
JPEG. Use this format for base map services that have large color variation and do not need to have a transparent background. For example, raster imagery and very detailed vector basemaps tend to work well with JPEG.
-
BMP. BMP is a preview image display option used solely to show raw drawing performance (and it is the default image format setting for preview). You can use this as a baseline to see how any map changes that you make will affect overall drawing speed regardless of the image format used by the prospective web clients.
You should not use PNG 8 if your map contains more than 256 colors. Imagery, hillshades, gradient fills, transparency, and various anti-aliasing options can easily push your map to use over 256 colors. Even symbols such as highway shields may have subtle anti-aliasing around their edges that can unexpectedly add colors to your map. If PNG8 is the primary image format that will be requested from your service, you should turn of anti-aliasing options including text anti-aliasing prior to publishing your Map Service Definition.
JPEG is a lossy image format. It attempts to selectively remove data without affecting the appearance of the image. This creates very small tile sizes, but if your map contains vector linework or labels, it may produce too much "noise" or blurry areas around the lines. If this is the case and you are creating a cached map service, you can attempt to raise the Compression value from the default of 75. A higher value such as 90 may balance an acceptable quality of linework with the smaller tile size benefit of the JPEG.
It's up to the person who assembles the web client application if he is willing to accept a minor amount of noise in the images. He may be able to reduce time and the amount of web bandwidth consumed by map services by choosing JPEG. The smaller size also means end-user applications can download the map more quickly.
If you are also responsible for configuring the web map client application to be used, you can test your raster settings in the Preview ArcGIS Server window before committing to an image format.
Anti-Aliasing Map Settings
When you publish a map service using an Map Service Definition (MSD), you can set two anti-aliasing properties that can affect the picture quality of your map service as well as its performance. The ArcGIS Server Options panel enables you set options for anti-aliasing. Access this from the Options button on the Map Service Publishing toolbar as shown here.

The panel for setting anti-aliasing options will appear:
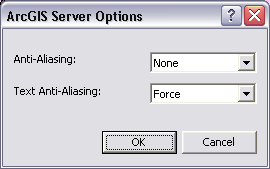
Once you set these options, you should test your settings by opening another preview window (
Anti-Aliasing Options. Anti-aliasing is a graphics technique that blends foreground and background pixels near edges of objects to trick your eye into seeing smoother borders. You can use this option if unwanted artifacts appear in your map displays -- for example, jagged lines, wavy lines or bands, and moiré patterns.
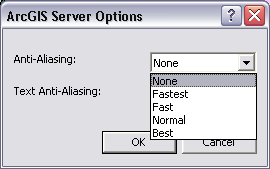
The amount of filtering to be applied for anti-aliasing will affect performance. However, ne aware that not enough filtering can potentially generate an image with unwanted artifacts. The range of anti-aliasing options allow you to choose the option that gives you a good map image view without sacrificing too much performance. Alternatively, you can choose a slower, yet more effective technique to get the map display that meets your needs, but performs more slowly.
Use these options to experiment in order to get the effect and performance that will meet your needs.
- None - No anti-aliasing is performed
- Fastest - minimal anti-aliasing is performed, optimized for speed.
- Fast - some anti-aliasing is performed, optimized for speed with better quality than fastest.
- Normal - a good balance of speed and quality.
- Best - the best quality anti-aliasing. This option takes the longest to render.
If anti-aliasing is not needed for improving map display clarity, use None because it will provide the best performance.
Text Anti-Aliasing Options. Anti-aliasing text is the process of blending text font edges so that characters appear less jagged. Control of text anti-aliasing is important. Too much might make text fuzzy and blurred and too little might make text appear as jagged. Map display performance is not affected by text anti-aliasing, but it may affect image size.
The text anti-aliasing options are shown here:
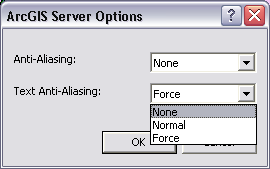
- None - no text anti-aliasing is performed.
- Normal - text anti-aliasing is performed as determined by the font. Each individual font has parameters created within it by the font author that define at which sizes the font should draw with anti-aliasing.
- Force - text is always drawn with anti-aliasing, regardless of the individual font's parameters. This is the recommended setting.
Use these options to experiment in order to create the effect and performance that will meet your needs. If text anti-aliasing is not needed for improving map display clarity, use None because it will result in smaller image sizes.
Publish a map service to ArcGIS Server
Once you have saved your Map Service Definition (MSD), the next step is to create a map service for deployment using ArcGIS Server. You can choose to publish your ArcGIS map service directly from ArcMap using the workflow described here. All the other map publishing methods for ArcGIS Server are also supported by saving and publishing a Map Service Definition (e.g, publishing a map service in the ArcGIS Server Manager web application console).

Selecting the "Publish Map Service" button will take you through the following steps to create your map service for use with ArcGIS Server.
Steps
- When you press the "Publish Map Service" button, the map is automatically analyzed for performance first. This ensures that any changes to your map will work correctly in the map service. This will help you to catch any last minute changes that may be required.
- Then, if there are no errors, the Publish to ArcGIS Server wizard will appear as shown here.
- Select the ArcGIS server you will use
- Enter the name of the new map service to be created
- Identify the folder that you will publish the map service into
- If you want to make the map service available as KML or WMS, click Next. Otherwise, hit finish and go to the final step.
- A summary panel appears that lists the properties of the map service that will be created. For example:
- If you are done, hit Finish to create the map service.
Review and repair any errors in this map analysis report as described in Analyze and repair map drawing performance.
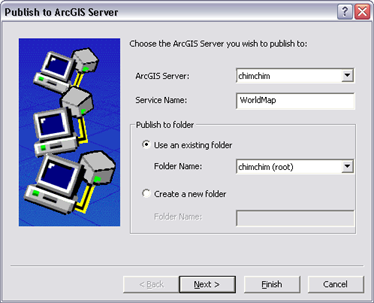
In this panel, you will:
A second page of the wizard will appear where you choose the additional capabilities you want to publish for this map service.
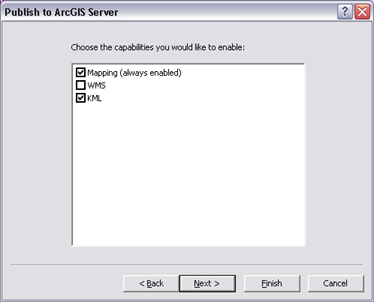
Click on the additional map capabilities that you would like to publish, and hit Next to see a summary or select Finish to be done.
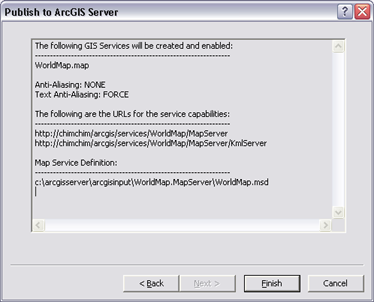
Review the summary information for your map service. The summary page will list the location the Map Service Definition will be copied to in the arcgisinput directory on the server.
Validating data connections on the server
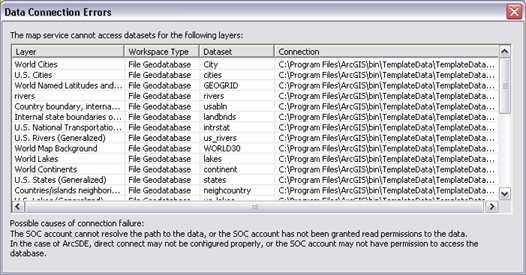
The publish command will validate whether the data connections your service is using are visible to the server. If there are problems with data connections, you will see a dialog like the one below. Check to see if the SOC user account has privileges to the data as a first step to resolving this issue. You may need to move file based data into a location where the SOC user account has permissions to read it.
How to publish optimized map services to ArcGIS Server installations on UNIX and Linux
Publishing an optimized map service using a Map Service Definition (MSD) file on Linux and UNIX uses a similar workflow as the procedure described above with one additional task -- you need to reset the MSD's data source references to use UNIX / Linux pathnames for your map's file based data sources. Below are the steps to complete this task.
Steps
- Organize the set of pathnames to your data sources of your map service on UNIX or Linux. If your map only references data stored in an enterprise geodatabase, you will not need to modify the paths of data and the service can be published directly from ArcMap.
- Save your map document as a Map Service Definition.
- Use the Set Data Sources command in ArcCatalog to replace the Windows file paths with UNIX or Linux file paths. This tool is intended for setting the paths of file based data sources from one path to another. It is not intended for use in changing data source types or changing the data sources of data with different schemas such as moving data from an enterprise geodatabase to a file geodatabase.
- Copy the updated MSD file to your UNIX or Linux system.
- Publish the MSD as an optimized map serivce using the Server Manager.
Save your ArcMap document as a Map Service Definition (MSD)
Once you have analyzed your map document and previewed your map service, you can save your map document (along with your option settings for anti-aliasing) to a Map Service Definition file (MSD). Press the Save button (![]() ) on the Map Service Publishing toolbar. A save dialog will appear to create an MSD. Its default name will be the ArcMap document's name with the file extension ".msd".
) on the Map Service Publishing toolbar. A save dialog will appear to create an MSD. Its default name will be the ArcMap document's name with the file extension ".msd".
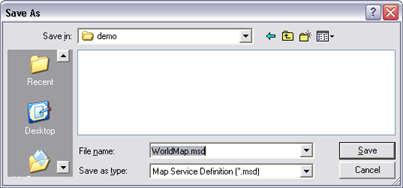
Your saved MSD will contain your map definition as a new format along with your settings for anti-aliasing and text anti-aliasing.
In ArcGIS Server, Map Service Definition (MSD) files will use a high performance, optimized map display engine in order to generate faster, more scalable maps. MSDs can be used for both dynamic map services that are generated on-the-fly (a key MSD advantage) as well as for cached map services. The cached map services will be generated more efficiently from an MSD because of faster map generation.
Optimized map services created using MSDs perform very well, and they are also scalable. Repeated tests have shown that dynamic map services created using an MSD will perform at least 25% faster than ArcIMS maps and will scale to support around 20% more users. In many cases, the time savings and scalability are much more dramatic.
NOTE: ArcMap's standard map documents (MXDs) can also be used in ArcGIS Server for both dynamic and cached map services. However, as dynamic map services, they perform more slowly and will not scale as well for many users. When you need very high quality cartography that leverages ArcMap's advanced capabilities (e.g., cartographic representations and Maplex labeling), use ArcMap MXD's because they will support the capabilities you'll need. You'll get what you want cartographically, but drawing performance will be slower. This is often very useful for generating cached map services (essentially pre-computed maps that are the fastest map services).
Keeping track of the ArcMap document used as the source for each Map Service Definition (MSD)
Publishing optimized map services involves creating an MSD using an ArcMap document (MXD). Once your MSD is generated, how do you keep track of the original MXD used to create the optimized map service?
Tracking the source document for an MSD is similar to tracking the source for a PDF -- for example, tracking the original Microsoft Word document (.DOC file) used for generating a PDF.
It's helpful that the default name when creating an MSD is the same name as the ArcMap document (just like default PDF names). In this case, the Map Service Definition file has a ".msd" file extension instead of a ".mxd" file extension. These companion files can be organized side-by-side on disk.
Also, if you want to document the source MXD as a property of your MSD file, you can right-click on the MSD in ArcCatalog and record the map document name in the Comments field as shown here.
Periodically analyze and tune your map document for performance
Over time, periodically assess your map document to ensure that you maintain map performance.
It is important to recognize that changes to your underlying datasets can affect map drawing performance even if you have not made any changes to the Map Service Definition. Indexes can be dropped, new fields can be added, and updated, and data can be moved from one location to another.
Therefore, it's important to periodically repeat this workflow in order to analyze your maps, identify and address potential issues, and to maintain strong performance of your optimized map services.
We recommend that you periodically re-assess your map document and its data sources by analyzing and addressing any ongoing performance issues that may arise.