Editing and data compilation > Editing existing features
Moving features |
|
|
Release 9.3
Last modified May 21, 2009 |


Print all topics in : "Editing existing features" |
About moving features
Note:
This topic was updated for 9.3.1.
You can move a feature by dragging it or specifying x,y coordinates relative to its current position. When moving features, you can use snapping, in conjunction with the selection anchor, to get precise placement in relation to other features.
You can prevent features from being moved accidentally by setting the sticky move tolerance.
Dragging
Dragging is the easiest way to move a feature. Use this method when you have a general idea of where you want to move the feature. Use the Edit tool to select and drag features.
Use either the Edit tool or the Edit Annotation tool to drag annotation features. The Edit Annotation tool enables special functionality specifically for editing annotation features. To learn how to move annotation, see Editing the size and position of annotation features.
Specifying x,y coordinates
Specify x,y coordinates when you want to move a feature to a precise location. ArcMap uses the current location of the selected feature as the origin (0,0) and moves it from that location according to the coordinates you specify. In other words, the coordinates you enter are relative to the current position of the feature. The coordinates are measured in map units. The graphic below illustrates the change in location when delta x,y coordinates of 2,3 are specified for a building.
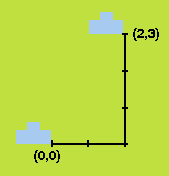
In the example above, the building is moved up and to the right as positive coordinate values are specified. To move the building left and down, you would specify negative values.
Using snapping
You can use snapping to move one or more features to a precise location in relation to another feature. For example, with snapping, you can move a polygon feature representing a new building and, when it is moved within the snapping tolerance, have one of its corners jump, or snap, precisely to the corner of an existing building. To do this, set up your snapping environment so the buildings have vertex snapping enabled, and move the new building's selection anchor to its corner vertex. Then drag the new building until the selection anchor snaps to the corner vertex of the existing building.
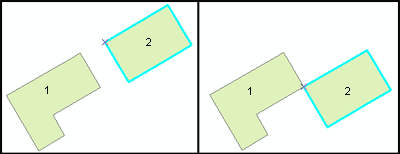
The graphic shows two buildings, with one of them (Building 2) selected. The left side of the graphic shows that Building 2's selection anchor has been moved from its default place in the center of the feature to one of its corners. The right side shows the same buildings, but with Building 2 snapped and moved to the corner of Building 1.
Normally, the selection anchor is positioned in the center of selected features. To move a selection anchor, use the Edit tool and hold down the Ctrl key while you hover over the selection anchor (the "x"). When the pointer turns into the "move" pointer ![]() , click the selection anchor and drag it to the new location.
, click the selection anchor and drag it to the new location.
Changing the sticky move tolerance
The sticky move tolerance allows you to set a minimum number of pixels your pointer must move on the screen before a selected feature is moved. This can be a useful way to prevent features from being accidentally moved small distances when they are clicked with the Edit tool. By default, the sticky move tolerance is 0 pixels, but you can change it on the General tab of the Editing Options dialog box.
How to move features
Dragging a feature
- Click the Edit tool
 .
.
- Click the feature or features you want to move. Hold down the Shift key while clicking features to select additional features.
- Click and drag the feature or features to the desired location.
| Tips |
|
Moving a feature relative to its current location
- Click the Edit tool .
- Click the feature or features you want to move. Hold down the Shift key while clicking features to select additional features.
- Click the Editor menu and click Move.
- Type the desired coordinates and press Enter.
The feature is moved according to the specified coordinates.
| Tips |
|