Tables and attribute information > Creating tables and managing attribute information
Making field calculations |
|
|
Release 9.3
Last modified April 24, 2009 |


Print all topics in : "Creating tables and managing attribute information" |
About making field calculations
Note:
This topic was updated for 9.3.1.
Entering values with the keyboard is not the only way you can edit values in a table. In some cases, you might want to perform a mathematical calculation to set a field value for a single record or even all records. The ArcMap Field Calculator lets you perform simple as well as advanced calculations on all or selected records.
In addition, you can calculate area, length, perimeter, and other geometric properties on fields in attribute tables.
Performing calculations on feature geometry
If you're working with an attribute table of a feature layer, you can easily calculate the area, perimeter, length, coordinates of the centroid, coordinates of a point, or coordinates of a start or end point using the Calculate Geometry dialog box.
You can use the coordinate system of the data source or the coordinate system of the data frame when performing calculations. In addition, if one or more records are currently selected, only the selected records are calculated.
The following table shows the geometric properties you can calculate for different types of features:
|
|
Area | Perimeter | Length | X- or y-coordinate of centroid | X- or y-coordinate of point | X- or y-coordinate of start point | X- or y-coordinate of end point |
| Polygon features |
|
|
|
|
|
|
|
| Line features |
|
|
|
|
|
|
|
| Annotation features |
|
|
|
|
|
|
|
| Point features |
|
|
|
|
|
|
|
Geometry calculations in ArcGIS are planimetric—in other words, take place in projected space, not spherical or geodesic space. You can only calculate the area, length, or perimeter of features if the coordinate system being used is a projected coordinate system. If the data source uses a geographic coordinate system such as WGS 1984, and is therefore unprojected, you can use the projected coordinate system of the data frame to perform the calculations. Alternatively, you can project the data source.
Calculate Geometry works with any numeric or text field. For the most precise results, use a field of type double, with the desired number of decimal places. If you use an integer field, the result will be rounded up to a whole number. If you use a text field, you can include the unit abbreviation, choose the format, and so on, to easily create a ready-to-use field for labeling.
Field display options in the Field Calculator
A menu in the Field Calculator dialog box lets you choose how fields will be listed. This menu is accessed by clicking a small control to the right of the fields list or by right-clicking the fields list and gives you the option of listing fields with their field aliases instead of their underlying field names. When you choose this option, the fields list respects field alias properties when you are working with layers and tables. Seeing field aliases in the list can be helpful because you can use field aliases to make cryptic field names more user-friendly or long ArcSDE field names more manageable.
The Show Field Aliases option is turned off by default. Choosing to show aliases in this dialog box has no effect on the expression syntax. Field aliases are not shown or supported in the expression itself. If you double-click a field shown with its alias, it will still be added into the expression with its actual name and the required [ ] field delimiters.
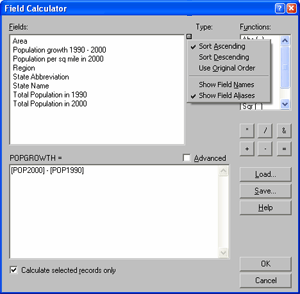
Another option in this menu lets you choose how the fields are sorted in the list. By default, the fields are still listed in their original order in the data source. Choosing Sort Ascending or Sort Descending can make it easier to quickly locate the field you want. In the example below, the fields list has been changed to be sorted in ascending order and to show the field aliases:
The sorting and field name options you choose remain in effect whenever you use this dialog box or others that offer the same options such as the Select By Attributes dialog box, all Query Builder dialog boxes, and the Label Expression dialog box.
Reasons the Field Calculator might be disabled
If you find that the Field Calculator or Calculate Geometry commands are unavailable when you right-click a field, here are some things to check:
- You right-clicked a field that is managed by ArcGIS and therefore cannot be edited manually. These include the ObjectID (OID or FID) field; the Shape_Length and Shape_Area fields for a geodatabase feature class; the Area, Perimeter, and <Coverage># fields for a point or polygon feature class in a coverage; and the FNODE#, TNODE#, LPOLY#, RPOLY#, Length, and <Coverage># fields for an arc feature class in a coverage.
- The table's data source is read-only, write access can't be established to the folder or geodatabase, or the data source is a format that can't normally be modified in ArcMap. You also may be working with EDG or SDC data or ArcIMS services, which usually allow you to open their attribute tables but not modify the data.
- You are not in an edit session and you need to be editing to calculate the data. For example, you must be in an edit session when working with versioned ArcSDE data or a feature class that participates in a geodatabase topology or a geometric network.
- The field belongs to a table that has been joined into your table. You can only calculate values for fields in the origin table.
- The field may be a raster, BLOB, or Global ID type, which cannot be calculated. To review the type of a field, right-click it and click Properties.
Advanced calculations with VBA statements
The Field Calculator lets you perform advanced calculations using VBA statements that process the data before calculations are made on the selected field. For example, using demographic data, you might want to find the largest age group by percentage of the population for each county in the United States. You can create a script that preprocesses your data using logical constructs such as If...Then statements and Select Case blocks. This lets you perform sophisticated calculations quickly and easily.
Simple field calculator expressions are entered into Field Calculator directly. More complex expressions, such as multiline scripts, looping, and branching, are entered in the Pre-Logic VBA Script Code box on the Field Calculator after checking the Advanced box.
Common VBA functions in the Field Calculator
Below are some code examples for commonly used functions in the Field Calculator. You can include any Visual Basic number, string, or date function in the calculation expression and can even combine the functions available with a particular data type.
For additional help with functions, refer to the Visual Basic help. From ArcMap, click Tools, point to Macros, and click Visual Basic Editor (or press Alt + F11). Once the Visual Basic Editor is open, click Help and Microsoft Visual Basic Help (or press F1). You can then search for a function's name for more information.
For more examples of using VBA statements in the Field Calculator, see ESRI Knowledge Base article 31807.
Note: In the VBA function syntax below, optional parameters are shown in square brackets [ ]. In the examples, field names are shown in square brackets [ ].
Left Function: Returns a Variant (String) containing a specified number of characters from the left side of a string.
-
Syntax
Left(string, length)
Example
MyStr = Left([MyField], 1)
Right Function: Returns a Variant (String) containing a specified number of characters from the right side of a string.
-
Syntax
Right(string, length)
Example
MyStr = Right([MyField], 1)
Mid Function: Returns a Variant (String) containing a specified number of characters from a string.
-
Syntax
Mid(string, start[, length])
Example
MyString = "Mid Function Demo" 'Create text string
FirstWord = Mid(MyString, 1, 3) ' Returns "Mid"
LastWord = Mid(MyString, 14, 4) 'Returns "Demo"
MidWords = Mid(MyString, 5) 'Returns "Function Demo"
Len Function: Returns a Variant (Long) containing the number of characters in a string.
-
Syntax
Len(string)
Example
MyString = [MyField] ' Initialize variable.
MyLen = Len(MyString)
InStr Function: Returns a Variant (Long) specifying the position of the first occurrence of one string within another.
-
Syntax
InStr([start, ]string1, string2[, compare])
Example
MyPosition = InStr([address], " ")
Replace Function: Returns a string in which a specified substring has been replaced with another substring a specified number of times.
-
Syntax
Replace(expression, find, replace[, start[, count[, compare]]])
Example:
NewString = Replace([comments], "#", "!")
Chr Function: Returns a String containing the character associated with the specified character code.
-
Syntax
Chr(charcode)
Example
' Replace a carriage return character with an exclamation
NewString = Replace([comments], chr(13), "!")
& Operator: Used to force string concatenation of two expressions.
Syntax
result = expression1 & expression2
Example
MyStr = [MyField1] & " " & [MyField2]
If...Then...Else Statement: Conditionally executes a group of statements, depending on the value of an expression.
-
Syntax
If condition Then [statements] [Else elsestatements]
Or you can use the block form syntax:
If condition Then
[statements]
[ElseIf condition-n Then
[elseifstatements] ...

[Else
[elsestatements]]
End If
Example
This code examines a numeric field of population density (POP90_SQMI); categorizes the values as low, medium, or high; and writes the results to a text field (PopulationDensity).
Dim density as string
If [POP90_SQMI] < 100 Then
density = "low"

elseif [POP90_SQMI] < 300 Then
density = "medium"

else
density = "high"
end if
The variable density would then need to be entered in the PopulationDensity = box.
PopulationDensity = density
Common VBA code examples for the Field Calculator
Below are some commonly used code examples for the Field Calculator.
- These code examples return a value of type double, so use them to calculate either an existing field of type double or a new field of type double you've added to the table.
- In the Field Calculator dialog box, check Advanced. You'll see two empty text entry boxes.
- Enter one of these code examples into the topmost box, the one labeled Pre-Logic VBA Script Code. Tip: You can select the code in this help topic, right-click and choose Copy, and then paste it into the box.
- Type the variable Output into the second text box. Do not enclose it in quotes or brackets.
- Click OK.
To calculate a sequential ID or a number based on an interval:
Static lastValue as variant
Dim Output as double
Dim pStartValue as double
Dim pIntervalValue as double

pStartValue = 100
pIntervalValue = 1

If IsEmpty(lastValue) Then
 Output = pStartValue
Else
 Output = lastValue + pIntervalValue
End If
lastValue = Output
To calculate the accumulative value of a numeric field:
Static lastValue as variant
Dim Output As Double

If IsEmpty(lastValue) Then
 Output = [Increment]
Else
 Output =  [Increment] + lastValue
End If
lastValue = Output
To calculate the percentage increase of a numeric field (to display the results in percentage format, change the numeric settings from the Field Properties dialog box to display as a percentage):
Static lastValue as variant
Dim Output As Double

If IsEmpty(lastValue) Then
 Output = 0
Else
 Output = (([Increment] - lastValue) / lastValue) * 100
End If
lastValue = [Increment]
Common VBA geometry calculations in the Field Calculator
Below are some code samples you can use to perform geometric calculations with VBA statements, rather than having the Calculate Geometry command do them for you.
To use the samples, open the Field Calculator, check Advanced, and type the VBA statement in the first text box. Then, type the variable name in the text box directly under the field name. For example, the general steps for calculating area using a VBA statement are
- Open the attribute table, right-click the field into which you want to calculate area, and open the Field Calculator.
- Check Advanced.
- Type the following VBA statement in the first text box:
- Type the variable "dblArea" in the text box directly under the area field name.
- Click OK.
Dim dblArea as double
Dim pArea as IArea
Set pArea = [shape]
dblArea = pArea.area
Area
Dim dblArea as double
Dim pArea as IArea
Set pArea = [shape]
dblArea = pArea.area
Perimeter
Dim dblPerimeter as double
Dim pCurve as ICurve
Set pCurve = [shape]
dblPerimeter = pCurve.Length
Length
Dim dblLength as double
Dim pCurve as ICurve
Set pCurve = [shape]
dblLength = pCurve.Length
X-coordinate of a point
Dim dblX As Double
Dim pPoint As IPoint
Set pPoint = [Shape]
dblX = pPoint.X
Y-coordinate of a point
Dim dblY As Double
Dim pPoint As IPoint
Set pPoint = [Shape]
dblY = pPoint.Y
X-coordinate of a polygon centroid
Dim dblX As Double
Dim pArea As IArea
Set pArea = [Shape]
dblX = pArea.Centroid.X
Y-coordinate of a polygon centroid
Dim dblY As Double
Dim pArea As IArea
Set pArea = [Shape]
dblY = pArea.Centroid.Y
To add the z-value of the start point of a polyline
Dim dblZ As Double
Dim pLine As IPolyline
Dim pPoint as IPoint
Set pLine = [Shape]
Set pPoint = pLine.FromPoint
dblZ= pPoint.Z
NOTE: The z-value calculation only works if the feature class is z-aware. To get the z-value of the end point of a polyline, use pLine.ToPoint instead of pLine.FromPoint.
How to make field calculations
Making simple field calculations
-
Start an edit session. You can make calculations without being in an editing session; however, in that case, there is no way to undo the results.
- Right-click the layer or table you want to edit and open its table.
- Right-click the field heading for which you want to make a calculation and click Field Calculator.
- Use the Fields list and Functions to build a calculation expression. You can also edit the expression in the text area. You can also type a value to set to the field.
- Optionally, if you have selected records in the table, choose whether to apply the calculations to all records or just the selected ones.
- Click OK.
| Tips |
|
Calculating area, length, and other geometric properties
-
Start an edit session. You can make calculations without being in an editing session; however, in that case, there is no way to undo the results.
- Right-click the layer and click Open Attribute Table. You can only perform geometric calculations on attribute tables.
- Right-click the field heading for which you want to make a calculation and click Calculate Geometry.
- Click the geometric property you want to calculate. Different properties are available depending on the type of layer you're using.
- Click to use either the coordinate system of the data source or the coordinate system of the data frame.
- Click the units of the output calculations.
- Optionally, if you have selected records in the table, choose whether to apply the calculations to all records or just the selected ones.
- Click OK.
| Tips |
|
Making advanced field calculations
-
Start an edit session. You can make calculations without being in an editing session; however, in that case, there is no way to undo the results.
- Right-click the layer or table you want to edit and open its table.
- Right-click the field heading for which you want to make a calculation and click Field Calculator.
- Check Advanced.
- Type VBA statements in the first text box. The VBA statements can include ArcMap methods.
- Type the variable or value that is to be written to the records.
- Optionally, if you have selected records in the table, choose whether to apply the calculations to all records or just the selected ones.
- Click OK.
| Tips |
|
Setting field display options in the Field Calculator
- Open the Field Calculator.
- Click the small box at the top right of the list of fields. This opens a menu containing options for field sorting and display.
- Click the sorting and alias display options you want.
The settings will be reflected in the list of fields. Aliases, however, won't be shown when you build an expression.
Changing the case of text field values
This is an example of using a VBA statement in the Field Calculator. For many other uses of using VBA statements, see ESRI Knowledge Base article 31807.
This task will convert strings such as example text, EXAMPLE TEXT, or eXAMPLE tEXT to Example Text.
- Right-click the layer or table you want to edit and open its table.
- Add a new text field to store the new string values.
If you are editing, stop the current edit session. Click Options and click Add Field. Name the field, set the type to Text, and specify a length. - Right-click the field heading for the field you just added and click Field Calculator.
- Type the following code in the text box under "Your Field Name = ":
- Change [Existing Field] to match the name of the existing field that contains the string values that are not currently in the proper case.
- Click OK.
StrConv([Existing Field], vbProperCase)