There may be cases where you want to be able to enter or verify a parameter value every time you run a workspace. You can do this by publishing a parameter. These parameters can include:
source and destination datasets
feature types
certain transformer values
log files
coordinate systems
By publishing parameters, you can be prompted for any information that might change when the workspace is run, making the workspace even more portable. You can also set many parameters to the value of one parameter. In this case, when you want to change the value of all parameters, you only have to change it once, in the main parameter.
All published parameters are also shown in the log file as they would appear on the command line. This allows for simpler migration of workspaces to a command-based environment.
Click on a parameter in the navigator pane, then right-click and choose Publish Parameter from the command menu.

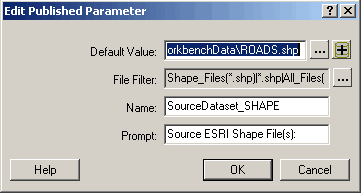
The Edit Published Parameter dialog appears:

Parameter Default Value: This is the current default value of this parameter (which can be blank).
Parameter Name: This is the name used to identify this parameter so other parameters can be set to the value of this one. It is also the name that is used on the command line.
Parameter Prompt: Text that will prompt the user for the parameter value when the workspace is run. This is particularly useful if you have published the same parameter in different transformers. This will allow you to acknowledge which transformer a particular parameter is for. If this is not changed and there are several of the same parameters published for different transformers, there will be no way to tell it apart from other parameters with the same prompt.
File Filter (file-based parameters only): If the published parameter is a file name, similar to, for example, the Joiner Source prompt for the Joiner transformer, there is also the option to specify what file types the parameter should allow. To change this parameter, click the Browse button to launch the File Filter dialog.
You can add, remove or modify file extensions. Click OK to accept the changes and dismiss the dialog. This will return you to the Edit Published Parameters dialog.

Click the OK button in the Published Parameter dialog, and the parameter will be published. The Published Parameter's node color will also change in the main area of the navigator pane, so you can easily see which parameters have been published.

The parameter is also added to the Published Parameters node.

You can reorder the parameters by dragging them up or down.
NOTE: Source and Destination datasets are published by default.
Select the parameter under the Published Parameters node, then right click and select Edit Definition.
This will launch the Edit Published Parameter dialog. From this dialog, you can change the parameter's Value, File Filter, Name or Prompt.

Edit the desired fields and click the OK button.
You can also double-click on any of the nodes under Published Parameters to launch an abbreviated Edit Published Parameters dialog, which allows you to change only the value of the parameter.

Select the parameter under the Published Parameters node, then right click and select Delete.
Select the parameter under the Published Parameters node, then right click and select Apply to.
In the Apply Published Parameter dialog, click the checkbox next to other workspace parameters.
Note: If you choose to filter the list by keyword, the list will dynamically update as you enter the keyword – clicking OK will close the dialog.
Click OK to copy the published parameter to the additional selected parameters.
There are two easy ways to "unpublish" a parameter:
Right-click on the published parameter under the Parameters node and select Unpublish Parameter.
Right click on the published parameter under the Published Parameters node and select Delete.