Tutorial: Creating a Web editing application
With ArcGIS Server, you can create Web applications for editing data without
writing any code. You create these applications in ArcGIS Server Manager. This
example shows how to create a Web editing application in Manager.
Creating the application is actually the final step of a larger workflow. The
first step is to make your data available through an ArcSDE geodatabase. This
example uses Workgroup ArcSDE because it works with the free
Microsoft SQL Server Express database and is available with the Workgroup level
of ArcGIS Server. Once you have your data available through ArcSDE, you need to
create a map from the data and symbolize it appropriately. You’ll publish this
map document to ArcGIS Server so that it will be available to users of your Web
application. As a final step, you’ll create and configure the Web application
with the Editing task. This document explains each part of the workflow.
Making the data available through ArcSDE
There’s no specific data that you need for this tutorial. It’s recommended that
you use a subset of your own data that includes some point, line, and polygon
layers. By using your own data for this test application, you’ll be
well-prepared to create your production application.
Installing ArcSDE
Creating a Web editing application in Manager requires that your data be
available in an ArcSDE geodatabase. That’s because ArcSDE geodatabases are
designed to be edited by simultaneous users, which is the situation you’ll
encounter through a Web application.
If your data is in ArcSDE already, you can skip the rest of this section. If
your data is in some other format, you need to move it to ArcSDE. An easy way
to set up a small deployment is to use the ArcSDE included with ArcGIS Server
Workgroup, which uses the
Microsoft SQL Server Express database.
The first thing you need to do, if you haven’t already, is install ArcSDE
Workgroup Edition. The CD or DVD comes with ArcGIS Server and contains an
Install Guide that can help you through the installation and postinstallation.
Note: If you want to work through this tutorial and you have ArcGIS
Server Enterprise, chances are your data is in ArcSDE already. If not, you need
to install Enterprise ArcSDE and move your data into it before continuing with
this tutorial. The steps below are for the Workgroup level of ArcGIS Server and
will not work with ArcGIS Server Enterprise. You can find information about
administering Enterprise geodatabases in the ArcGIS Desktop Help book Administering ArcSDE geodatabases.
Creating the geodatabase
Once you’ve installed Workgroup ArcSDE, follow these steps to create a
geodatabase:
-
Open ArcCatalog and find the Database Servers node. A database server is a
machine containing SQL Server Express and Workgroup ArcSDE. This is where
you’ll add and manage your Workgroup ArcSDE geodatabases.
-
Double-click Add Database Server and enter the SQL Server Express instance to
which you want to connect. In most cases, this will take the form of
<database server name>\sqlexpress. You’ll see the server appear in the
list.
Tip: If you have any difficulties connecting to the database server, see Troubleshooting connections to the database server.
-
The ArcGIS Server SOC account needs permission to read data from the database
server. Right-click the database server you just added and click Permissions.
-
Click Add User and add the SOC account.
-
Now you can add a new geodatabase. In the list of Database Servers, right-click
your server and click New Geodatabase.
-
Type a name for your geodatabase, then set a location and initial size. Don’t
worry about setting the initial size too low; the geodatabase will grow as it
needs to until it reaches SQL Server Express’s 4 GB limit.
-
You’ve already given the SOC account permissions to use the database server,
but now you need to define the permissions the SOC account will have for this
specific geodatabase. Right-click your new geodatabase and click Administration
> Permissions.
-
Click the SOC account, give it Read/Write permissions, and click OK.
Tip: If you don’t see the SOC account in the list, make sure you
completed steps 3 – 4.
-
Use ArcCatalog to copy and paste any existing feature classes that you want to
add to your new geodatabase.
A note about attribute domains and subtypes
To enhance the user experience of the Editing Task and to prevent data entry
errors, configure your datasets to use attribute domains and subtypes where
appropriate. These provide ways of categorizing your data and ensuring that
appropriate values are entered when the data is edited. In some cases the
Editing Task can detect and use the subtypes and domains. For example, if you
have a domain limiting the color of a fire hydrant to red, yellow, or blue, you
will see a dropdown list in the Editing Task allowing only the selection of one
of those three values.
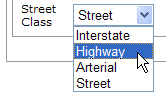
The picture below shows part of an Editing Task in which a roads feature class
has been configured to use a domain. The user can now classify the road using a
dropdown.
Remember, if you want these dropdowns to be available in the Editing Task,
you’ll need to prepare your geodatabase by creating domains and subtypes. This
might happen long before you publish the service or create the Web application.
Authoring the map
The map you use in your Web editing application can contain both editable and
non-editable layers. Follow these steps to create the map:
-
Open ArcMap to a new empty map.
-
Add all of the layers you want to see in the map. You should include at least
one layer from an ArcSDE geodatabase. Only layers from ArcSDE geodatabases will
be editable through the Editing Task.
-
Set up the symbology and layer order that you need.
Tip: If you set a layer’s symbology based on unique values, the different
symbols will appear in the Editing Task as individual buttons. This can help a
user to quickly pick the type of feature he or she would like to create. For
example, the image below shows what the Editing Task looks like when the
Buildings layer of the map has a unique value renderer applied. The renderer
was based on a building type field. The task exposes buttons for creating each
type of building. Pressing the green button allows the user to create a
residential building.

-
Save the map document.
Publishing the map service
Once your map document is complete, you can publish it as a map service. When
you publish a map service, you make it available on your ArcGIS Server so that
many users can access it at once.
Choosing pooled or non-pooled
You can choose to make a service available in either pooled or non-pooled modes.
When you use a pooled service, you share instances of the service with many
other users while you work through your edit session. In contrast, when you use
a non-pooled service, an instance of the service is dedicated to you throughout
your entire edit session. With non-pooled services, if someone else needs to
use the service at the same time as you, another instance of the service must
be created at the expense of server resources.
Starting with ArcGIS Server 9.2, Service Pack 2, you can use both pooled and
non-pooled services for editing over the Web. When you edit with pooled
services, each edit is saved immediately. This means that the data cannot be
versioned and you cannot undo your edits. However, using pooled services you
can accommodate many more concurrent editors than you can with non-pooled
services.
Setting the required permissions
Before publishing your services, be sure to read and follow the guidelines
presented in Preparing resources
for publishing as services. These will help you ensure that the server
has permissions to read and access all of the data for your map. Specifically,
the SOC account needs to have read permissions to your map document and any
data in the map document. It also needs to have write permissions to any data
that you will be editing. If you have the components of ArcGIS Server
distributed among multiple machines, all of the above data must be referenced
using UNC paths or ArcSDE connections so that all machines
can read it.
Publishing the service
Follow these steps to publish a map service that you can use for editing:
-
Log in to ArcGIS Server Manager and click Publish a map, globe, or other GIS
resource as a service.
Tip: There are two wizards in Manager that you can use to publish
services. This link takes you to the Publish GIS Resource wizard, which is the
simplest way to create a service. It asks you the minimum amount of information
needed to create a service.
The other way to create services is the Add New Service wizard. This wizard is
the completely manual way of publishing a service; it prompts you for all of
the service parameters.
-
On the first panel of the wizard, you’re prompted for the resource that you
want to publish. This is the map document you just created. If it’s in a shared
directory, you can browse to the map document. If it’s not in a shared
location, carefully type the path name of the map document.
-
Give your service a name. Optionally, if you have your services grouped in
folders, select the folder where you want to publish the service.
-
Click Next to move to the second panel of the wizard. Notice that the Mapping
capability is enabled by default. The other available capabilities will vary
depending on what types of layers are in your map. For this example, you can
accept the default and click Next to move on.
-
The final panel of the wizard explains that the service will be created and
gives its URL. Click Finish to publish the service and exit the wizard.
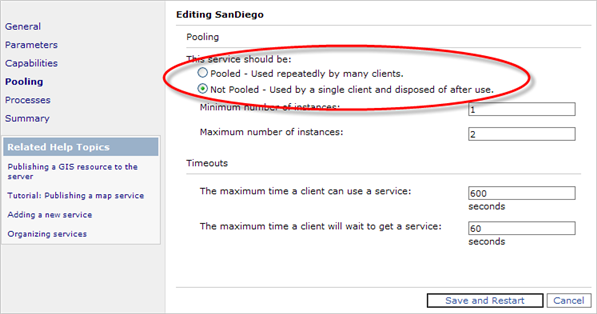
Important: This wizard created a pooled service by default. If you need
to do versioned editing or you require the undo-redo capability, you need to
change this to non-pooled. In Manager, click the Services tab, find your
service, and click the Edit (pencil) icon. Click the Pooling link and change
the service to be Non-Pooled. Then click Save & Restart.
Creating the Web application
Once you have a running map service, you can create the Web editing application.
You’ll do this using Manager’s wizard interface for creating a Web mapping
application. Some of the most important things you’ll do in this wizard are
selecting the map for the application to display (telling it to use a local
connection) and configuring the Editing Task.
These are the steps for creating the Web application:
-
In Manager, click the Applications tab and click Create Web Application. A
wizard appears that helps you create the application. The host name is the name
of your Web server and should already be filled in.
-
Type a name for your application. This name will appear in the application’s
URL. Optionally, type a description for use within Manager, then click Next.
-
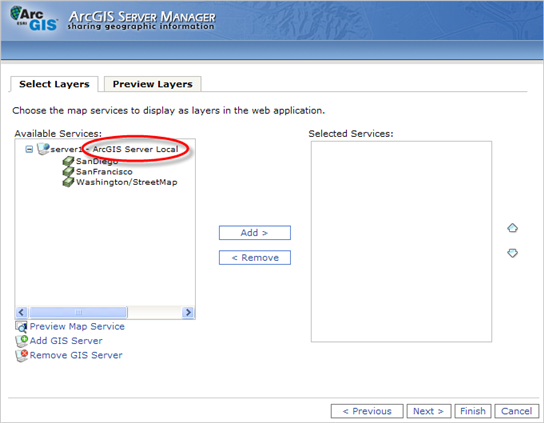
The next panel helps you choose the services you want to display in your map.
You need to add the map service you just published that contains your editable
layers. Examine the list of servers in the Available Services box. Does your
server appear, followed by the words "ArcGIS Server Local"? If not, you need to
click Add GIS Server, choose to add an ArcGIS Server Local connection, and
enter the name of your server.
Remember:
An ArcGIS Server Local connection is required for editing. Your web application
will still be available through the Internet, but the application itself needs
to make a local connection to the GIS server in order for the editing to occur.
-
In the Available Services list, expand the local connection to your server,
find the map service you just published, and click the Add button to move it to
the list of Selected Services. Optionally, add any other services you want to
have in the map, then click Next.
-
In this panel, you can choose the tasks you want in your application. You want
to include the Editing Task, so in the Available Task Items list select Editing
and click Add.

-
With the Editing Task still selected, click Configure. You can use the resulting
dialog, called the task configurator, to do the following things:
-
Select the layers and versions you can edit
You may not want to expose all of the layers in your map for editing. Similarly,
you may want your users to only edit specific versions. In the General tab you
can check on and off the editable layers and versions.
-
Select the types of edits users can make
In the Settings tab of the configurator, you can choose whether or not users
will be able to Add Features, Edit Attributes, or Edit Features. For example,
you may want users to be able to add new features, with the assurance that they
will not modify any existing features in the database.
-
Set the selection rules
To edit a feature, you first need to select it. The configurator gives several
options for how users make selections and how many features they can select at
once. You can set these options here, or you can choose if these options are
exposed through the task so that each user can set it up in his or her
preferred way.
-
Set the snapping rules
When editing a feature, you may want to share boundaries or vertices with
existing features. Snapping is a way to ensure that if you place a feature
close enough to an existing vertex or boundary, your feature will share that
vertex or boundary. Snapping is important for maintaining data quality; it can
help you avoid topological problems like overshoots and sliver polygons.
In the Settings tab of the configurator, you can set snapping rules, such as
which features can be snapped to and how close you need to click in order for
snapping to occur (this distance is known as the snapping tolerance).
-
Set conflict resolution rules
What happens when two people edit the same features, then save their edits? In
the Advanced tab of the configurator, you can set rules for the way the
database will handle these situations. See the Editing Task section of
Configuring Tasks for a discussion of different conflict resolution
options.
If you’re editing a pooled service, you won’t be able to set any of the conflict
resolution options; this is because in the non-versioned editing environment,
the edits are saved immediately. If two people edit the same feature, the last
edit to be made is the one that will remain in the database.
Tip: If you see a message that your map does not contain editable layers,
check to make sure that you gave the SOC account Read/Write permissions to the
geodatabase, as described previously in this document. Your map must contain at
least one layer from a geodatabase before you can edit.
-
When you’ve configured the Editing Task the way you want it, click OK to
dismiss the dialog and click Next to move to the next panel of the wizard. Read
the information about local connections and, if necessary, change the account
that will be used to make the local connection.
-
You’ve completed the essential parts of configuring the Editing Task, so you
can click Next to advance through the remaining panels of the wizard. These
give you the opportunity to customize the look of your application. When you’re
ready to create the application, click Finish.
Using the Web editing application
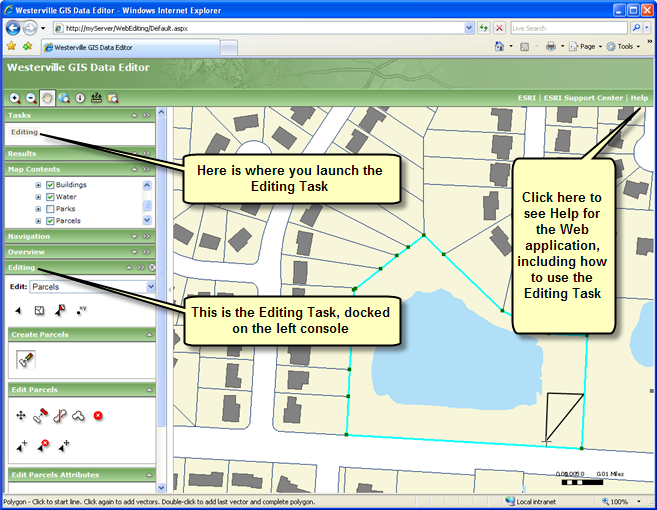
As you view your new Web application, you’ll see a Task panel on the left
console. You can launch the Editing Task from this panel. The Editing Task runs
inside its own floating panel, which you can move around the screen or dock on
the left console with the other tasks.
The application has built-in help that you can access by clicking the Help link
in the upper-right hand corner. The help has an “Editing data” section that
explains each tool on the Editing Task. This help was created in HTML so that
you can customize it if needed.
Editing in a Web application has a slightly different feel from editing in
ArcMap. When using the Editing Task, you’ll often need to point and click in
situations where you may be accustomed to clicking and dragging in ArcMap.
Also, when snapping, the cursor does not automatically jump to the snap point
on the screen, but the snapping will occur if you place the point within the
snapping threshold.
It may be helpful to prepare a practice application that your editors can use to
familiarize themselves with the Web editing environment. This is especially
recommended if your editors will be working with non-versioned data, where
Undo/Redo is not available.