Editor task


Editor task |
|
| Release 9.3.1 |


|
The Editor task provides a suite of tools for Web-based editing of features and attributes in ArcSDE geodatabases. This task requires that your application contain a map service accessed through an ArcGIS Server local connection that includes at least one layer from an ArcSDE geodatabase. Shapefiles, personal geodatabase layers, and file geodatabase layers are not editable; however, you can include these types of layers in the map service.
When you add the Editor task to an application, users of that application will be able to access various tools to edit data and save their edits. The Editor task includes tools for creating, moving, copying, splitting, merging, and deleting features. Additionally, you can view and edit the locations of feature vertices. When you configure the Editor task for your application, you can select which versions and layers users will be able to edit. When editing, users of your application can adjust the snapping and selection options.
Editing in the Web environment has a slightly different feel from desktop editing, and you may want to use a practice dataset to accustom yourself to the available tools and their behavior. For instance, when editing with snapping enabled, you will not see the snapping occur on the screen until after you place the vertex. The placed vertex will be snapped to the appropriate vertex, edge, or end.
Note: To see the snapping tolerance, check the Show snap circle check box, and to see where the current cursor location will snap to, press the S key.
You can find detailed help about each tool in the Editor task by clicking the Help button in the upper right corner of the Web Mapping Application. The Editing Data page contains graphics and instructions for using all the tools contained in the Editor task.
The Editor task is customizable. See the Editor task control discussion in the Developer Help for samples and instructions on how you can add your own functionality to the Editor task.
You can also customize the Web Mapping Application Help to document any tools you add to the Editor task. The help file for the "Editing data" topic is located in C:\Inetpub\wwwroot\<Application name>\Help\EditorTask.htm. You can use any text or HTML editor to modify this topic with a description of your customized Editor task.
You can use the Editor task with both pooled and nonpooled services. When you use pooled services, your server can support a larger number of concurrent users because the server does not have to create a dedicated service instance for each user during an application session. Instead, users can share service instances from a pool. Before you implement the Editor task with a pooled service, you should be aware of the following:
The Editor task supports editing versioned and nonversioned data. To edit versioned data with the Editor task, you must be using a nonpooled service.
You can edit nonversioned data with either pooled or nonpooled services. When editing nonversioned data, you cannot undo or redo edits or adjust the autoreconciliation options. The last edit to be saved always overwrites any previous edits to the same feature.
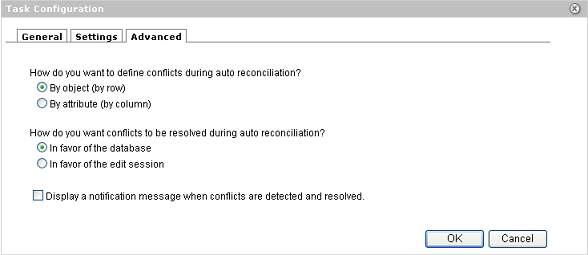
What happens when two users edit the same feature at the same time using the Editor task? The Editor task autoreconciles any conflicts based on two important settings:
By default, conflicts are resolved by object (row) in favor of the database. If you want different settings, click the Configure button for the Editor task in Manager and click the Advanced tab to set the autoreconciliation options.

You can also choose whether users will receive a message when attempting to save a conflicting edit. The message reads: "The target version has been updated since you started editing. While merging these changes into your edit session, conflicts were detected and resolved." You can see the changes from others' edits when the map refreshes.
Following is some additional information that you should know about the behavior and abilities of the Editor task:
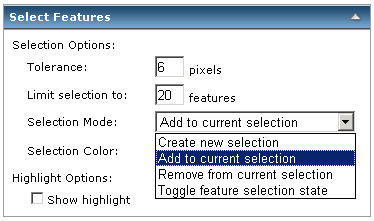
By default, the Editor task creates a new selection every time you apply the Select Features tool. You change this behavior at run time so that the selection envelope always adds to the current selection set, removes from the current selection set, or toggles the selected state of features within the envelope. To do this, click Settings on the Editor task, expand the Select Features panel, and change the Selection Mode.

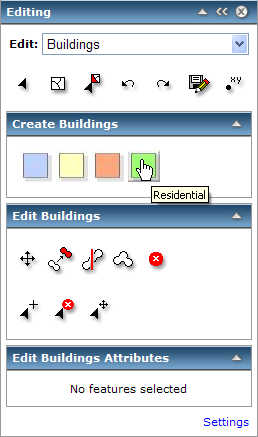
When editing a layer that has a unique value renderer applied, you will see multiple buttons available for creating features. These buttons allow you to immediately create the type of feature on which the renderer is based.
Because the Buildings feature class in the following screen shot has a unique value renderer defined in the map service, multiple buttons are available for creating features.
