| Clip and Ship example |
This example |
|---|
| User gets to choose which layers to download. |
A fixed set of data is downloaded. |
| The spatial reference of the output data can be specified. |
Spatial reference cannot be specified—it is set to the spatial reference the datasets being clipped. |
| Output is a file geodatabase. |
Shapefiles are output. |
| Uses models, scripts, and tool layers. The service is published using a map document. |
No models are used, only scripts. The toolbox is published rather than a map document. |
| Layers from the map document are clipped. |
Datasets are clipped. (Because there is no source map document containing layers, layers cannot be used, only datasets.) |
| Area of interest (the clip polygon the user digitizes) is not downloaded. |
Area of interest is downloaded. |
| Name of the e–mail server is a model parameter. |
E–mail server name is coded into the ClipZipAndEmail tool (source file is DataOnDemand/Scripts/zipandemail.py).
NOTE: In order to run this service, you must edit this script and provide an e–mail server name.
|
NOTE: The map and geoprocessing services found in sampleserver1 and sampleserver2 may change in the future. There is no guarantee that the services described above are always available.
The data is of a small area in the city of Portland, Oregon, and is found in C:\arcgis\ArcTutor\GP Service Examples\DataOnDemand\ToolData\Portland.gdb.
The ClipZipAndEmail tool uses a Feature Set variable, which in turn needs a schema to define the feature types and fields. The schema can be found in C:\arcgis\ArcTutor\GP Service Examples\DataOnDemand\ToolData\Templates.gdb.
The ToolData folder also contains Mapofzip.mxd, which is included in the zip file and displays the clipped and shipped data.
The DataOnDemandTools toolbox contains one script tool, ClipZipAndEmail. The source for this script tool is DataOnDemand/Scripts/zipandemail.py.
Before using the ClipZipAndEmail tool, you must edit the code and provide the name of your e–mail server. (You can either edit the Python source directly in an application like PythonWin, or, in ArcToolbox, right-click the script tool and click Edit.) Your system administrator should be able to supply you with the name of your e–mail server.
Some salient properties and features of this script are described below.
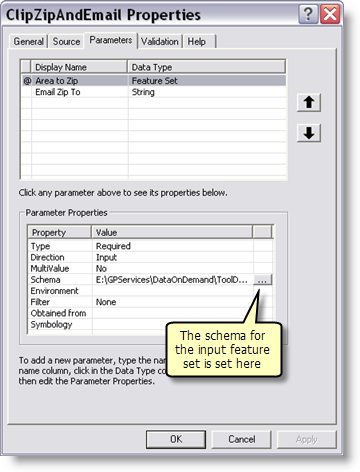
- The Area to Zip parameter is a feature set and, therefore, needs to have a schema. The schema is set in the Parameters tab of the tool's properties, as illustrated below.

- In the ClipZipAndEmail script, the UtilityTools toolbox is added and the Zip script tool from that toolbox is used. See the zipData() routine in the script.
- In ClipZipAndEmail script, the emailZip() routine imports the send_mail() routine found in the sendemail.py script (found in DataOnDemand/Scripts), as follows:
from sendemail import send_mail
PortlandDataMapService is published as a map service.
The DataOnDemandTools toolbox is published as a geoprocessing service.
To configure this service for your data, you will need to edit the ClipZipAndEmail script tool. The source for this script tool is DataOnDemand/Scripts/zipandemail.py. You can either edit the Python source directly in an application like PythonWin, or, in ArcToolbox, right-click the script tool and click Edit.
You will need to change the location of data and the list of datasets. In the main routine
if __name__ == '__main__':
Locate the definition of the dataloc variable and change it to the following:
global dataloc; dataloc = os.path.dirname(sys.path[0]) + g + "tooldata" + g + "portland.gdb" + g
The location of the data is relative to the location of the script.
Learn more about using the script location to build pathnames
Next, change the list of datasets to clip, found in this code snippet:
    ds = ["Streets" + g + "streets", \
            "Water" + g + "StreamRoute", "Water" + g + "floodplain", "Water" + g + "riv_fill", \
            "Transit" + g + "railroad", \
            "Census" + g + "blockgrp", \
            "Develop" + g + "Buildings", \
            "Land" + g + "zoning", "Land" + g + "Parks", \
            "Places" + g + "schools", "Places" + g + "hospital"]
Finally, you will need to provide the name of your e–mail server in the sendemail.py script. The code you need to modify is near the top of the script:
def send_mail(send_from, send_to, subject, text, f=""):
    assert type(send_to)==list

    # Provide the name of your email server below
    #
    server = "ouremailserver.somewhere.com"


