When you reconcile and conflicts are detected, you can choose to review them with the interactive Conflicts dialog box. It contains all the conflict classes and their features or rows in conflict. It also lets you
- Determine which fields or rows are in conflict.
- View conflicts.
- Resolve conflicts by designating which representation to use to replace features or attributes.
Determining which fields or rows are in conflictAll conflicting classes and features are shown in the list box in the upper left side of the Conflicts dialog box. This Conflicts list tells you the total number of conflicts that have been reviewed and the total number of conflicts in all feature classes. Initially, these numbers will be the same. In the example below, there is a total of two objects in conflict and neither of them has been reviewed.
Conflicts (2/2)
Under Conflicts is a list of the feature classes that contain conflicts followed by the number of conflicts visited or replaced in the feature class and the number of conflicts in the feature class. In this example, two feature classes each contain one conflict.
Conflicts (2/2)
   sde.RJP.ponds (1/1)
   sde.RJP.lakes (1/1)
Under each feature class, the ObjectIDs for the features in conflict are listed. In this example, there is a conflict for ObjectID 30 in the ponds feature class and a conflict for feature 11 in the lakes feature class.
Conflicts (2/2)
   sde.RJP.ponds (1/1)
        30
   sde.RJP.lakes (1/1)
        11
You can tell that none of the objects has been visited or replaced because the ratio of total reviewed conflicts to total conflicts is still (2/2) and (1/1) for each feature class. You can also tell none of the conflicts has been viewed or replaced because all ObjectIDs and feature classes are in bold.
As you mark objects as visited (see "Mark as Visited or Mark as not visited" below) or replace objects (see the "Resolving conflicts" section below), the first number in parentheses decreases and the reviewed object ID is no longer in bold. If all ObjectIDs in a feature class have been marked visited or replaced, the feature class itself is no longer in bold. In the ponds and lakes example, if you marked ObjectID30 as visited, you would see the following in the list box of the Conflicts dialog box:
Conflicts (1/2)
  sde.RJP.ponds (0/1)
        30
   sde.RJP.lakes (1/1)
        11
If there had been a second ponds feature in conflict, the list might look like this:
Conflicts (2/3)
sde.RJP.ponds (1/2)
         5
        30
   sde.RJP.lakes (1/1)
        11
This list indicates there is a total of three conflicts as a result of the reconcile, and one of those three has been visited or replaced. The list also shows that 30 is the ObjectID of the conflicting feature that has been visited or replaced, and this feature is in the ponds feature class.
When you select an individual feature in the list, the columns and attributes in the prereconcile, conflict, and common ancestor versions of the feature appear in the list on the right of the Conflicts dialog box.
- The prereconcile version represents the feature and attribute edits that you made.
- The conflict version represents the feature and its attributes as edited and reconciled by another user.
- The common ancestor version is the representation of the feature and its attributes as they are in the database; this is what the feature and attributes were before any edits were made.
A red dot to the left of the field name identifies a conflict. For example, if the feature's geometry was edited in each version, a red dot appears next to the Shape field.
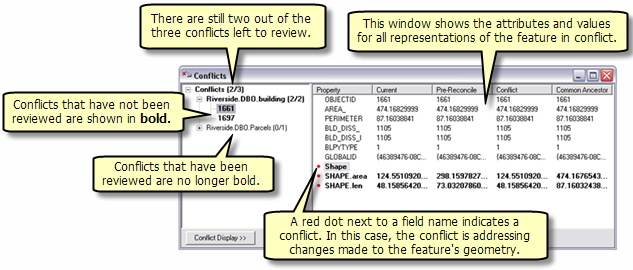
If other attribute fields are in conflict, a red dot appears next to them. If a feature has been deleted in either version, <deleted> appears for that version's attribute value.
Having the attributes and values for all representations of a feature in conflict allows you to see how the attribute values differ and helps you choose which representation of the data to preserve.
Viewing conflictsIf you click the Conflict Display button on the dialog box, two representations—the prereconcile and conflict versions—of the conflicting features are displayed at the bottom of the dialog box.
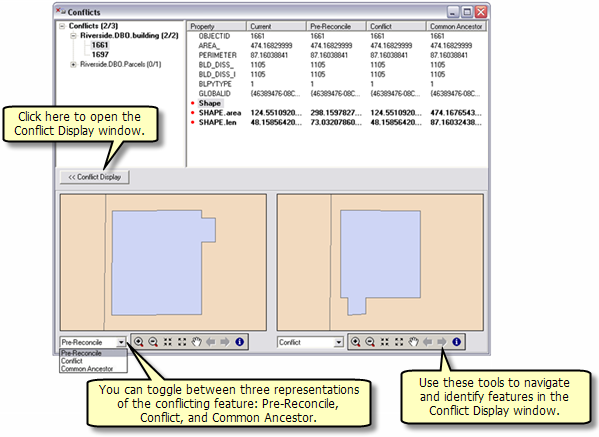
Using the pull-down lists beneath each representation, you can toggle through three different representations of the conflicting features: Pre-Reconcile, Conflict, and Common Ancestor. Note that these will only look different if the features' geometries are in conflict.
Each representation has a toolbar below it that contains tools you can use to navigate to and identify the corresponding representation.
You can zoom to a specific version of a conflicting feature on your map by right-clicking it in the list and clicking either Zoom To Pre-Reconcile Version, Zoom To Conflict Version, or Zoom To Common Ancestor Version.
If there are geometry conflicts, you can also see different representations on the map by right-clicking the Shape field in the list box and clicking Display.
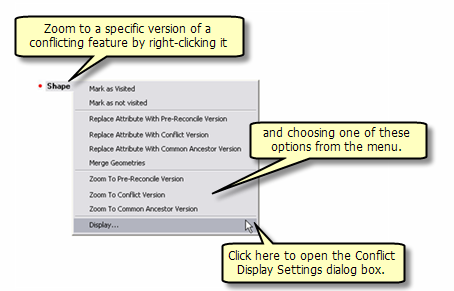
This will open the Conflict Display Settings dialog box. Click the representation you want drawn on the map.
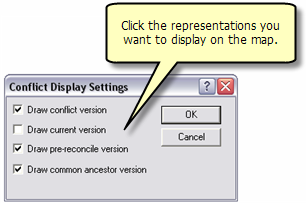
After you click OK, the following occurs on the map:
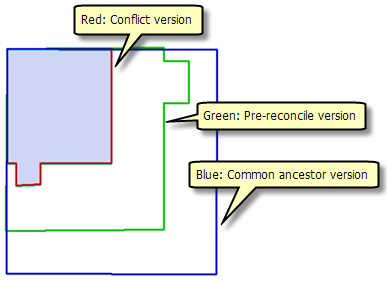
- The conflict (target) version's representation displays red.
- The prereconcile representation displays green.
- The common ancestor version's representation displays blue.
For the conflict display settings checked above, the following is an example of what would be displayed on the map:
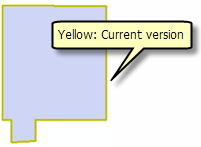
If only Draw current version is checked on the Conflict Display Settings dialog box, the following is an example of what would be displayed on the map:
After you have viewed the conflicts, you can mark them as visited or choose a replacement option to resolve the conflict.
Mark as Visited or Mark as not visitedAs mentioned in the section "Determining which fields or rows are in conflict," you can mark a feature as visited. This indicates you have reviewed the conflict but do not want to choose a replacement option at this time. You can keep track of which features in the list you have reviewed because those marked as visited are no longer shown in bold.
If you decide you want to come back to a feature conflict later, you can right-click the ObjectID in the Conflicts list and click Mark as not visited. This causes the feature to be shown in bold again.
Resolving conflicts When you resolve conflicts, you are deciding which representation of the features and attributes you want to keep. Regardless of what version you opted to reconcile in favor of—the target or your edited version—you can specify which representation to keep; either the prereconcile representation (how it appeared in your version prior to reconciliation), conflict representation (how it appears in changes made by another editor), or common ancestor representation (how the feature or attribute is in the target version).
Learn how to reconcile.
There are five different replacement options you can use to resolve conflicts:
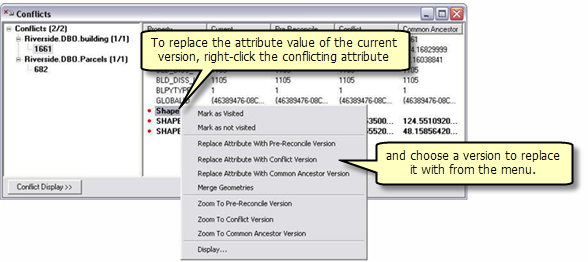
- Attribute replacement
This occurs at the field level. If there are conflicts in attributes, you can replace just the attribute value in the current version with one from either the prereconcile, conflict, or common ancestor representations. To do this, right-click the attribute in conflict and click the option you want from the menu.
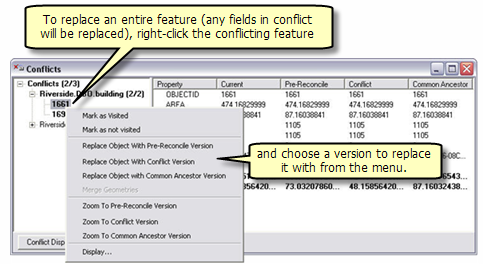
- Feature replacement
This occurs at the row level. You can replace an entire feature with the representation of the feature in the pre-reconcile, conflict, or common ancestor versions. This means any fields in conflict will be replaced. In this example, the Name and Shape fields will be replaced.To do this, right-click the feature in the Conflicts list and choose which version to use.
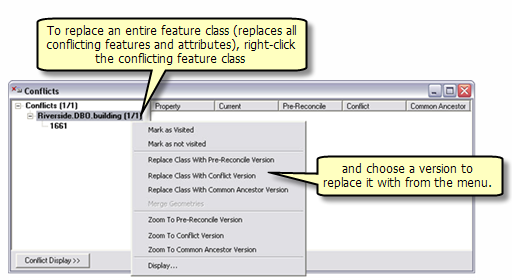
- Class-level replacement
You can choose to replace the current representation of the entire feature class with either the prereconcile, conflict, or common ancestor version representations to resolve the conflict. This replaces all the conflicting features and attributes at once, allowing you to quickly update and replace conflicting features. If there are multiple features in the Conflicts list, all of them are replaced with the version you choose.
To choose a class-level replacement option, right-click the feature class name in the Conflicts list and click whichever version you want to use.
- Complete replacement
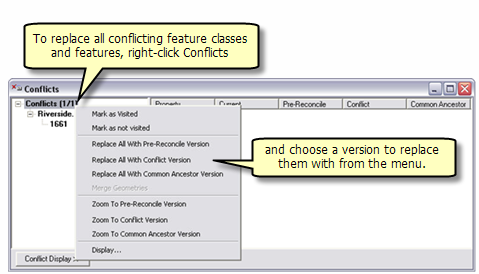
This is root-level replacement. Using this replacement option replaces all conflicting features and feature classes in the list with the representation designated. If you have multiple feature classes and multiple objects in conflict, all of them are replaced with the version of your choosing.
Right-click Conflicts and click the version you want to replace all conflicts.
- Merge geometries
This occurs at the field level and is associated specifically with the Shape attribute. The option to merge geometries is available when there is a conflict concerning the Shape field. If two editors both edit the geometry of the same feature but do not edit the same area of that feature, they have the option to resolve the conflict by merging geometries and accepting both edits.
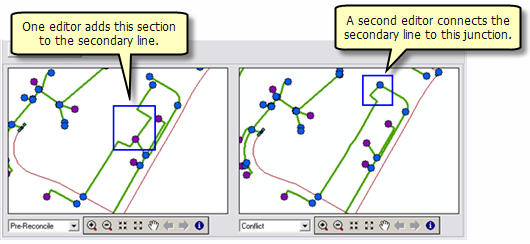 The option to merge geometries is only available on the Shape field shortcut menu.
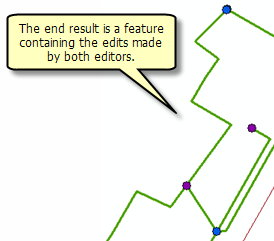
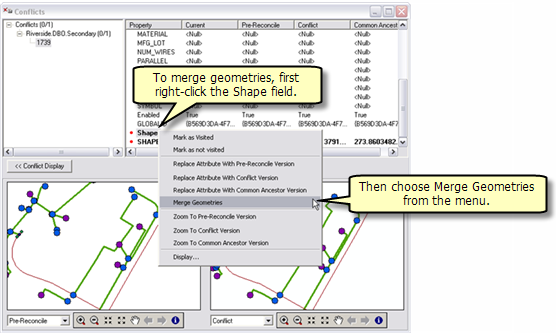 Once the geometries are merged, the end result is a feature that contains the edits made by both editors:
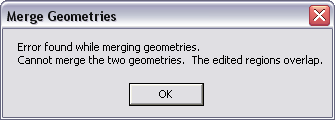
 If the edits made by one editor share a region that was also edited by another editor, their edited areas will overlap. Although the option to merge geometries may be available, trying to do so will fail. When this happens, the following error message is displayed:
Learn how to use each option to resolve conflicts interactively.
If you don't choose a replacement option before you post, the conflict will be resolved based on the option you chose when you reconciled.
When you edit network features, changes to the geometric network and to the logical network may create conflicts.
For example, when you add a service to a main, the main will not be physically split in the geometric network but will be split in the logical network. Therefore, while you have not directly edited the main's geometry, it has been edited logically. If the target version you are reconciling has also modified the main, the new service you inserted will create a conflict with the main.
Reviewing a conflict involving geometric network feature classes requires understanding how the Replace With command on the Conflicts dialog box updates the existing network topology present in the edit session.
In the service main example, two users modified the water main—one by changing an attribute and the other by connecting a new service. Reviewing the conflict merely requires investigating the differences and seeing that the conflict is valid, and no further action is required. Since the main contains the correct attribute for the diameter, the new service is correctly connected to the main. But there are cases when resolving conflicts involving a junction feature class also updates the connected network edge.
Working with feature-linked annotation requires that you remember one rule: when replacing a feature that has feature-linked annotation, both the feature and the annotation are replaced with the new feature and annotation. Therefore, you may have to further edit the new annotation to avoid ending up with two annotations.
For example, you may encounter a conflict in which you have moved a feature and repositioned its annotation. The conflict version has performed the same edit, moving the feature and rotating the annotation. If you decide to replace the feature with the conflict version's feature, the existing feature-linked annotation is deleted, the conflict feature is inserted, and a new annotation is created. You will then need to edit the new annotation by moving and rotating it as necessary.
Or you might encounter a conflict in which another editor has deleted a feature in the DEFAULT version of the geodatabase, which also deletes its associated feature-linked annotation. In a child version of the geodatabase, you edit the annotation that was just deleted. When you reconcile, if you decide to replace the feature with the edit version, the feature that had been deleted in the DEFAULT version and its associated linked annotation will be replaced, plus you will get the annotation from your edit session, thereby leaving you with two annotations for the same feature.
Relationships have dependencies similar to feature-linked annotation. Deleting a feature from an origin relationship class may trigger a message to delete a feature from the destination relationship class. Therefore, be aware of the ramifications of simply replacing conflicts involving feature classes that participate in relationship classes.
The following is an example of a conflict that can arise between relationship classes:
- You update the Origin Class Primary field, breaking the relationship in version A.
- At the same time, you update the destination class-related feature in version B.
- Since the destination class is dependent on the origin class, a conflict is detected when you reconcile the versions.
Another example is the following:
- In your electric utilities feature dataset, you delete a pole that has a relationship to a transformer, causing the related transformer to also be deleted.
- In another edit session occurring at the same time, an editor alters the attributes of the transformer you had just caused to be deleted by deleting its related pole.
- When the edits are reconciled, an update-delete conflict will be detected.
In this last example, if the second editor chose to replace all conflicts with the edit session representations, the pole and transformer deleted during your edit session will be re-created, and the transformer from the second editor's session will be created, thus, leaving you with two transformers. You may not be able to detect this looking at the map, because the transformers will be one on top of the other; however, there will be two records for the transformer in the attribute table.
Because features in feature classes that participate in a topology can share geometry with other features, the process of reviewing conflicts between versions of topological feature classes is different from replacing conflicts with simple feature classes. It is also different from the process used to replace conflicts with geometric networks, relationship classes, and feature-linked annotation.
When a feature class that participates in a topology is edited, other topologically related features may be simultaneously changed. The changed features may belong to the same feature class or to one or more other feature classes. To manage the process of detecting new topology errors that may have been introduced by edits, topologies record where edits have been made as dirty areas. Editing features in a topology creates dirty areas in the topology.
New topology errors may occur when edited parent and child versions are reconciled, even when the dirty areas within each version have been validated and are free of errors. To detect such topology errors, the dirty areas in a child version are all returned to dirty status after changes from the parent version are brought into it during a reconcile. After the reconcile, these areas can be revalidated, and any errors will be detected.
Reconciling two versions that do not contain active dirty areas may still result in dirty areas. Any dirty area that has been present in the child version, whether it has been validated or not, will be a dirty area after the versions are reconciled. In general, when reconciling a version
- Any dirty area the child version inherited from the parent version, whether it is validated in the child version or not, will be a dirty area after the reconcile.
- Any dirty area that was created for any feature that was created, updated, or deleted in the child version, whether it is validated or not, will be a dirty area after the reconcile.


 If other attribute fields are in conflict, a red dot appears next to them. If a feature has been deleted in either version, <deleted> appears for that version's attribute value.
Having the attributes and values for all representations of a feature in conflict allows you to see how the attribute values differ and helps you choose which representation of the data to preserve.
Viewing conflictsIf you click the Conflict Display button on the dialog box, two representations—the prereconcile and conflict versions—of the conflicting features are displayed at the bottom of the dialog box.
 Using the pull-down lists beneath each representation, you can toggle through three different representations of the conflicting features: Pre-Reconcile, Conflict, and Common Ancestor. Note that these will only look different if the features' geometries are in conflict.
Each representation has a toolbar below it that contains tools you can use to navigate to and identify the corresponding representation.
You can zoom to a specific version of a conflicting feature on your map by right-clicking it in the list and clicking either Zoom To Pre-Reconcile Version, Zoom To Conflict Version, or Zoom To Common Ancestor Version.
If there are geometry conflicts, you can also see different representations on the map by right-clicking the Shape field in the list box and clicking Display.
  This will open the Conflict Display Settings dialog box. Click the representation you want drawn on the map.
 After you click OK, the following occurs on the map:
 If only Draw current version is checked on the Conflict Display Settings dialog box, the following is an example of what would be displayed on the map:
 After you have viewed the conflicts, you can mark them as visited or choose a replacement option to resolve the conflict.
Mark as Visited or Mark as not visitedAs mentioned in the section "Determining which fields or rows are in conflict," you can mark a feature as visited. This indicates you have reviewed the conflict but do not want to choose a replacement option at this time. You can keep track of which features in the list you have reviewed because those marked as visited are no longer shown in bold.
If you decide you want to come back to a feature conflict later, you can right-click the ObjectID in the Conflicts list and click Mark as not visited. This causes the feature to be shown in bold again.
Resolving conflicts When you resolve conflicts, you are deciding which representation of the features and attributes you want to keep. Regardless of what version you opted to reconcile in favor of—the target or your edited version—you can specify which representation to keep; either the prereconcile representation (how it appeared in your version prior to reconciliation), conflict representation (how it appears in changes made by another editor), or common ancestor representation (how the feature or attribute is in the target version).Learn how to reconcile.
There are five different replacement options you can use to resolve conflicts:


 The option to merge geometries is only available on the Shape field shortcut menu.
 Once the geometries are merged, the end result is a feature that contains the edits made by both editors:
 If the edits made by one editor share a region that was also edited by another editor, their edited areas will overlap. Although the option to merge geometries may be available, trying to do so will fail. When this happens, the following error message is displayed:
