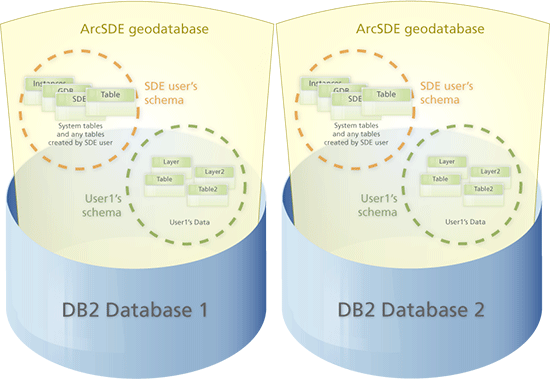
For DB2, you store one geodatabase per spatially-enabled database.

If you need to have multiple geodatabases from the same DB2 instance on the same server machine, you should set up your first geodatabase and its ArcSDE service, then you will need to create additional DB2 spatially-enabled databases and follow the instructions below to set up subsequent geodatabases. Each geodatabase will reside in its own database and have its own ArcSDE service.
If you only use direct connections to the separate geodatabases, no special configuration is required; when you connect with a direct connection, the database name will differentiate to which geodatabase you are connecting. If, however, you use an ArcSDE service to connect to the geodatabases, you will need to have separate ArcSDE services with unique service names and a separate port number in the services file. Follow these steps to create a second geodatabase in your second DB2 spatially-enabled database.
For Windows
- Modify the services.sde file to add a unique ArcSDE service name and port number for the new ArcSDE service.
- If you plan to set variables in the dbinit.sde file to connect to the second geodatabase, make a copy of your dbinit.sde file, giving it a new name. This name must include the name of the new ArcSDE service. For example, if the new service name is esri2_db2, name the dbinit file dbinit_esri2_db2.sde.
- Set the appropriate variables in the new dbinit file.
- If you want to specify different geodatabase storage information for the second geodatabase, make copies of your giomgr.defs and dbtune.sde files, giving them different names. For example, you could name them giomgr2.defs and dbtune2.sde.
- Alter the contents of the new copies of the files to include the parameters and values with which you want your second geodatabase to be built. Based on the example given in the previous step, you would be altering giomgr2.defs and dbtune2.sde.
- Create the geodatabase in the second DB2 database using the Post Installation wizard. When you get to the ArcSDE configuration files dialog box, click Use custom file for the giomgr.defs, dbinit.sde, and dbtune.sde files and specify or browse to the location of each of these.
- Start your ArcSDE service using the Post Installation wizard or using the Windows Services manager (found under Windows Administrative tools).
For Unix/Linux
- Modify the services.sde file to add a unique ArcSDE service name and port number for the new ArcSDE service.
- If you plan to set variables in the dbinit.sde file to connect to the second geodatabase, make a copy of your dbinit.sde file, giving it a new name. This name must include the name of the new ArcSDE service. For example, if the new service name is esri2_db2, name the dbinit file dbinit_esri2_db2.sde.
- Set the appropriate variables in the new dbinit file.
- If you want to specify different geodatabase storage information for the second geodatabase, make backup copies of your giomgr.defs and dbtune.sde files. This will ensure you have a copy of the files as they were used for the first geodatabase.
- Next, alter the contents of the giomgr.defs and dbtune.sde files to include the parameters and values with which you want your second geodatabase to be built.
- Create the geodatabase in the second DB2 database using the sdesetup command.
sdesetup –o install –d DB2 –D <name_of_second_db> –l
<license_key> –p <ArcSDE_admin_password>
- Start the ArcSDE service for your second database using the sdemon command.
sdemon –o start –i <name_of_second_ArcSDE_service> –p <ArcSDE_admin_password>
When connecting to the different geodatabases, specify the ArcSDE service name and database name for the geodatabase to which you want to connect. When using ArcSDE administration commands, these are specified with the –i <service_name> and –D <database_name> variables as shown above.
Client connections can be made to one geodatabase at a time. When connected to one geodatabase on a DB2 instance, you cannot query information from another geodatabase through that same connection.
For instance, in ArcCatalog, you could create a spatial database connection to database1. When you add data to ArcMap through that connection, you cannot "see" the data in database2. To access the data in database2, you would set up a second spatial database connection in ArcCatalog, this time specifying database2 in the Database field and database2's service name or port number in the Service field.
For information on setting up spatial database connections in ArcCatalog, see
Creating spatial database connections in the "Data management with ArcCatalog" section of the help. For connection syntax, see
ArcSDE connection syntax.
Keep in mind that the DB2 database itself has a setting, NUMDB, that controls how many databases in one DB2 instance can be concurrently active. Be sure NUMDB is set at least as high as the number of geodatabases you plan to have users connecting to concurrently.
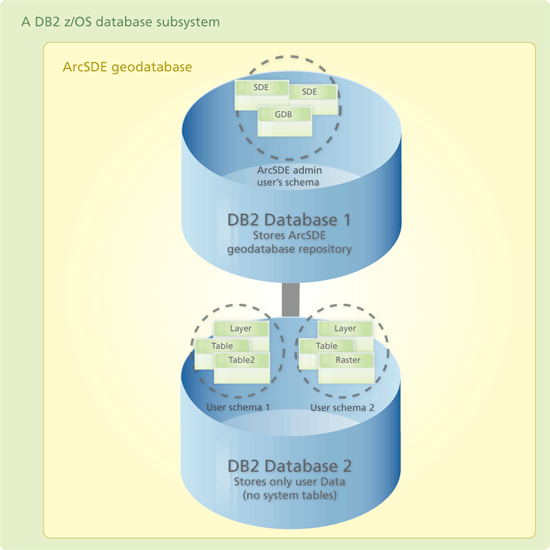
For individual ArcSDE geodatabases stored in DB2 for z/OS, at least two databases are used in the database subsystem—one to store the ArcSDE geodatabase repository and at least one to store user data. This is illustrated in the following graphic:

NOTE: Consult the ArcSDE for DB2 installation guide and DB2 z/OS documentation for further information on setting up a database subsystem and creating the geodatabase.
To set up multiple geodatabases, you need multiple database subsystems.
Since connections to geodatabases on DB2 for z/OS are only made using direct connections, you just need to be sure to specify the correct database subsystem name when making a connection from the client machine, including when issuing ArcSDE administration commands.


 If you need to have multiple geodatabases from the same DB2 instance on the same server machine, you should set up your first geodatabase and its ArcSDE service, then you will need to create additional DB2 spatially-enabled databases and follow the instructions below to set up subsequent geodatabases. Each geodatabase will reside in its own database and have its own ArcSDE service.
If you only use direct connections to the separate geodatabases, no special configuration is required; when you connect with a direct connection, the database name will differentiate to which geodatabase you are connecting. If, however, you use an ArcSDE service to connect to the geodatabases, you will need to have separate ArcSDE services with unique service names and a separate port number in the services file. Follow these steps to create a second geodatabase in your second DB2 spatially-enabled database.
For Windows
