Tips for caching by feature class


Tips for caching by feature class |
|
| Release 9.3.1 |
|
The ArcGIS Server 9.3 map caching tools allow you to create tiles based on the boundaries of a feature class. Caching by feature class allows you to create tiles only in the places where you need them, avoiding empty or uninteresting areas.
The following tips will help you efficiently create caches based on a feature class:
At small scales you create relatively few tiles, so it doesn't make much of a difference whether you cache by feature class or not. Creating all tiles at small and medium scales ensures that as users open your map and begin zooming in, they don't miss any tiles or have to create any tiles on demand.
To minimize duplicate labeling, the caching tools draw a large area, or "supertile", before cutting the image into tiles of the size you requested. When antialiasing is enabled, the supertile is 2048 x 2048 pixels, otherwise it's 4096 x 4096. When your feature intersects the boundary of a supertile, that entire supertile must be created. This means it takes some zooming in before caching by feature class begins to have a real effect in saving time and disk space. If your features are numerous and all over the map, you may not get much benefit from caching by feature class because most of your features will intersect a supertile.
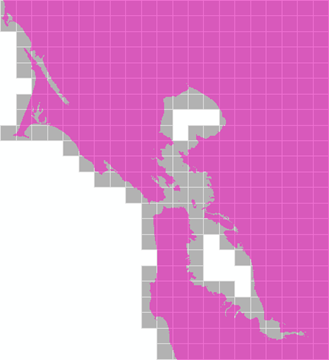
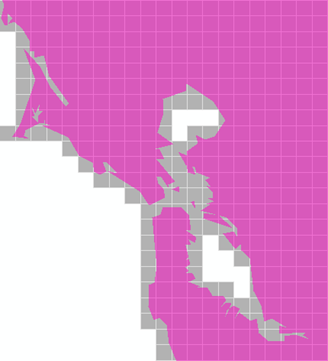
Too many vertices in the feature class can slow down the caching tools, but fortunately you don't need to have a lot of vertices. The fact that the caching tools are drawing square areas tends to "blunt" whatever detailed features were in the feature class. Your feature class doesn't need to include every island, wharf, and inlet.
You can use the Simplify Polygon tool to systematically remove vertices from the feature class without changing the general shape.
The images below show how very similar sets of tiles get created whether you use a detailed or a generalized feature class. The second feature class has had most of the vertices removed using the Simplify Polygon tool. The gray squares represent a 4096 x 4096 supertile at about 1:4500.
When you cache by feature class, the map service caches all scale levels for one feature, then the service restarts before moving on to the next feature. Supertiles that straddle the feature boundary are drawn twice. If your feature class has many small, nearby features such as parcels or tiny islands, you'll experience more service restarts and duplicate tile creation.
You can use Dissolve to make one multipart feature from many features. You can use Aggregate Polygons to remove small polygons or combine small polygons into one larger polygon shape. Both tools will improve performance when you cache by feature class.
Caching by feature class not only saves you space, it can also help you track the status of your cache. By default, the caching tools report the OID of the feature being cached. After you dissolve your feature class as described above, you might cut it into a few regions so that you can still track the status.
One effective way to do this is to make a grid with the Create Fishnet tool and clip it to your feature class boundary. You can keep a copy of the clipped grid open in ArcMap and follow along as the caching tools report "Processing feature with OID = 8", "Processing feature with OID = 9", and so on.
If you're caching at some very large scales, you might include more cells in the grid to get a more fine-grained idea of the status. Just remember that the caching tools restart for each feature and you'll get double tile creation along feature boundaries. The more cells you use, the longer the caching will take. For that reason you might want to do some manual post-processing on your gridded feature class to merge some of the smallest features with their larger neighbors.