This walkthrough shows how to implement security for Web applications and GIS services. In this walkthrough, users and roles are stored in a Microsoft SQL Server Express database. SQL Server is one of several options for users and roles. This option is often used when users of the server are on the Internet, but can also be used on local networks.
In this walkthrough, you will install SQL Server Express if necessary, configure the user and role location in Manager, set permissions for a Web application and a GIS Web service, and enable security for GIS Web services.
Important: this walkthrough enables security for GIS Web services. Once you enable services security, you will need to manage permissions for all services. You should not enable security unless you are prepared to continue managing permissions.
The steps in this walkthrough are:
-
Install prerequisites for walkthrough
-
Configure the user and role location in Manager
-
Add users and roles
-
Secure a Web application
-
Set permissions for GIS Web services
-
Apply security to GIS Web services
Install prerequisites for walkthrough
You may need to install one or both of two items before you proceed with this walkthrough.
-
SQL Server Express: if Microsoft SQL Server Express is not yet installed (or you are not certain whether it is installed), follow the instructions at Install Microsoft SQL Server 2005 Express. Do only that section, not the following sections. Then return to this page and continue with the walkthrough.
-
SSL certificate: access to secured GIS Web services in this walkthrough requires that the Web server supports use of HTTPS, which requires that a Secure Sockets Layer (SSL) certificate be installed on the Web server. If you are not certain whether a SSL certificate is installed, follow the steps in Determining whether a SSL certificate is installed. If no certificate is installed, you must do one of the following:
- Request a certificate from a certificate authority. This option is appropriate if your Web server is a production or public-facing Web server that will be used to serve applications or services to clients. See Obtaining and Installing a SSL Certificate from a Certificate Authority for information.
-- OR --
- Create your own certificate for local use. This option is appropriate for development and testing only. See Using a self-signed SSL certificate for information and instructions.
-- OR --
- Disable the requirement for SSL. This option is only appropriate for development machines. The token service installed with ArcGIS Server will not require HTTPS, and therefore passwords will be transmitted over the network in clear text, making them vulnerable to capture by anyone with access to the network. Clients may also display a warning to the user about unsecure transmission of logins. To use this option, see the instructions at Secure connection (HTTPS/SSL) required for Token Service.
Configure the user and role location in Manager
After you have installed the prerequisites, use Manager to configure SQL Server Express as the user and role location.
- Start ArcGIS Server Manager and log in.
- In Manager, expand the Security panel and click Settings.
- Click the Configure link.
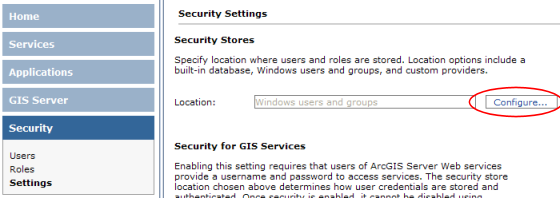
- In the dialog that opens for Location for Users, choose
SQL Server. Click Next.
-
In the dialog for specifying settings for SQL Server, enter the
database server name in the Server text box. You may use "localhost" if SQL Server Express is installed on the local computer. For SQL Server Express, add "\SQLEXPRESS" to the end of the name, for example, localhost\SQLEXPRESS.
- Click Connect to display a list of available
databases and options (if the connection fails, check to ensure
your database server is running and available on the network, and that the account you used to log into Manager is allowed to administer the SQL Server).
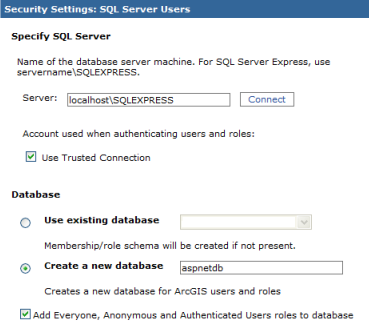
- If using SQL Server Express, verify that the option to Use Trusted Connection is checked. This means that applications will use the account that runs ASP.NET to authenticate users and to check roles. If using the full version of SQL Server, and the SQL Server is installed on a separate machine, uncheck the Use Trusted Connection option, and enter a SQL database login. For full SQL Server on the same machine, the trusted connection option is recommended, but a SQL login may also be used.
- Click the
option to Create a new database, and enter a name (such as
aspnetdb). Verify that the option is checked to "Add Everyone, Anonymous and Authenticated Users roles to database". Then click Next.
- In the panel for password recovery, leave the option unchecked. You can re-run the wizard later if desired to enter settings for the mail server, which is required to recover passwords. Click Finish. The wizard dismisses with the entry SQL Server users and roles displayed in the Location box.
Notice that security for services is set to Not Enabled. Do not enable security at this point. You will enable security in the last step in this walkthrough. Enabling security is the last step because you first need to set permissions for your Web services. Once security is enabled, only users whose roles you have permitted can access the GIS Web services.
Add users and roles
Before you can assign permissions to applications or services, you need to add some users and roles.
- In Manager, click the Security tab on the left side, then click Users. No users will be listed if you just created the database by following the steps above.
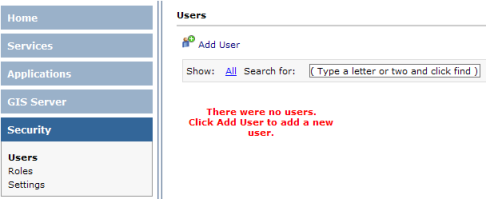
- In the Users panel, click the Add User link to display the dialog for adding a new user.
- In the new-user dialog, enter the information for the new user. The following is a suggestion, but you may enter your own user settings. Note: by default, passwords must have at least seven characters, and at least one character must be non-alphanumeric (such as @, #, $, or %; but avoid using &).
- User name: staff1
- Password: staff1$
- Email: staff1@yourcompany.com
- Security Question: What was your first pet's name?
- Security Answer: Fido
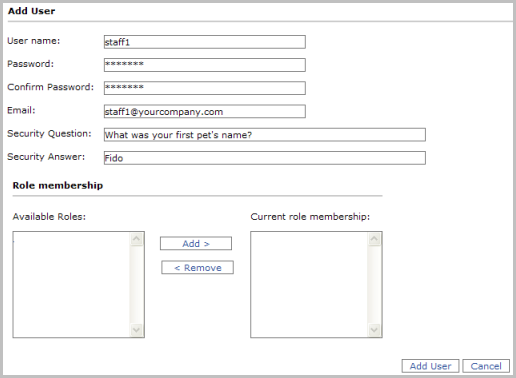
- No roles have been defined yet, so leave that aspect blank. Click Add to add the new user. Manager should return to the Users list and display the new user.
- Add another user, such as engineer1. Make up your own values for password, etc. Optionally, you may add more users at this point.
- Click the Roles link in the Security section. No roles will exist yet.
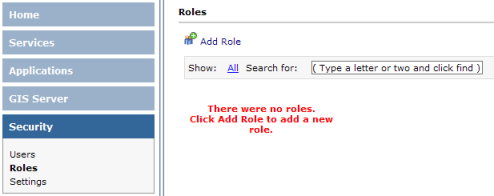
- In the Roles panel, click the Add Role link to display the dialog for adding a new role.
- In the new-role dialog, enter a name for the role, such as Staff. Then highlight the user you created earlier, such as staff1, and click the Add> button to add it to the Role members list.
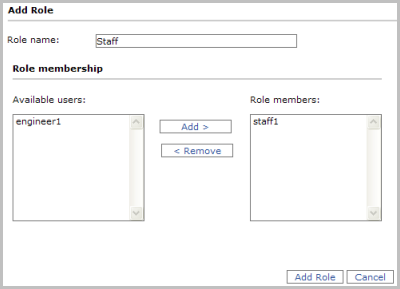
- Click Add Role to add the role and return to the Roles list. The new role should appear in the list.
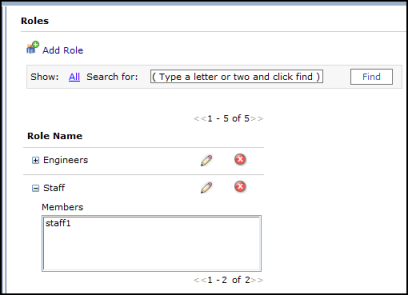
- Create one more role, such as Engineers, and add the second user you created earlier to this role.
- Notice that you can expand the roles list to show the members of the role.
- Optionally, add more users and roles. Always add each user to at least one role. As we will see next, permissions for services and applications are based on roles, not individual users.
Secure a Web application
Now you will secure a Web application by limiting access to designated roles.
- Create a new Web application in Manager. The application may be simple, with just a map service and no extra tools or tasks. You may follow the Creating a Web application tutorial if you need to create an application. You may use an existing application, but all users of the application will be required to log in as a user in a role you permit during the walkthrough.
- Since users will log in using a form on the Web page, you may wish to protect the login by requiring users to use https to connect to the application. This is only possible if you installed a SSL certificate as discussed in the prerequisites. You can specify https for the application URL in Manager when you create the application by selecting https in the Advanced option in the first wizard panel.
- In Manager, click Applications to list the Web applications. Find the application you want to secure in the list. In the Permissions column, you will notice the unlocked icon
 . This indicates that the application is not restricted, so that users currently are not required to log in.
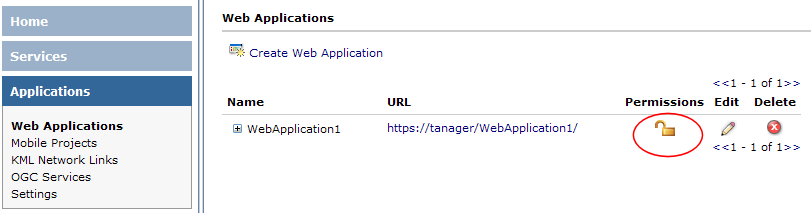
- Click the permissions icon , which displays the Permissions dialog for the Web application.
- Check the box for Enable security for this web application. This enables the lists of available and allowed roles.
- Highlight the Staff role (or other role you added above) in the Available Roles list. Click the Add> button to add it to the list of Allowed Roles.
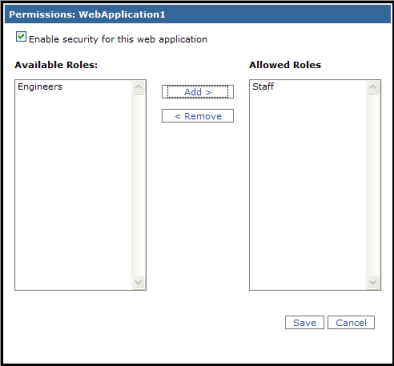
- Click Save to save the permissions and return to the list of applications. Notice that the permissions icon changes to a locked
 appearance, which shows that it now requires a login to access the application.
- Test the application by clicking its URL hyperlink in the list of Web applications. The application should open in a new browser window, and it should be redirected to the Login page.

Enter the username and password for a user who is a member of the role you permitted (for example, the staff1 user added above). Upon a successful login, the application will proceed to the ArcGIS Server web application page.
- Click the Logout link on the Web application page.
The application returns to the Login page. Optionally, attempt to login with another user login that is not permitted based in role membership. The user will not be allowed to log in. Close the application and return to Manager.
Set permissions for GIS Web services
In addition to securing Web applications, you can restrict access to GIS Web services using Manager. This section shows how to set permissions for services. These permissions are not actually enforced until you complete the following section on applying security to services. This workflow enables you to configure permissions for services, then apply security, so that users will continue to be able to access services throughout the security process.
This walkthrough configures security so that, by default, services can be accessed without a login. Then you will set up some services to require a login. You will do this by restricting access to a folder to designated roles. This approach may be appropriate for a site with a mix of secured and open services. If your organization wishes to restrict all services to require a login, you may wish to use a different approach than the one below.
- In Manager, ensure you have at least one service in your server's root folder. Add a service if no services exist yet. You can refer to the tutorial Publishing a map service to create the service.
- Add a folder to your server's services by clicking Manage Folders, and in the drop-down list that appears, clicking Add.
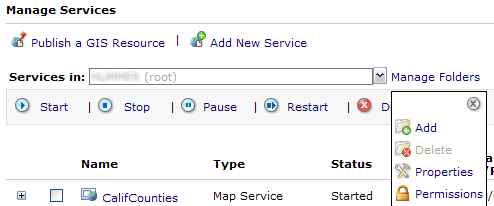
In the Add Folder prompt, enter a folder name such as SecureServices. Click OK to add the folder.
- Add a service to the new folder. Use Publish a GIS Resource to add the service, being careful to specify the SecureServices folder as the location. (You can also use the Add New Service wizard, but ensure that the Services in: drop-down list shows the SecureServices folder. You can also use ArcCatalog to add the service.) You can delete the service and folder after the walkthrough if desired.
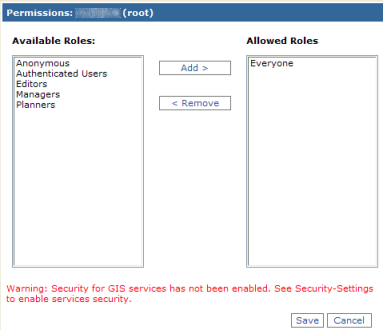
- Set permissions on the root folder to allow anyone to access services regardless of whether the user provides a login. This approach is appropriate if you wish by default to allow all users, but then will restrict certain services or folders to require a valid login. To set this permission, ensure the Services in: box reads "Server name (root)", where Server name is your server's machine name (click the drop-down list to select this item if necessary). Then click Manage Folders, and in the drop-down, choose Permissions (see graphic above for an illustration). The permissions dialog that opens should display the folder name (in this case, root).
- In the Permissions dialog, select the Everyone role, then click Add>. The Everyone role moves to the Allowed Roles list. It is not necessary to add any other roles because Everyone covers all users, whether they provide a login or not. Note the warning that security for services is not enabled; we will enable security in the next section. Click Save to save the permissions list.
- Restrict permissions on the folder you created earlier. In the Services in: list, use the drop-down to select the folder (SecureServices). Then click Manage Folders and then Permissions.
- In the Permissions dialog, click the Everyone role in the Allowed Roles list, then click <Remove. The role is moved to the Available Roles list.
- Next, click a role to allow, such as Staff. You can add multiple roles as allowed if desired. Click Save to save the permissions list.
The permissions are now configured for services. However, security is not yet enforced. In other words, at this point any user can still access services in the SecureServices folder without supplying a login. The next section enables security, which enforces the access permissions we have configured.
Apply security to GIS Web services
The final step for securing GIS Web services is to apply security to the services. This step restricts GIS Web services so that only users whose roles you have permitted can access the services. Until you perform this step, any permissions you have applied are not actually in effect, and anyone can access any service. You should not do the steps here until you have configured permissions as in the previous section.
Warning: once you enable security for services, you cannot disable it in Manager (see the Server Help page on securing services for information on manually disabling security if necessary). Security for services should be a one-way process. If you are not ready to enable security for GIS Web services, you can skip this section of the walkthrough.
- In Manager, click the Security tab on the left, then click Settings within the Security section. This displays the settings panel for security.
- In the Security Settings panel, read the information under Security for GIS Services. Notice that security is set to Not Enabled when you install ArcGIS Server.
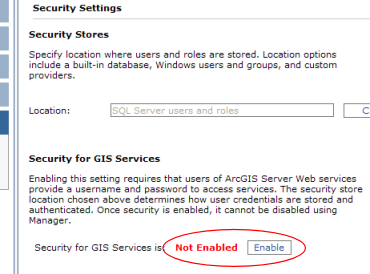
- Click Enable. A warning dialog opens cautioning you to set permissions before enabling security for services. Click the Enable Security for Services button to confirm. The dialog returns to the Security Settings panel, and the indicator now shows that security is enabled.
- Click the Services tab on the left side of Manager. In the list of services, the permissions icons now appear as a locked icon . If you see an icon with a red exclamation mark
 , it indicates that the service has an empty permissions list. These services will be inaccessible to all users until at least one role is added to its Allowed Roles list.
- To verify that security for services is in effect, use ArcCatalog to connect to your services. Start ArcCatalog, either on your local machine or on a machine that can access the Web server for your ArcGIS Server.
- In ArcCatalog, expand the GIS Servers node in the Catalog tree. Double-click the Add ArcGIS Server item. The Add ArcGIS Server dialog opens.
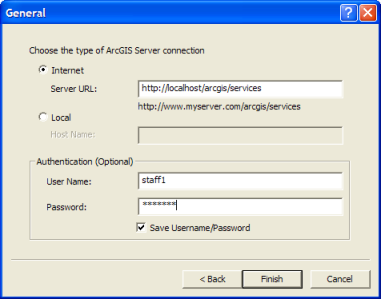
- In the dialog, click Use GIS Services. Click Next.
- In the next panel, click the Internet type of connection, then enter your server's URL, for example, http://myserver/arcgis/services. For this connection, leave the Authentication dialog blank. Click Finish.
- The dialog closes and a new connection should appear in your GIS Servers list, such as "arcgis on myserver". Expand this node. You should see the service at the root of your server. However, the folder that you secured in the previous connection (SecureServices) should not be visible. Since you permitted the Everyone role to access the root folder, services in the root and any folders that did not override its settings will be visible to all users, even without a login. Since you did not connect with an appropriate login, the SecureServices folder is not available to this connection.
- Add another GIS Server connection in ArcCatalog, using steps 6 to 8 above. Enter the same server URL, but step 8, enter the username and password in the Authentication section of the connection dialog. Use the login you created above for the user (e.g., staff1) in the role for which you permitted use of the SecureServices folder. Click Finish to add the connection.
- Expand this connection (e.g., arcgis on myserver (2)). You should now see the SecureServices folder, along with any services and folders permitted to Everyone.
- You may close ArcCatalog and Manager when finished.
Your Web services are now secured. Services permitted to specific roles are available only to users in those roles. As you have seen, you can open services to users who do not supply a login by adding the Everyone role to the list of allowed roles for the service or containing folder.
You can use secured services in various clients, including ArcGIS Desktop, Web ADF applications, and JavaScript API applications. To add a secured service to a Web ADF application, add a new ArcGIS Server Internet connection, enter the appropriate username and password in the Identity in the connection dialog in Manager or Visual Studio.
If desired, you may remove any services, folders, users or roles created during this walkthrough. Keep in mind that once you enable security for services, you must manage permissions for all folders and services. If you add a service but do not add any permitted roles, it will be inaccessible to all users (a warning icon will be displayed to alert you of this problem). One way to ensure at least a default set of permissions is to add permissions to the containing folder at the root or subfolder. Services inherit the permissions of their containing folder, making it simpler to configure security for services.


