This walkthrough shows how to implement security for Web applications and GIS services. In this walkthrough, users are stored as Windows operating system accounts on the local Web server machine, or on the domain of which the Web server is a member. Roles for users are defined as groups on the local server or domain. Windows users and groups is one of several options for users and roles. This option is typically employed when users of the server are on the local network, rather than connecting over the Internet. It can be a convenient approach when you want your GIS users to take advantage of the accounts they already have on your network.
In this walkthrough, you will add users and groups as needed to your system, configure the user and role location in Manager, set permissions for a Web application and a GIS Web service, and enable security for GIS Web services.
Important: near the end of this walkthrough, you enable security for GIS Web services. Once you enable services security, only users whom you have authorized, based on their Windows group membership, will be able to access any services on your system. Also from this point on, you will need to manage permissions for all services. You should not enable services security unless you wish to restrict all services to authorized users, and you are prepared to continue managing permissions.
The steps in this walkthrough are:
-
Add users and groups with operating system tools
-
Configure the user and role location in Manager
-
View users and roles
-
Secure a Web application
-
Set permissions for GIS Web services
-
Disable anonymous access to GIS Web services
-
Apply security to GIS Web services
Add users and groups with operating system tools
In order to assign permissions based on Windows users and groups, you may need to add users and groups to your system. The instructions below provide basic steps. Refer to Windows documentation for details.
If you already have users and groups defined on your Web server or domain and wish to use them to assign permissions for applications and services, you can skip this section.
- To add users and groups to the local Web server, go to Start - Control Panel - Administrative Tools - Computer Management (alternatively, right-click on the My Computer icon on the Desktop, and click Manage). In the Computer Management console, expand if necessary the System Tools and then Local Users and Groups. Click the Users folder to view the list of users.
- In Windows Vista or Server 2008, go instead to Start - Control Panel - Administrative Tools - Server Manager. In the Server Manager, expand Configuration and then Local Users and Groups. Click the Users folder to view the list of users.
- Right-click on the Users folder and choose New User... The New User dialog opens.
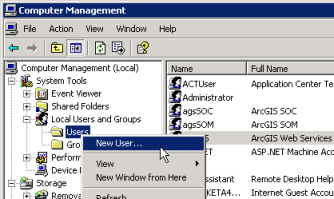
- Enter the user name, for example, walkthrough1. Enter a password and confirm it (for example, walkthrough1). You may uncheck the requirement that the user must change password at next logon. Set other options as desired, then click Create.
- Add at least one other user, for example, walkthrough2. Close the New User dialog.
- Right-click on the Groups folder in the Computer Management (or Server Manager) tree, and choose New Group... The New Group dialog opens.
- Enter the group name, for example, WTGroup1. Optionally add a description. To add members to the group:
- Under the Members area, click Add... The Select Users, Computer or Groups dialog opens.
- In the Select Users dialog, click the Locations... button, and in the popup dialog, select the local computer's name and click OK.
- Back in the Select Users dialog, under the Enter the object names to select box, type the name of the first user added above (walkthrough1).
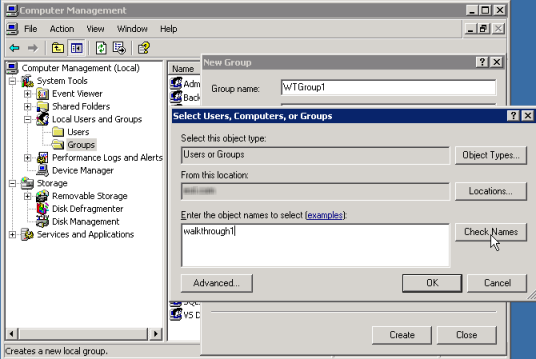
- Click Check Names to verify the user exists (if necessary, click the Advanced button, then Find Now to list all users; you can select the user from this list).
- Click OK to close the Select Users dialog and return to the Add Group dialog. The New Group dialog now lists the user you selected.
- Click Create to create the new group.
- Create one more group, for example, WTGroup2, adding the second user created above (walkthrough2). Then close the New Group dialog. You may also close the Computer Management console.
Configure the user and role location in Manager
In order to assign permissions for Web applications and services, you must first tell ArcGIS Server where your users and roles are stored. In this walkthrough, users are operating system accounts on the Web server or on the domain, and roles are Windows groups on the Web server or domain.
- Start ArcGIS Server Manager and log in.
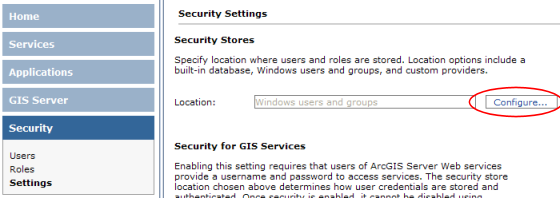
- In Manager, expand the Security panel and click Settings.
- Click the Change button (do this even if the Location already indicates Windows users and groups; the wizard performs additional essential configuration steps).
- In the dialog that opens for location for Users, choose
Windows users.
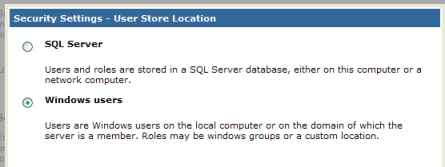
Click Next.
- In the panel for Role store location for users, click Windows groups. Click Finish. The wizard will dismiss and the Location box will read Windows Users and Groups.
Notice that security for services is set to Not Enabled. Do not enable security at this point. You will enable security in the last step in this walkthrough. Enabling security is the last step because you first need to set permissions for your Web services. Once security is enabled, only users whose roles you have permitted can access the GIS Web services.
View Users and Roles
When your users and roles are Windows users and groups, you may view them in Manager. To add, edit or delete users or groups, you must use Windows operating system tools, as described in the first section of this walkthrough.
- In Manager, click the Security tab on the left side, then click Users. The Users panel will display a list of users on the local Web server.
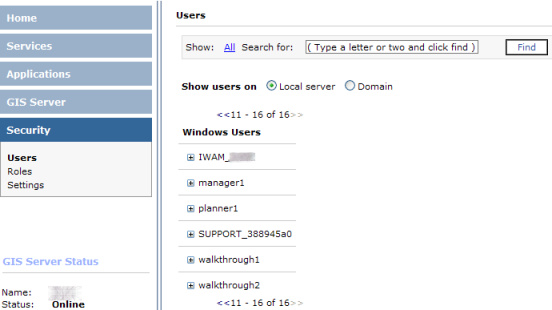
- If you have more users than can be displayed in a single panel, click the >> to display additional users. You can also enter part or all of a user name in the Show: box near the top of the panel and click Find to filter the list of users.
- To view a user's group membership, click the plus symbol next to the name. The list will show the groups of which the user is a member on the local system.
- If the computer is a member of a domain, you can view users on the domain by clicking the Domain radio button for Show users on. You can then view domain group membership for these users (the list will not show membership in local system groups).
- View roles by clicking Roles in the Manager Security tab. In this case, the list displays Windows groups on the local Web server. If the computer is a member of a domain, you may click Domain to see groups in the domain. You can page between lists of groups or filter/search for groups as with the Users dialog.
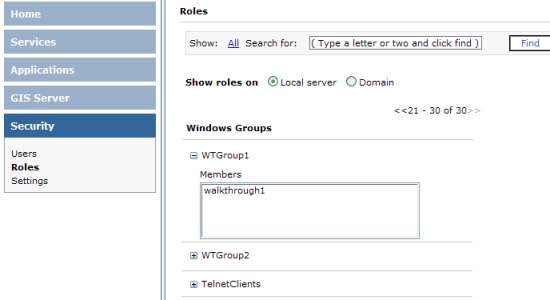
- Click the plus button next to a group to view the users who are members of the group.
Secure a Web application
Now you will secure a Web application by limiting access to designated roles (in this case, Windows groups). The final sections of this walkthrough will accomplish this goal.
- Create a new Web application in Manager. The application may be simple, with just a map service and no extra tools or tasks. You may follow the Creating a Web application tutorial if you need to create an application. If you have installed an SSL certificate on the Web server, then when creating the application, you may want to set the application to use https (in the application wizard, use the Advanced option on the first panel). You may use an existing application, but all users of the application will be required to log in as a user in a role you permit during the walkthrough.
- In Manager, click Applications to list the Web applications. Find the application you want to secure in the list. In the Permissions column, you will notice the unlocked icon
 . This indicates that the application is not restricted, so that users currently are not required to log in.
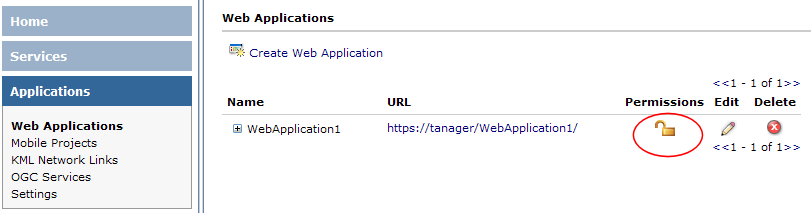
- Click the permissions icon , which displays the Permissions dialog for the Web application.
- Check the box for Enable security for this web application. This enables the lists of available and allowed roles.
- If you wish to allow roles based on domain groups, click the Domain option under Show roles on. Otherwise click Local server to see groups on the local machine. You can add both domain and local groups as allowed roles.
- Highlight the WTGroup1 role (or other role you added above) in the Available Roles list. Click the Add> button to add it to the list of Allowed Roles. Optionally, add other roles to the allowed list.
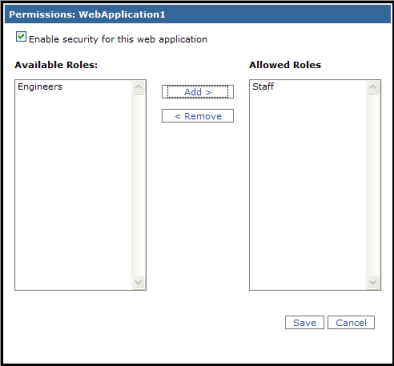
- Click Save to save the permissions and return to the list of applications. Notice that the permissions icon changes to a locked
 appearance, which shows that it now requires a login to access the application.
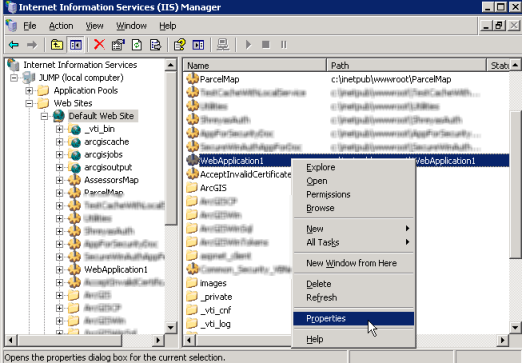
- Set the authentication method for the application using IIS Manager:
- Open IIS Manager by going to Start - Settings - Control Panel - Administrative Tools - Internet Information Services Manager.
- Expand the left-hand tree of IIS Manager, under Web Sites or Sites, to find Default Web Site, then expand Default Web Site to find the Web application you just secured.
- On Windows XP or Server 2003:
(1) Right-click on the Web application and click Properties in the context menu. The Properties dialog opens for the application.
(2) In the Properties dialog, click the Directory Security tab. In this panel, under Anonymous access and authentication control, click Edit... The Authentication Methods dialog opens.
(3) In the Authentication Methods dialog, uncheck the Anonymous access box. Then check at least one of the methods under Authenticated access. For the demonstration purposes of this walkthrough, you may choose Basic authentication (click Yes if a warning message appears). For more information on authentication methods, see the Security Overview page.
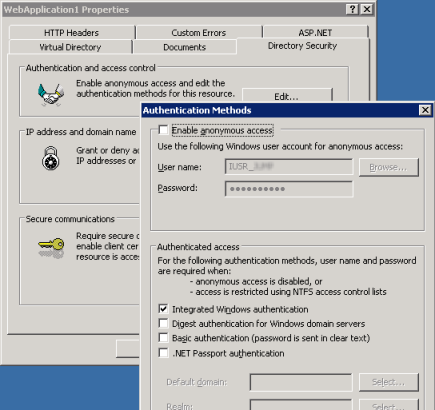
(4) Click OK to dismiss the Authentication Methods dialog and return to the application's Properties dialog.
On Windows Vista or Server 2008:
(1) Click once on the application in the tree. In the right side of the IIS Manager, double-click Authentication. The Authentication panel opens for the application.
(2) Click the Anonymous Authentication item to select it, then click Disable in the Actions list on the right side of the IIS Manager. Then enable at least one other authentication method. For more information on authentication methods, see the Security Overview page.
- If you have installed a SSL certificate on your Web server, you can require https when using the application. This will protect the login when the authentication method is set to Basic.
To require https on Windows XP or Server 2003: in the Properties dialog for the application, click the Directory Security tab. In the Secure communications area of this panel, click Edit... (if this button is disabled, then no SSL certificate is installed). In the Secure Communications dialog, click Require secure channel (SSL). Click OK to save the setting. Click OK to close the Properties dialog.
To require https on Windows Vista or Server 2008: In IIS Manager, click the application in the left-hand tree to select it. In the right side of IIS Manager, double-click SSL Settings. In the SSL Settings panel that opens, check the box to Require SSL.
- You may then close the IIS Manager console.
- Test the application by clicking its URL hyperlink in the list of Web applications. The application should open in a new browser window, but you should see a pop-up prompt to log in. Enter the username and password for a user who is a member of the role you permitted (for example, the walkthrough1 user added above), and click OK. Upon a successful login, the application will proceed to the ArcGIS Server web application page. Close the application when finished viewing it.
Set permissions for GIS Web services
In addition to securing Web applications, you can restrict access to GIS Web services using Manager. This section shows how to set permissions for services. These permissions are not actually enforced until you complete the following section on applying security to services. This workflow enables you to configure permissions for services, then apply security, so that users will continue to be able to access services throughout the security process.
This walkthrough configures security so that, by default, services on the server will allow anyone in the Users group (which typically includes all user accounts on the local server) to access services. Then a folder is configured to permit a more limited set of roles to access services within the folder. This approach may be appropriate for a site with a mix of more-secured and more-open services. Your organization may wish to use a different approach than the one illustrated below.
Note that when users and roles of your services are Windows users and groups, then it is not possible to have "anonymous" access to services, where users do not provide login credentials. In other words, all users of your services will need to have a Windows account and input the username and password when prompted.
- In Manager, ensure you have at least one service in your server's root folder. Add a service if no services exist yet. You can refer to the tutorial Publishing a map service to create the service.
- Add a folder to your server's services by clicking Manage Folders, and in the drop-down list that appears, clicking Add.
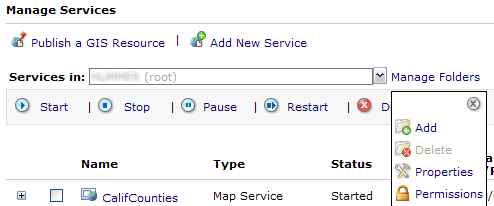
In the Add Folder prompt, enter a folder name such as SecurityWalkthrough. Click OK to add the folder.
- Add a service to the new folder. Use Publish a GIS Resource to add the service, being careful to specify the new folder (SecurityWalkthrough) as the location. (You can also use the Add New Service wizard, but ensure that the Services in: drop-down list shows the SecureServices folder. You can also use ArcCatalog to add the service.). You can delete the service and folder after the walkthrough if desired.
- Set permissions on the root folder to allow anyone in the Users group to access services. This approach is appropriate if you wish by default to allow all users, but then will restrict certain services or folders to require a valid login. To set this permission, ensure the Services in: box reads "Server name (root)", where Server name is your server's machine name (click the drop-down list to select this item if necessary). Then click Manage Folders, and in the drop-down, choose Permissions. The permissions dialog that opens should display the folder name (root).
- In the Permissions dialog, select the Users role (group), then click Add>. The Users role moves to the Allowed Roles list. The Users role typically covers all users with accounts on the local server. Optionally, if you have users on the Windows domain that you wish to allow, you may add them by clicking the Domain option at the top of the list (the Domain Users group typically includes all users in the domain). Note the warning that security for services is not enabled; we will enable security in the next section. Click Save to save the permissions list.

- Restrict permissions on the folder you created earlier. In the Services in: list, use the drop-down to select the folder (SecurityWalkthrough). Then click Manage Folders and then Permissions.
- In the Permissions dialog, click the Users role in the Allowed Roles list, then click <Remove. The role is moved to the Available Roles list. If you added other roles (e.g., Domain Users), remove them as well. Next, click a specific role to allow, from either the local server or the domain, such as WTGroup1. You can add multiple roles as allowed if desired. Click Save to save the permissions list.
The permissions are now configured for services. However, security is not yet enforced. In other words, at this point any user can still access services in the SecureServices folder without supplying a login. The next section enables security, which enforces the access permissions we have configured.
Disable anonymous access to GIS Web services
You want the users of your GIS Web services to provide a Windows login in order to access services. Client applications will only prompt for a login if they receive an authentication challenge from the Web server. This section of the walkthough configures the IIS Web server to obtain the user's login.
Note: you should not complete this section unless you wish to require all users of your GIS Web services to have Windows accounts on your local server or on the domain.
- Open IIS Manager from Control Panel >
Administrative Tools > Internet Information
Services.
- Navigate in the local computer's Web Sites to the website
containing your ArcGIS instance (typically in the
Default Web Site). Find the ArcGIS folder and
expand it.
- The method to disable anonymous access depends on your system.
- In Windows Server 2003 or XP:
- Right-click on the Services web application
and click Properties. The Services Properties
dialog opens.
- Click the Directory Security tab. Under
Anonymous access and authentication control, click
Edit... This opens the Authentication Methods
dialog.
- Uncheck Anonymous access. Check at least
one of the methods under Authenticated access. See below for more information on authentication methods. Then click OK twice to return to the IIS Manager console.
- In Windows Server 2008 or Vista:
- Left-click on the Services application to display its property links on the right side of IIS Manager.
- Double-click on the Authentication item under the IIS group. This displays the authentication methods list for the application.
- In the list of authentication methods, right-click on Anonymous Authentication, and in the context menu, click Disable.
- Enable at least one of the other authentication methods. See below for more information on authentication methods.
- Repeat steps 3 through 5 above, but set the properties for the Rest web application within the ArcGIS folder.
The For more information
on authentication methods, see IIS documentation and other
resources such as the MSDN page Authentication Methods Supported in IIS
6.0.
Apply security to GIS Web services
The final step for securing GIS Web services is to apply security to the services. This step restricts GIS Web services so that only users whose roles you have permitted can access the services. Until you perform this step, any permissions you have applied are not actually in effect, and any user can access any service. You should not do the steps here until you have configured permissions as in the section above.
Warning: once you enable security for services, you cannot disable it in Manager (see the Server Help page on securing services for information on manually disabling security if necessary). Security for services should be a one-way process. If you are not ready to enable security for GIS Web services, you can skip this section of the walkthrough.
- In Manager, click the Security tab on the left, then click Settings within the Security section. This displays the settings panel for security.
- In the Security Settings panel, read the information under Security for GIS Services. Notice that security is set to Not Enabled when you install ArcGIS Server.
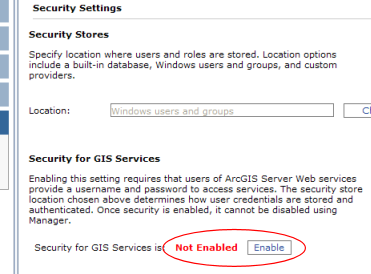
- Click Enable. A warning dialog opens cautioning you to set permissions before enabling security for services. Click the Enable Security for Services button to confirm. The dialog returns to the Security Settings panel, and the indicator now shows that security is enabled.
- Click the Services tab on the left side of Manager. In the list of services, the permissions icons now appear as a locked icon . If you see an icon with a red exclamation mark
 , it indicates that the service has an empty permissions list. These services will be inaccessible to all users until at least one role is added to its Allowed Roles list.
- To verify that security for services is in effect, use ArcCatalog to connect to your services. Start ArcCatalog, either on your local machine or on a machine that can access the Web server for your ArcGIS Server.
- In ArcCatalog, expand the GIS Servers node in the Catalog tree. Double-click the Add ArcGIS Server item. The Add ArcGIS Server dialog opens.
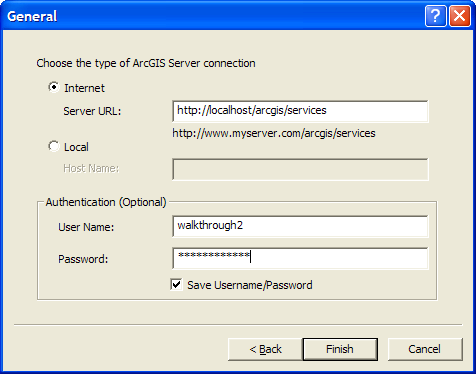
- In the dialog, click Use GIS Services. Click Next.
- In the next panel, click the Internet type of connection, then enter your server's URL, for example, http://myserver/arcgis/services. In the Authentication part of the dialog, enter the user name and password for an account that is in the Users group, but not in the WTGroup1, for example, walkthrough2 (or if you configured security with different users and roles, use an account that does not permission to the secured folder, SecurityWalkthrough). Click Finish.
- The dialog closes and a new connection should appear in your GIS Servers list, such as "arcgis on myserver". Expand this node. You should see the service at the root of your server. However, the folder that you secured in the previous connection (SecurityWalkthrough) should not be visible. Since you permitted the Users role to access the root folder, services in the root and any folders that did not override its settings will be visible to all Users. Since you did not connect with an appropriate login, the SecureServices folder is not available to this connection.
- Add another GIS Server connection in ArcCatalog, using steps 6 to 8 above. Enter the same server URL, but step 8, enter the username and password. Use the login you created above for the user (e.g., walkthrough1) in the role for which you permitted use of the SecurityWalkthrough folder. Click Finish to add the connection.
- Expand this connection (e.g., arcgis on myserver (2)). You should now see the SecurityWalkthrough folder, along with any services and folders permitted to Users.
- You may close ArcCatalog and Manager when finished.
These steps have secured your Web application and GIS Web services based on Windows users and groups. For more details on configuring security, see the other pages on security in this section of the ArcGIS Server Help.
You can use secured services in various clients, including ArcGIS Desktop, Web ADF applications, and JavaScript API applications. To add a secured service to a Web ADF application, add a new ArcGIS Server Internet connection, enter the appropriate username and password in the Identity in the connection dialog in Manager or Visual Studio.
If desired, you may remove any services, folders, users or roles created during this walkthrough. Keep in mind that once you enable security for services, you must manage permissions for all folders and services. If you add a service but do not add any permitted roles, it will be inaccessible to all users (a warning icon will be displayed to alert you of this problem). One way to ensure at least a default set of permissions is to add permissions to the containing folder at the root or subfolder. Services inherit the permissions of their containing folder, making it simpler to configure security for services.


