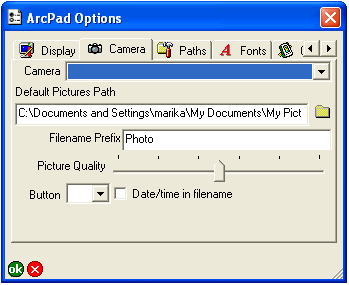
Camera


Camera |
|
| Release 8 |


|
The Camera tab is used to choose the camera to be used by ArcPad, as well as to specify the file name and settings to be used when capturing digital photographs, or pictures.

Choose the camera to be used by ArcPad.
The chosen camera and camera settings are used in the following places:
By default, no camera is selected.
Tap  to specify the default
folder for saving stand-alone photos, i.e. photos that are taken using the
stand-alone camera tool on the Tools drop-down list, of the Main toolbar. Photos
taken using the Camera tool on the Pictures tab of the Feature Properties dialog box
are automatically saved in the same folder as the associated shapefile.
The default is \My Documents\My Pictures folder.
Enter the prefix to use for the file name of the photo captured with the Camera tool in the Tools drop-down list.
The file names for photos captured with the Camera tool on the Picture tab of the Feature Properties dialog box use the selected field name for the prefix.
The default prefix is Photo.
Use the slider to specify the picture quality for the photo (JPEG) image file. The range of the picture quality is from 50% to 100%. The default is 75%.
Choose the button (on Windows Mobile and Windows CE devices) or function key (on PCs) to be used as a shortcut for starting the stand-alone Camera tool. The correct button or function key will be specific for each device.
The default is blank.
When checked, the file name for the photo consists of the date and time added to the prefix (for stand-alone photos) or field name (for photos associated with a feature), using the following conventions: Prefix_YYYYMMDD_HHMMSS.jpg FIELDNAME_YYYYMMDD_HHMMSS.jpg
When unchecked, the file name for the photo is Prefix_nnnn.jpg or FIELDNAME_nnnn.jpg, where “nnnn” is a sequential unique number.
The default is unchecked.