'Get Data for ArcPad' tool  allows you to
select which layers in your map you want to extract for use in ArcPad. When you choose to run
this tool, the welcome screen appears. You can disable the welcome screen by selecting the option
'Do not show this welcome page again'.
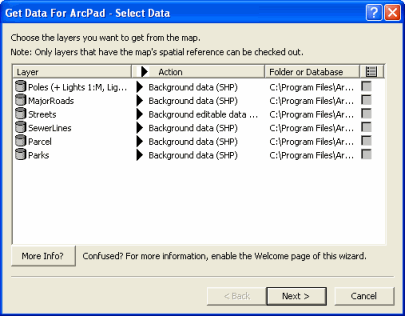
Click 'Next' and the following screen apppears.
On this screen, you will be able to select data for check out as shown below. If you are not
sure about this process you can enable the 'Welcome page' by clicking on 'More Info'.
Note
Only the layers that have the map’s spatial reference will be available for
checkout.
The sample data ‘Riverside’ (which is installed when you install ArcPad 8.0) is used here for
demonstrating the process.
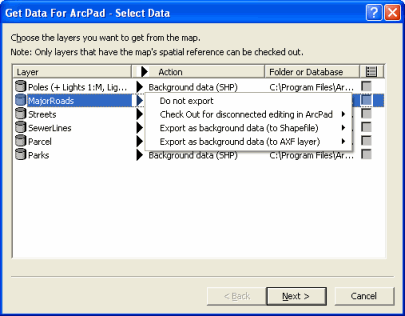
There are different layers (poles, streets etc) that can be checked out. When you do a left
click on the ‘Do not export’ action, a list of actions is displayed as listed and shown below:
- Do not Export is the default action
- Check out for disconnected editing in ArcPad with two options (Data based on defined extent
and Schema Only)
- Export as background data (to Shapefile)
- Export as background data (to AXF layer)

- Check out for disconnected editing in ArcPad: This action requests that the layer be
added to the resultant AXF. Tables related to those layers selected for check out will be
included in the newly created .AXF File. The .AXF File format enables field editing of related
tables in ArcPad.”.The Schema only option will check out the structure of the feature layer,
with no actual data being present. An example of where this could be used is if you were
collecting locations and data of speeding offences and you did not require the field user to
have any of the previously collected data. They will only be able to add new features/data.
- Export as background data (to Shapefile):By selecting this action, you are requesting
to create layers within an .AXF as background data only. All layers selected in this way will
be included in a single, separate background data .AXF file. These shapefiles can still be
opened in ArcPad but the edits cannot be checked in. By default they are read only.
Alternatively you can choose to make these shapefiles editable, but the edits cannot be checked
back into the geodatabase. This option should be used for layers that are for reference only.
For example, contour, and parcel layers are often very large, and usually are not edited. They
are for reference only. A read only shapefile version of these layers will increase the draw
speed of your map.
- Export as background data (to AXF layer): By selecting this option, you are
requesting to create axf layers. AXF files can only be opened in ArcPad or ArcPad Studio. They
cannot be viewed or queried in ArcCatalog or ArcMap. In ArcPad you can add and remove AXF
feature Layers as you can add and remove shapefiles. Related tables are only visible in ArcPad
when you select a feature from a Feature Layer that has a related record. In ArcPad Studio you
are able to browse the contents of an AXF file, but you are unable to alter the data. You are
however, able to add customisations to the AXF including layer icons, custom forms, symbology,
labelling and scripting.
Note
This action should be selected only if you do not wish to check back in your
field edits to the geodatabase
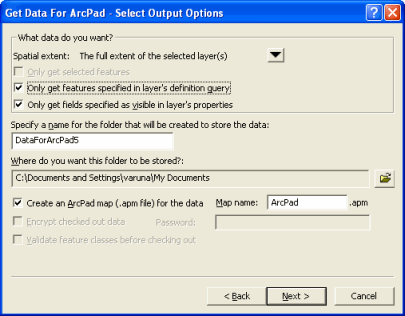
When you click ‘Next’ the following screen appears.
On this page of the wizard, you can choose the location and name for the folder, that will be
created to store the data.
Note
Encryption and Validation functions are for AXF file only not for
shapefiles.
If you have not already validated your data using the ArcMap validation tools,
it is recommended that the Validate feature classes before checking out option is checked when
checking out data for ArcPad. If a feature class is not valid, it will not be included in the AXF
file. If any feature classes are not valid, warning messages will be displayed giving some
indication as to why it failed validation.
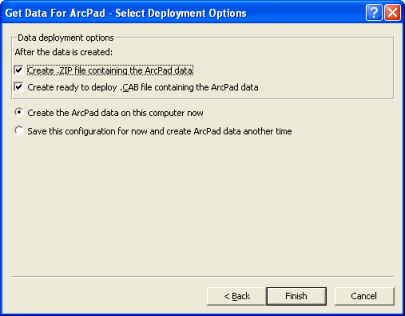
Once the output options are selected, hit 'Next', the following screen appears.
This page of the wizard allows you to select among different deployment options. By Selecting
the option 'Create the ArcPad data on this computer now', data will be created locally on your
computer. You can also choose to create .ZIP and .CAB file containing the ArcPad data.
When you hit 'Finish' , a window pops up showing the results of the selected options.


 allows you to
select which layers in your map you want to extract for use in ArcPad. When you choose to run
this tool, the welcome screen appears. You can disable the welcome screen by selecting the option
'Do not show this welcome page again'.


