Steps to define complex symbology

Release 8 E-mail This Topic Printable Version Give Us Feedback

  1. Tap the Table of Contents button.

  2. Tap the Legend tab.
  3. To display/hide the details of a layer’s symbology, tap on the plus/minus, +/-, symbol next to the layer name.

  4. Tap the symbol you would like to change.

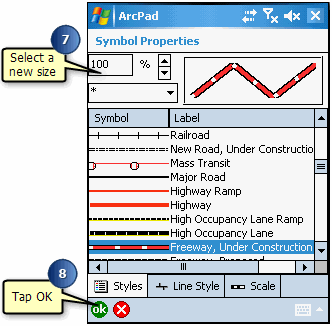
    The Symbol Properties dialog box opens and enables you to define your simple and complex symbology.

  5. To select a new symbol, tap on the appropriate symbol.

    The new symbol is displayed in the showcase box at the top right of your screen.

  6. To view the symbols from a specific style, tap the appropriate style in the selection box.

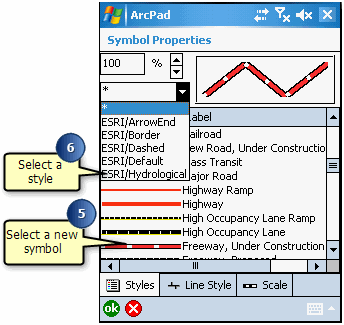
    By default, the symbols from all imported styles are displayed, designated by the * symbol.

  7. The percent box illustrates what the symbol will look like at the specified size. This setting is useful if you have defined a reference scale for the layer’s symbology. Use the scroll bars or type the new percentage in the given box.

  8. Tap OK on the Styles page of the Symbol Properties dialog box.
  9. Tap OK on the Table of Contents.

    Tip
    Arranging the list of symbols: By default, the symbols are displayed in the same order as their respective stylesheet. Tapping the Label colum heading will sort the symbols in ascending order based on the name of the label. To sort in descending order, tap the Label heading column again. Tapping the Symbol column heading will display the symbols in icon view. By default, they are displayed in list view.