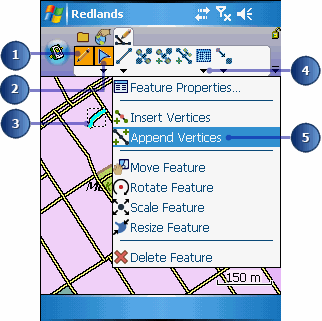
You can extend a line feature by adding, or appending, vertices to the tail (end) of
the line. The Append Vertices tool is selected via the Feature Properties drop-down
list.
In order to extend a line feature at the head (start) of a line, you can use the
Insert Vertices tool. Refer to the next exercise to learn how to use the Insert
Vertices tool.
Vertices can be added by using the pen, incoming GPS coordinates, offsets, or by
typing in coordinates.
-
Select a line layer for editing using the Start/Stop Editing drop-down list or
via the Table of Contents.
-
Tap the Select tool.
-
Select the the line feature you wish to extend.
-
Tap the drop-down arrow next to the Feature Properties button to display the
dropdown list.
-
Tap Append Vertices.
The vertices will be displayed using a gray square. The head, or start,
vertex is displayed with a bold square. All other vertices are displayed
with normal squares.
Tip
Changing the size of the vertex symbols: Vertices are
displayed using a square symbol. You can change the size of the square by
changing the Pen Tolerance in the Display page of the ArcPad Options dialog
box.
Note:
Selecting features for editing is discussed in section,
Editing basics
-
Tap the map to add vertices and extend the line.
You can only append vertices to the end or tail of the line.
Tip
Adding vertices with a GPS: You can also use the Add GPS
Vertex and Add GPS Vertices Continuously buttons to add vertices. These
buttons are only enabled if you have a GPS receiver connected and
activated.
-
Tap the Commit Geometry Changes button on the Command bar when you are finished
extending the line.
The new vertices are added to your line feature.
-
To exit the append vertices mode, tap any other tool to activate it and
deactivate the Append Vertices tool.